Love this? Save it for later!
Share the inspiration with your friends
“You know, I never thought deviled eggs could be a big deal,” I confessed to my friend Lisa one lazy Saturday afternoon. She just laughed, shaking her head as she scooped up another bite of the creamy never-fail deviled eggs with silky smooth filling I’d whipped up. Honestly, I wasn’t expecting much either when I first tried perfecting this recipe. It all started on a rainy Wednesday evening when I was scrambling to prepare a last-minute snack for an impromptu gathering. I had a handful of eggs and nothing fancy in the fridge, but I was craving something comforting and easy. What came out of that little kitchen experiment was surprisingly dreamy—deviled eggs that were velvety, rich, and, best of all, foolproof.
The thing is, I’m usually a bit intimidated by deviled eggs—they can dry out or get grainy so quickly. But this version? It’s different. The filling is unbelievably smooth, like a little cloud of flavor that melts in your mouth. I remember the moment I realized I’d nailed it: the first forkful was gone before anyone else could even grab their plate. Maybe you’ve been there—at a party, eyeing the platter nervously, hoping the deviled eggs won’t let you down. Well, this recipe won’t. It’s my go-to for brunches, potlucks, or even just a quiet night in when I want a little indulgence without fuss. And honestly, once you try it, you’ll understand why I keep coming back to it, rain or shine.”
Why You’ll Love This Recipe
After countless trials and a few happy accidents, this creamy never-fail deviled eggs recipe has become one of those kitchen staples I trust completely. Let me tell you why it might just become your favorite too:
- Quick & Easy: You can have these ready in under 30 minutes, which is perfect when life gets hectic or guests show up unexpectedly.
- Simple Ingredients: No need for fancy or hard-to-find items—just eggs, mayo, mustard, and a few pantry staples you likely already have.
- Perfect for Any Occasion: Whether it’s a cozy family brunch or a lively holiday party, these deviled eggs fit right in.
- Crowd-Pleaser: Kids love them, adults keep coming back for more, and they’re always the first to disappear from the appetizer table.
- Unbelievably Delicious: The smooth, creamy filling with just the right tang and hint of spice is the kind of comfort food that makes you close your eyes after one bite.
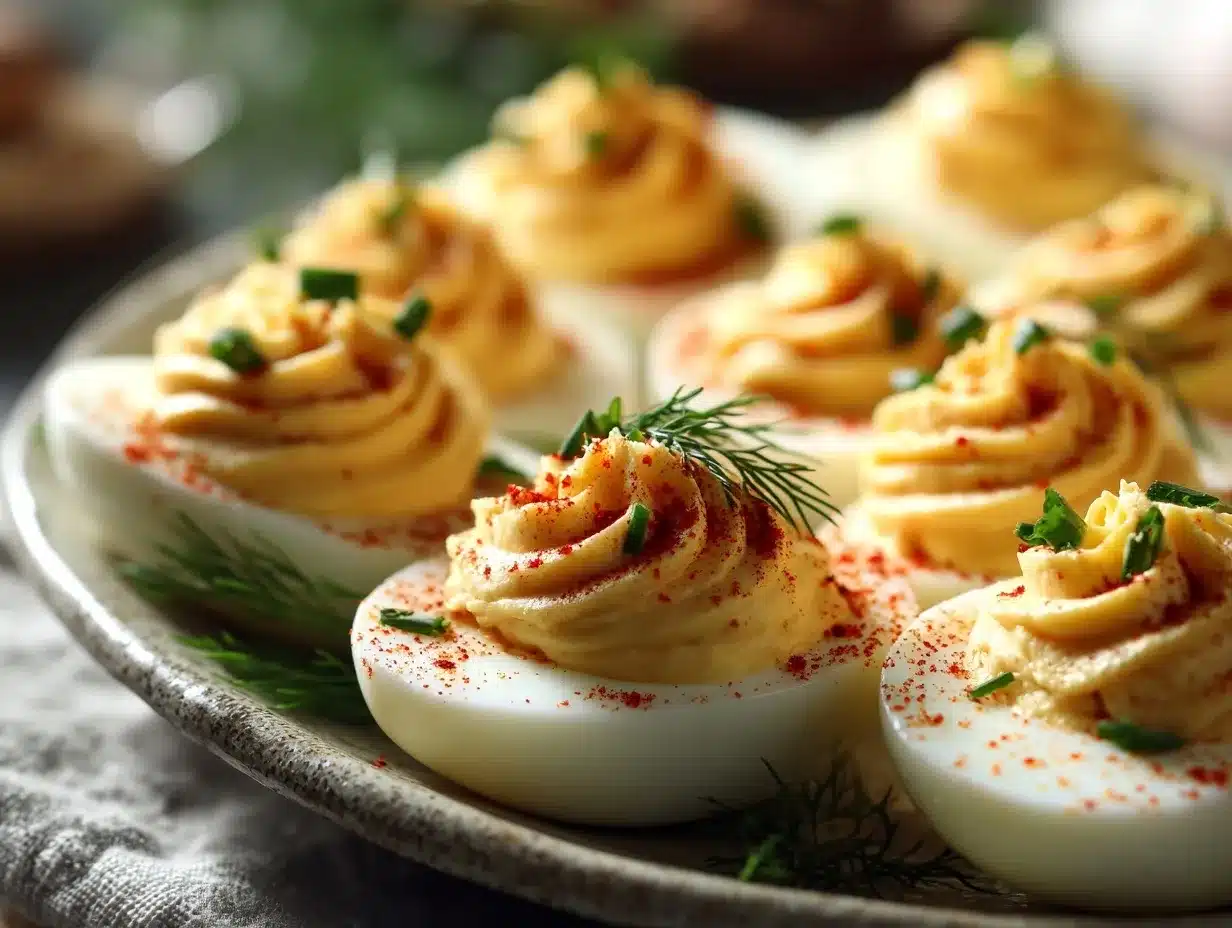
What makes this recipe stand apart is the silky smooth filling. I blend the yolks with mayo and a touch of Dijon mustard until it reaches a luscious, spreadable texture—no lumps, no dryness. Plus, a pinch of paprika on top adds that classic finishing touch. This isn’t just any deviled egg; it’s the one that will have you craving more and maybe sneaking a second before anyone notices. Honestly, this recipe is my secret weapon for impressing guests without breaking a sweat.
What Ingredients You Will Need
This recipe uses simple, wholesome ingredients to deliver bold flavor and satisfying texture without the fuss. Most of these are pantry staples, so you can pull them together quickly for a last-minute treat.
- Large eggs (6) – I always recommend using farm-fresh eggs if you can; they have a richer flavor and better texture.
- Mayonnaise (3 tablespoons) – Use your favorite brand; I like Hellmann’s for its creamy consistency.
- Dijon mustard (1 teaspoon) – Adds a gentle tang that balances the creaminess.
- Apple cider vinegar (1 teaspoon) – Just a splash to brighten the flavor and cut through richness.
- Salt (½ teaspoon) – Enhances all the flavors without overpowering.
- Black pepper (freshly ground, ¼ teaspoon) – Adds a subtle warmth.
- Smoked paprika (for garnish) – Gives that characteristic smoky hint and a pop of color.
- Optional: A pinch of cayenne pepper if you like a little kick, or chopped fresh chives for a mild onion flavor.
If you want to switch things up, you can swap mayonnaise with Greek yogurt for a lighter version or use whole grain mustard instead of Dijon for extra texture. Just keep in mind that these swaps will slightly change the flavor and consistency but can still yield great results.
Equipment Needed
- Medium saucepan – for boiling the eggs evenly without cracking.
- Mixing bowl – to combine the filling ingredients smoothly.
- Fork or whisk – for mashing the yolks and mixing the filling thoroughly.
- Small spoon or piping bag – to fill the egg whites neatly. I personally prefer a piping bag with a round tip for that professional look, but a spoon works just fine.
- Slotted spoon – handy for transferring eggs from boiling water without breaking the shells.
If you don’t have a piping bag, a resealable plastic sandwich bag with a tiny corner snipped off makes a great budget-friendly alternative. Also, using a timer helps avoid overcooking the eggs, which is key for that perfect creamy yolk texture.
Preparation Method
- Boil the eggs: Place 6 large eggs in a single layer in your saucepan and cover with about an inch of cold water. Bring to a boil over medium-high heat. Once boiling, cover the pan, turn off the heat, and let the eggs sit for exactly 12 minutes. (This method keeps the yolks creamy and prevents that green ring.)
- Cool and peel: Drain the hot water and immediately transfer the eggs to a bowl of ice water to stop cooking. Let them chill for at least 10 minutes. Gently tap and peel the eggs under running water to avoid sticking. Pro tip: peeling under water helps ease the shell off.
- Prepare the filling: Slice the eggs in half lengthwise and carefully scoop out the yolks into a mixing bowl. Use a fork or whisk to mash the yolks until completely smooth.
- Add creamy ingredients: Stir in 3 tablespoons mayonnaise, 1 teaspoon Dijon mustard, and 1 teaspoon apple cider vinegar. Season with ½ teaspoon salt and ¼ teaspoon freshly ground black pepper. Mix until silky and spreadable. If you want extra smoothness, you can briefly whip the mixture with a hand mixer or immersion blender.
- Fill the egg whites: Using a small spoon or piping bag, fill each egg white half generously with the yolk mixture. Smooth the tops or create a swirl pattern for a pretty presentation.
- Garnish and serve: Sprinkle smoked paprika evenly over the filled eggs and add fresh chives or a pinch of cayenne if desired. Chill for at least 15 minutes before serving to let the flavors meld.
Watch out for overcooking the eggs, which can make the yolks crumbly and dry. Timing and cooling are your friends here. Also, if the filling seems too thick, add a splash more mayo or a teaspoon of milk to loosen it up.
Cooking Tips & Techniques
Getting that perfect silky smooth filling isn’t just luck—it’s about technique. Here are some tips I’ve picked up over the years:
- Egg boiling: Avoid boiling eggs too long. The “off-heat” method where you turn off the stove and let eggs sit in hot water works like magic for creamy yolks.
- Peeling: Older eggs peel easier, but fresh eggs taste better. If you’re stuck with super fresh eggs, peeling under running water or in a bowl of water helps a lot.
- Mixing filling: Mash yolks thoroughly. Lumps are the enemy of that silky texture. I sometimes use a fine mesh sieve to push the yolks through for extra smoothness when I’m feeling fancy.
- Seasoning: Taste the filling before stuffing. You might need a pinch more salt or mustard depending on your mayo brand.
- Presentation: Using a piping bag makes the eggs look professional, but don’t stress if you don’t have one. A spoon and a little patience do the job well.
Oh, and let me confess—once I tried adding too much mustard because I was distracted by a phone call. The filling was a bit sharp but still edible! Lesson learned: measure your ingredients carefully but don’t sweat small mistakes. This recipe is forgiving.
Variations & Adaptations
This recipe is wonderfully adaptable. Here are some ideas I’ve tried or want to try:
- Dietary swap: Use Greek yogurt instead of mayo for a tangier, lower-fat filling. It changes the texture slightly but is still delicious.
- Herb twist: Mix in fresh dill, tarragon, or parsley to add a bright herbal note. I love dill for that classic touch.
- Spicy kick: Add a dash of hot sauce or finely minced jalapeño to the filling for heat. Perfect for those who like their deviled eggs with a little edge.
- Seasonal flavors: In spring, fold in chopped radishes or spring onions for crunch and freshness.
- Cooking method: For a smoked flavor, try gently smoking the eggs before peeling. It’s a bit more involved but totally worth it for a party.
I once made a batch with avocado mashed into the yolks for a creamy, green version that was a big hit at a brunch. Don’t be afraid to get creative—you might discover your own signature twist!
Serving & Storage Suggestions
These creamy never-fail deviled eggs are best served chilled but not ice-cold. Let them sit at room temperature for about 10 minutes before serving to bring out the flavors fully. They pair beautifully with crisp salads, crunchy crudité, or a tangy pickle on the side.
If you’re planning ahead, store the deviled eggs covered in an airtight container in the fridge for up to 2 days. The filling holds up well, but the eggs are best fresh. I don’t recommend freezing once assembled—the texture changes.
Reheat? Nah, deviled eggs are meant to be enjoyed cold or at room temp. But if you want to prep the filling early, keep it separate and fill the whites just before serving for best results. Over time, the flavors meld wonderfully, so they taste even better the next day if you can wait!
Nutritional Information & Benefits
Each serving (2 deviled egg halves) contains approximately 140 calories, 12 grams of fat, 1 gram of carbohydrates, and 6 grams of protein. Eggs provide high-quality protein and essential vitamins like B12 and D, while the mayonnaise adds richness and a source of healthy fats.
This recipe is gluten-free and can be adapted for lower-fat diets by swapping mayo with Greek yogurt. It offers a satisfying, nutrient-dense snack or appetizer that’s easy to fit into most eating plans. Plus, eggs are known for supporting brain health and muscle repair—bonus!
Conclusion
This creamy never-fail deviled eggs recipe with silky smooth filling ticks all the boxes: easy, tasty, and always a hit. You can tweak the flavors to your heart’s content or keep it classic—it just works. I love how simple ingredients come together to create something so comforting and memorable. Honestly, it’s one of those recipes I keep close for any occasion because it never disappoints.
Give it a try and see how it fits into your kitchen routine. And hey, if you add your own twist, I’d love to hear about it in the comments below. Sharing recipes is what makes cooking fun! So go on, whip up a batch, and enjoy that first creamy bite—you deserve it.
FAQs
How do I prevent my deviled eggs from turning green?
To avoid the greenish ring around the yolks, use the off-heat method: boil eggs, then cover and let them sit in hot water for 12 minutes. Cooling them quickly in ice water also helps.
Can I make deviled eggs ahead of time?
You can prepare the filling a day in advance and refrigerate it separately. Fill the egg whites just before serving for the best texture and flavor.
What can I use instead of mayonnaise?
Greek yogurt is a great substitute for a lighter, tangier filling. Avocado can also be mashed in for a creamy, dairy-free option.
How do I peel hard-boiled eggs easily?
Peeling under running water or soaking eggs in ice water right after boiling loosens the shells, making peeling much smoother.
Can I add other flavors to the deviled egg filling?
Absolutely! Try adding herbs like dill or chives, spices like cayenne or smoked paprika, or even mix in finely chopped pickles or bacon for extra flavor.
Pin This Recipe!
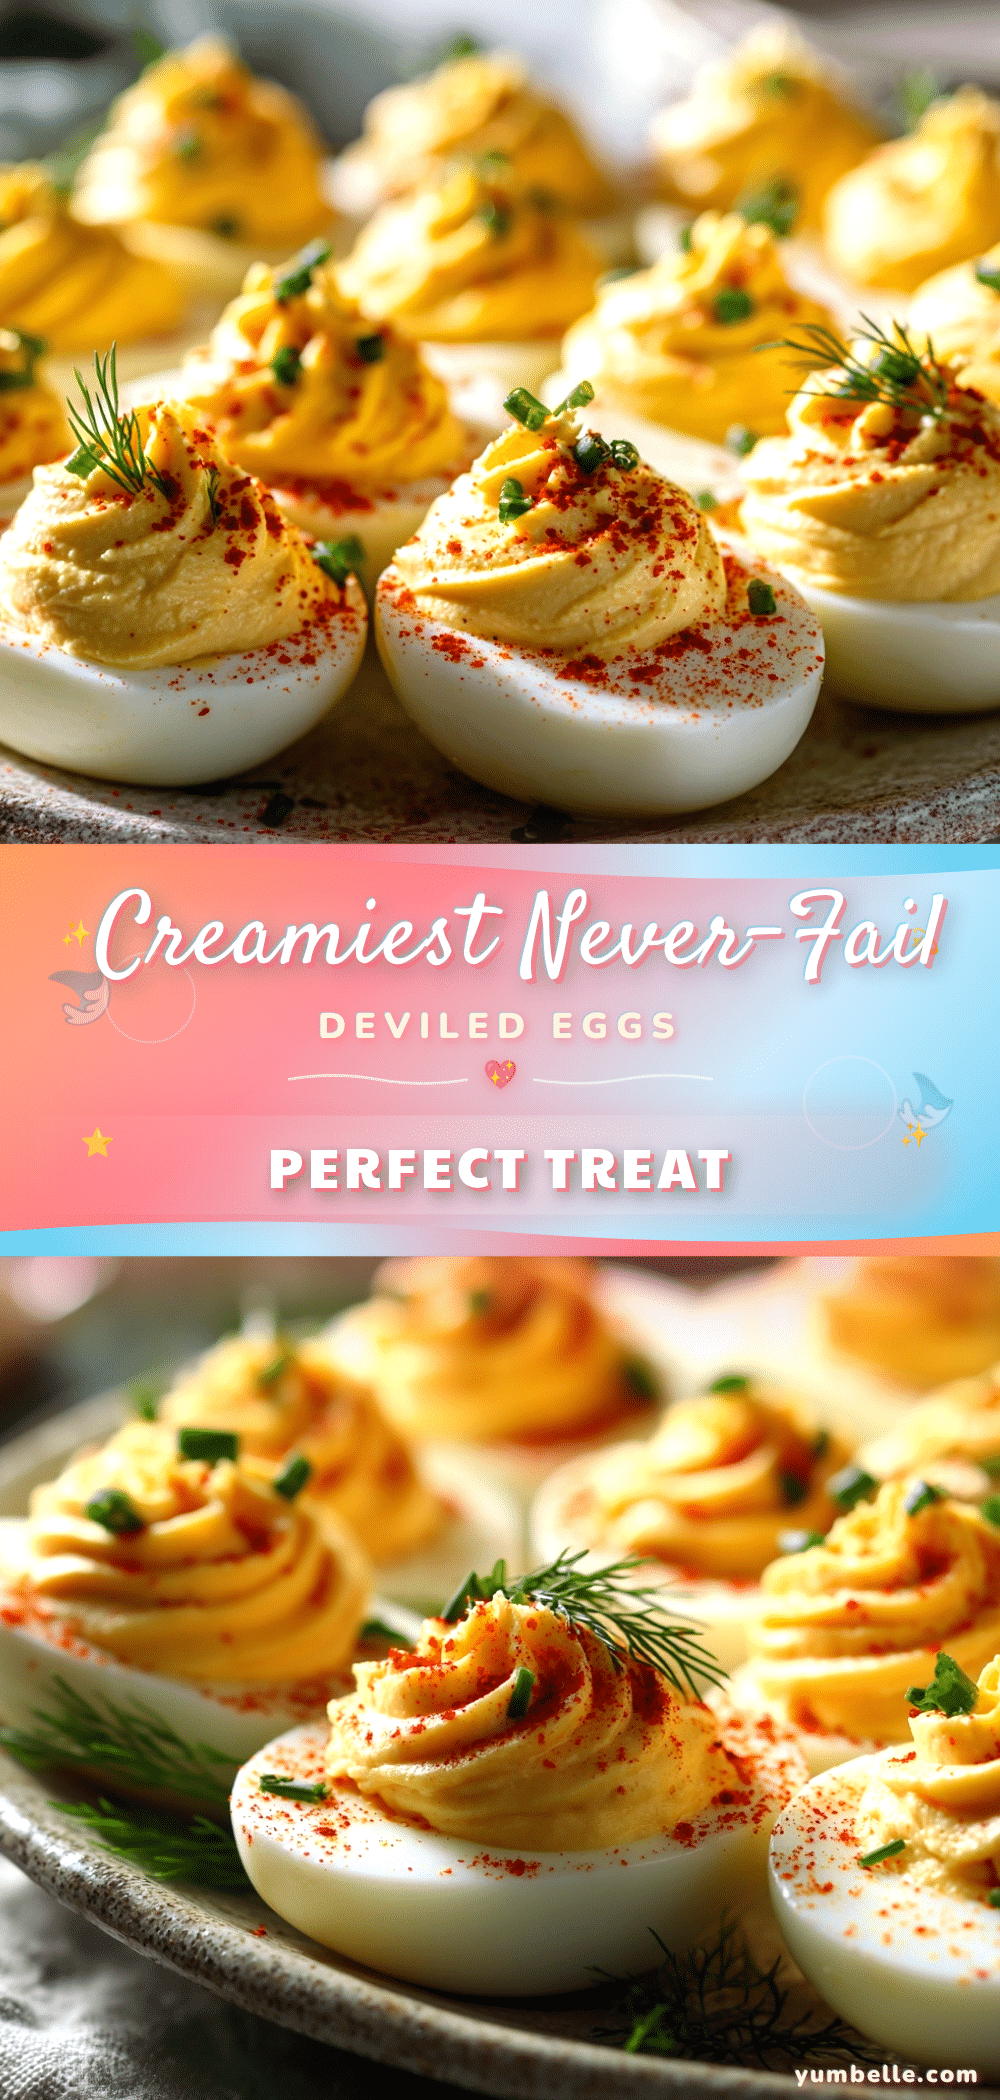
Creamy Never-Fail Deviled Eggs Recipe Easy Silky Smooth Filling

This recipe delivers velvety, rich deviled eggs with a silky smooth filling that’s foolproof and perfect for any occasion. Quick and easy to make, it’s a crowd-pleaser with simple pantry ingredients.
- Prep Time: 15 minutes
- Cook Time: 12 minutes
- Total Time: 27 minutes
- Yield: 12 deviled egg halves (6 eggs) 1x
- Category: Appetizer
- Cuisine: American
Ingredients
- 6 large eggs
- 3 tablespoons mayonnaise
- 1 teaspoon Dijon mustard
- 1 teaspoon apple cider vinegar
- ½ teaspoon salt
- ¼ teaspoon freshly ground black pepper
- Smoked paprika (for garnish)
- Optional: pinch of cayenne pepper
- Optional: chopped fresh chives
Instructions
- Place 6 large eggs in a single layer in a medium saucepan and cover with about an inch of cold water.
- Bring to a boil over medium-high heat. Once boiling, cover the pan, turn off the heat, and let the eggs sit for exactly 12 minutes.
- Drain the hot water and immediately transfer the eggs to a bowl of ice water to stop cooking. Let chill for at least 10 minutes.
- Gently tap and peel the eggs under running water to avoid sticking.
- Slice the eggs in half lengthwise and carefully scoop out the yolks into a mixing bowl.
- Mash the yolks with a fork or whisk until completely smooth.
- Stir in 3 tablespoons mayonnaise, 1 teaspoon Dijon mustard, and 1 teaspoon apple cider vinegar.
- Season with ½ teaspoon salt and ¼ teaspoon freshly ground black pepper. Mix until silky and spreadable.
- If desired, briefly whip the mixture with a hand mixer or immersion blender for extra smoothness.
- Using a small spoon or piping bag, fill each egg white half generously with the yolk mixture.
- Smooth the tops or create a swirl pattern for presentation.
- Sprinkle smoked paprika evenly over the filled eggs and add fresh chives or a pinch of cayenne if desired.
- Chill for at least 15 minutes before serving to let the flavors meld.
Notes
Use the off-heat boiling method to keep yolks creamy and prevent green rings. Peel eggs under running water for easier shell removal. If filling is too thick, add a splash of mayo or milk. Filling can be prepared a day ahead and refrigerated separately. Avoid overcooking eggs to prevent crumbly yolks.
Nutrition
- Serving Size: 2 deviled egg halves
- Calories: 140
- Fat: 12
- Carbohydrates: 1
- Protein: 6
Keywords: deviled eggs, creamy deviled eggs, easy appetizer, party snack, brunch recipe, smooth filling, crowd-pleaser