Love this? Save it for later!
Share the inspiration with your friends
Introduction
“You know that moment when you’re halfway through a hectic Tuesday, and suddenly, a craving hits that you just can’t shake?” That was me last week, standing in my tiny kitchen, eyeing a sad little carton of strawberries on the counter. Honestly, I wasn’t expecting much—I had no fancy baking plans, no hours to spare. Just a desperate itch for something sweet and creamy, but quick. Then inspiration struck: why not whip up something simple, fresh, and indulgent all at once? That’s how these Easy 15-Minute Strawberry Cheesecake Cups with Creamy Layers came to be.
I wasn’t aiming for perfection—heck, I even forgot to grab my mixing bowl the first time around and had to improvise with a large glass. But the result? Pure magic. Light, luscious, and layered with just the right balance of tangy cream cheese and juicy strawberries. This recipe isn’t just dessert; it’s the kind of treat that feels like a tiny celebration after a long day. Maybe you’ve been there too—stuck between wanting something fancy and having zero time. These cups became my go-to fix, and I bet they’ll become yours, too.
What makes it even better? No oven, no complicated steps, and absolutely no stress. Just fresh ingredients and a quick stir before layering into cute little cups. Honestly, I keep thinking about how these creamy layers and sweet berry bursts could brighten any day—whether it’s a casual weeknight or a last-minute guest surprise.
Why You’ll Love This Recipe
Over the years, I’ve tested countless cheesecake variations, but this one stands out for so many reasons. It’s not just about speed; it’s about flavor and texture that feel indulgent without the fuss. Here’s why you’ll want to make these strawberry cheesecake cups again and again:
- Quick & Easy: Ready in under 15 minutes, perfect for those busy evenings or unexpected sweet tooth moments.
- Simple Ingredients: Pantry staples and fresh strawberries—no hunting for exotic items.
- Perfect for Any Occasion: Great for brunch, potlucks, or even a cozy solo treat.
- Crowd-Pleaser: Kids, adults, skeptics—you name it, everyone loves these creamy cups.
- Unbelievably Delicious: The creamy, tangy cheesecake layer paired with fresh strawberry sweetness is pure comfort food.
This isn’t just another cheesecake recipe. The magic lies in the layering technique—lightly whipped cream cheese blended with a touch of vanilla, folded with airy whipped cream for that silky texture. Plus, using crushed graham crackers instead of a baked crust keeps it fresh and fuss-free. Trust me, after making these, you might never go back to a traditional cheesecake!
Let me tell you, there’s something about spooning this into a cup and watching the layers come together that feels just right. It’s dessert therapy, honestly.
What Ingredients You Will Need
This recipe uses simple, wholesome ingredients to deliver bold flavor and satisfying texture without the fuss. Most of these you probably have around, and the fresh strawberries add that perfect seasonal touch. Here’s what you’ll gather:
- For the Cheesecake Layer:
- Cream cheese, softened (I prefer Philadelphia for its smoothness)
- Powdered sugar (for that delicate sweetness)
- Vanilla extract (pure, if you can!)
- Heavy whipping cream, cold (helps get that fluffy texture)
- For the Strawberry Layer:
- Fresh strawberries, hulled and sliced (look for firm, bright red berries)
- Granulated sugar or honey (to macerate the strawberries)
- Fresh lemon juice (just a splash to brighten the flavor)
- For the Base:
- Graham crackers, crushed (You can substitute with digestive biscuits or gluten-free crackers if needed)
- Unsalted butter, melted (adds richness to the crumb)
Pro tip: If strawberries aren’t in season, frozen berries work fine—just thaw and drain excess juice before using. Also, for a dairy-free version, swap cream cheese with a plant-based alternative and use coconut cream instead of heavy cream.
Equipment Needed
- Mixing bowls (one large for whipping, one medium for macerating strawberries)
- Electric hand mixer or stand mixer (to whip the cream cheese and heavy cream smoothly)
- Measuring cups and spoons (for accuracy)
- Spatula (for folding and scraping the bowl)
- Small glasses or dessert cups (for assembling the layers)
- Food processor or plastic bag and rolling pin (to crush the graham crackers easily)
If you don’t have a mixer, you can whisk by hand—just be prepared for a bit more arm work! I once made a double batch without my mixer, and let me tell you, my arms were feeling it the next day.
For budget-friendly options, any sturdy glass or even mason jars work perfectly for serving these cheesecake cups.
Preparation Method
- Prepare the strawberry layer (5 minutes): In a medium bowl, combine sliced strawberries with 1 tablespoon granulated sugar (or honey) and a squeeze of fresh lemon juice. Stir gently and set aside to macerate while you prepare the other layers. You’ll notice the berries start to release their juices—that’s when the magic begins.
- Make the graham cracker crust base (3 minutes): Crush 1 cup (about 100g) of graham crackers using a food processor or place them in a zip-top bag and crush with a rolling pin. Transfer crumbs into a bowl and mix with 3 tablespoons (45g) melted unsalted butter until evenly coated. Press about 2 tablespoons of this crumb mixture into the bottom of each serving cup to form a base layer. If crumbs seem too loose, a quick chill in the fridge helps them set.
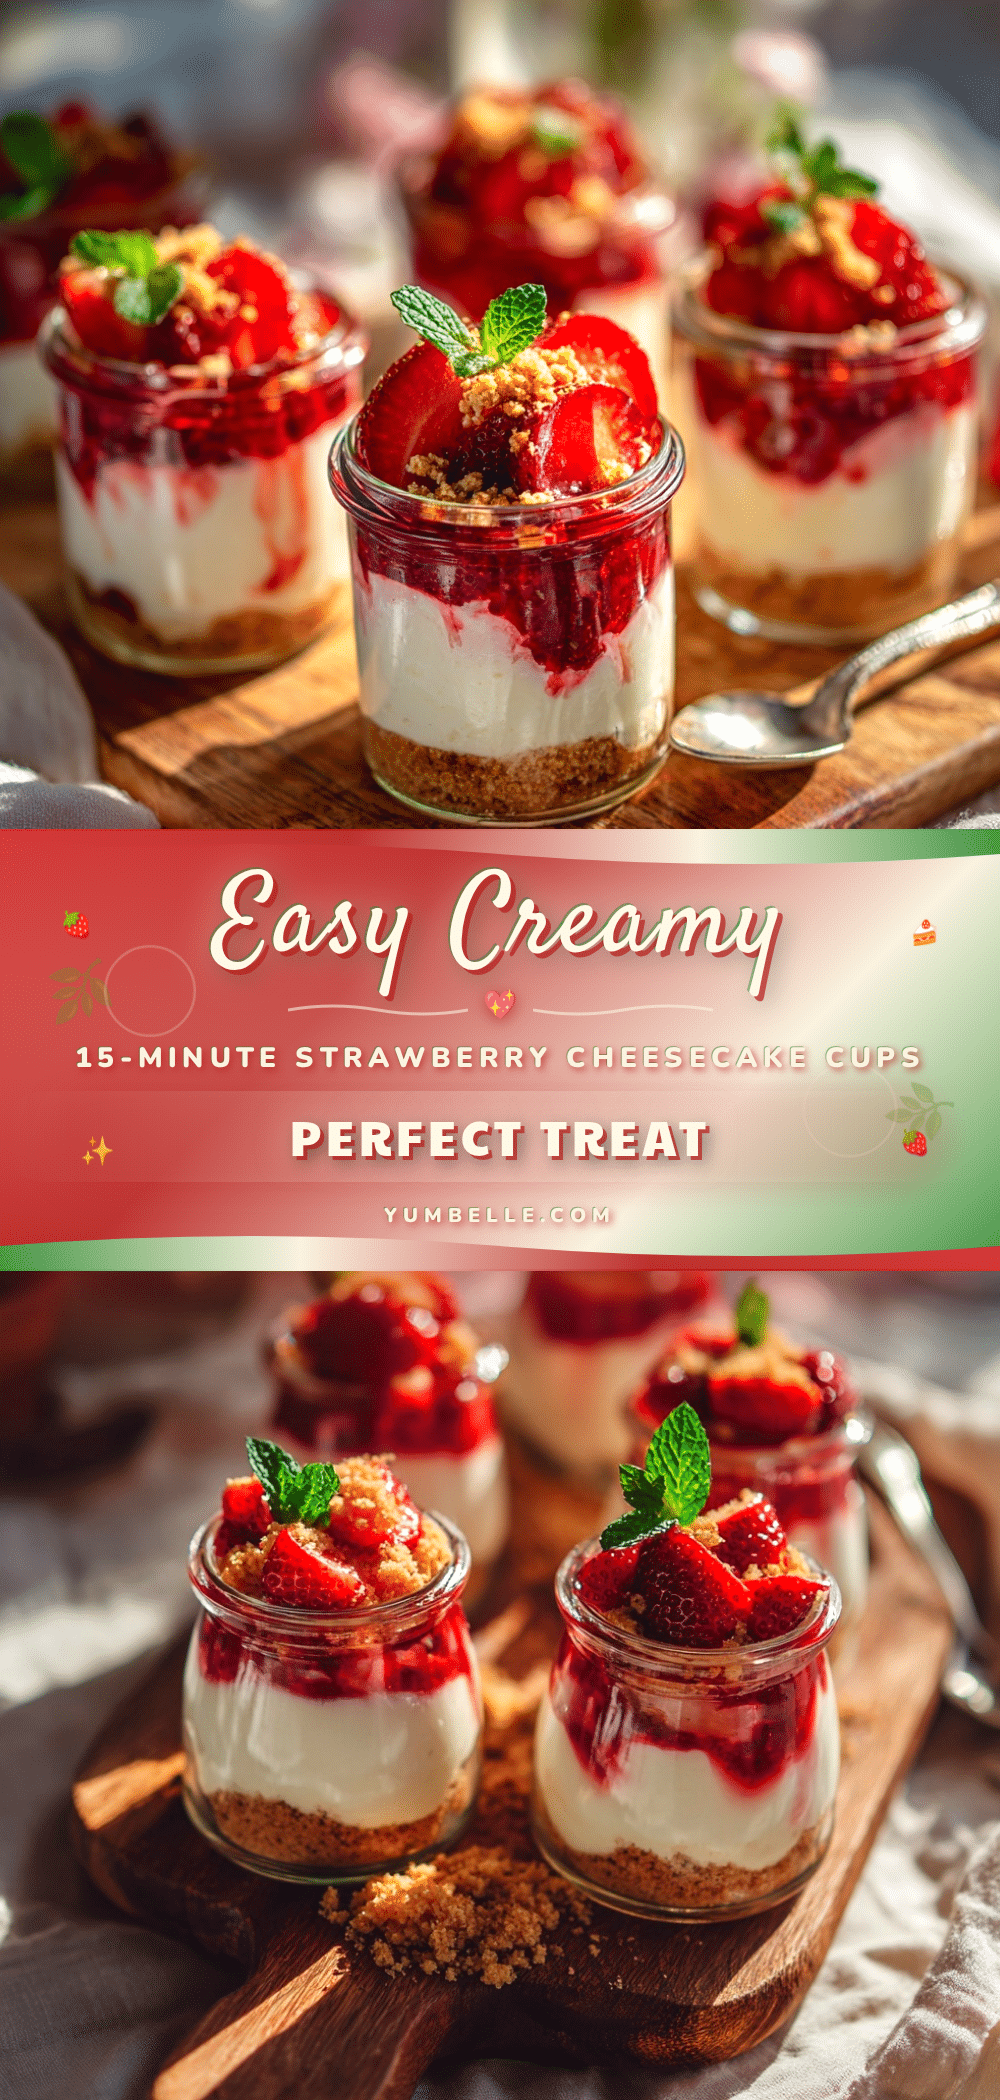
- Whip the cheesecake layer (5-7 minutes): In a large mixing bowl, beat 8 ounces (225g) of softened cream cheese with 1 cup (120g) powdered sugar and 1 teaspoon vanilla extract until smooth. In a separate bowl, whip 1 cup (240ml) heavy cream to stiff peaks. Gently fold the whipped cream into the cream cheese mixture using a spatula, being careful not to deflate the airy texture. The result should be silky, fluffy, and light as a cloud.
- Assemble the cups (3 minutes): Spoon or pipe a generous layer of the creamy cheesecake mixture over the graham cracker base in each cup. Next, add a spoonful of the macerated strawberries and their juices. Repeat the layers if your cups are tall enough, finishing with a few strawberry slices on top for garnish.
- Chill and serve: While you can enjoy these immediately, chilling for 15-30 minutes lets the flavors meld and the base firm up a bit. If you’re in a rush, no worries—these cheesecake cups are just as delightful fresh.
Note: If the cream cheese isn’t softened enough, the mixture might be lumpy. To fix that, microwave it for 10 seconds and stir before whipping. Also, when folding in the whipped cream, use a light hand to keep the texture fluffy.
Cooking Tips & Techniques
Making these strawberry cheesecake cups is straightforward, but a few tricks make all the difference. First, always soften your cream cheese to room temperature. I learned the hard way once—my mixer struggled, and the texture was far from smooth.
When macerating strawberries, don’t skip the sugar and lemon juice. They coax out the berries’ natural sweetness and add a subtle tang, which balances the rich cheesecake layer perfectly. Also, macerated fruit tends to release juice, so spoon both the fruit and the syrupy juice into your cups for maximum flavor.
For that perfect crumb base, melting the butter thoroughly before mixing helps the crumbs bind better. If you find the crumbs too dry, add a splash more melted butter—but don’t drown them, or they’ll get soggy.
Whipping the heavy cream to stiff peaks is key for light, airy cheesecake layers. If you under-whip, the layer will be runny; over-whip, and it risks turning grainy or turning into butter. I recommend stopping as soon as you see firm peaks that hold their shape.
Lastly, layering is your friend. Use a piping bag or a spoon to create clean layers, which not only look pretty but also give a nice balance of textures and flavors in every bite.
Variations & Adaptations
One of the best things about this recipe is how easy it is to adapt. Here are a few ways to make these strawberry cheesecake cups your own:
- Berry Swap: Try blueberries, raspberries, or mixed berries instead of strawberries. In summer, fresh berries add a vibrant, seasonal feel.
- Chocolate Twist: Add a teaspoon of cocoa powder to the cream cheese layer or sprinkle mini chocolate chips between layers for a mocha cheesecake vibe.
- Vegan Version: Use vegan cream cheese and coconut cream whipped to stiff peaks. Swap graham crackers for a nut-based crust if gluten-free or vegan.
- Crunch Factor: Add chopped toasted nuts like almonds or pecans on top for extra texture and nutty flavor.
- Personal Favorite: I once added a splash of rose water to the cheesecake mixture—it gave a subtle floral note that pairs beautifully with strawberries.
These adaptations let you match the recipe to your taste buds or dietary needs without losing the essence of what makes these cheesecake cups so delightful.
Serving & Storage Suggestions
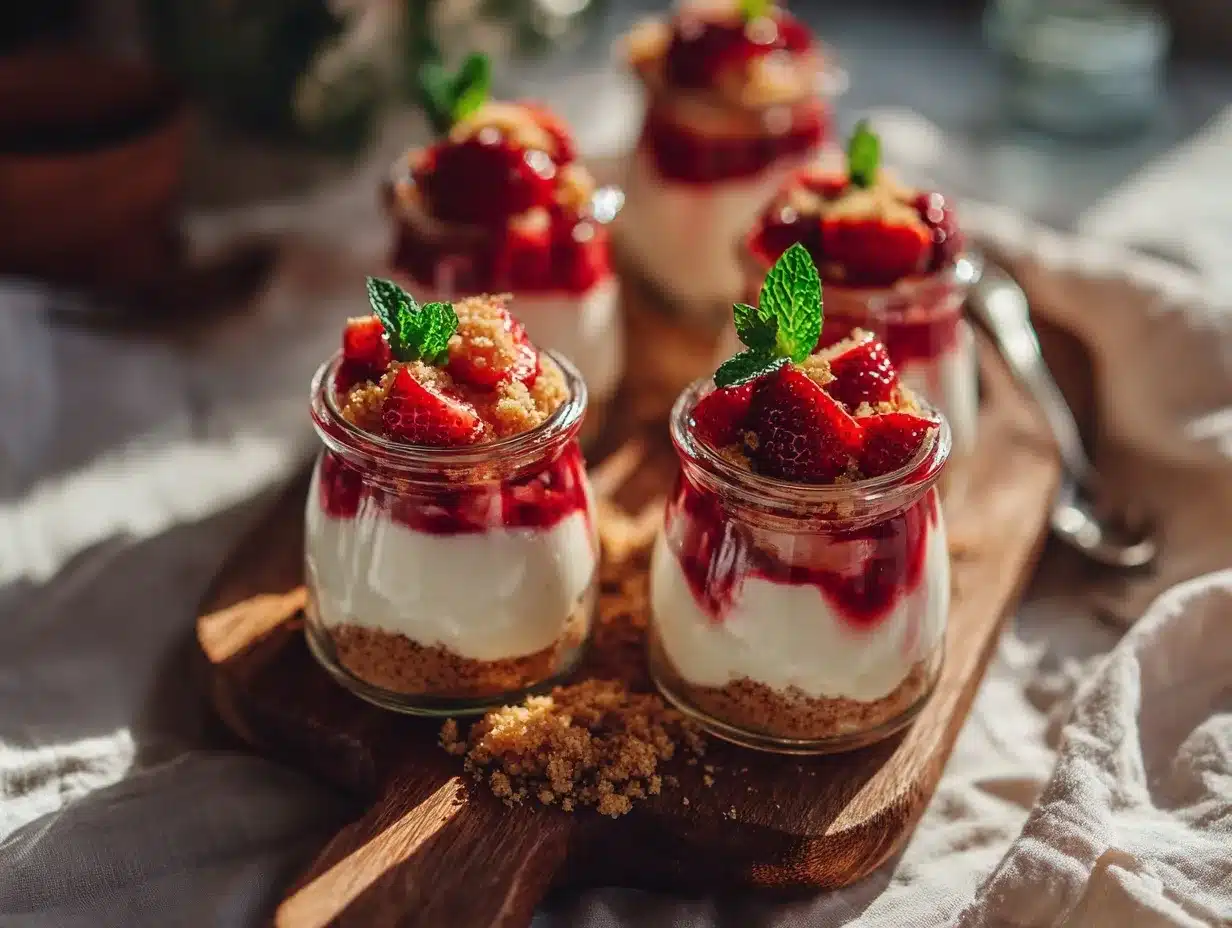
Serve these cheesecake cups chilled for the creamiest texture and brightest flavors. They look adorable in small clear glasses or mason jars—perfect for entertaining or gifting. A sprig of fresh mint or a light dusting of powdered sugar on top adds a lovely finishing touch.
Pair these with a cup of hot coffee, iced tea, or even a sparkling rosé for a light dessert experience. They’re also a fantastic sweet note to finish a casual lunch or picnic.
Leftovers keep well in the refrigerator for up to 3 days, covered tightly with plastic wrap or lids. The flavors actually deepen with time, though the crumb base might soften a bit. To revive a firmer crust, briefly chill them uncovered before serving.
For longer storage, you can freeze the assembled cups for up to 1 month. Thaw overnight in the refrigerator and give a gentle stir before serving if the layers have separated slightly.
Nutritional Information & Benefits
These strawberry cheesecake cups offer a balanced treat—rich in protein from cream cheese and heavy cream, plus antioxidants and vitamin C from fresh strawberries. While indulgent, the portion-controlled cups help keep servings in check.
Estimated per serving (makes 6 cups): 320 calories, 22g fat, 25g carbs, 4g protein.
For those avoiding gluten, simply swap the graham cracker crust for gluten-free cookies. You can also reduce sugar by using natural sweeteners like honey or maple syrup.
From a wellness viewpoint, these cups offer a satisfying dessert that doesn’t leave you feeling weighed down. They’re great for when you want something sweet but still want to keep things light and fresh.
Conclusion
So there you have it—your new go-to dessert for when you want something easy, impressive, and downright delicious without hours in the kitchen. These Easy 15-Minute Strawberry Cheesecake Cups with Creamy Layers are proof that simple ingredients and smart technique can create magic.
Feel free to tweak the layers, swap berries, or add your favorite touches to make them truly yours. Honestly, I love how versatile and forgiving this recipe is, which is why it keeps showing up in my rotation.
If you give these cheesecake cups a try, I’d love to hear how you customize them or what moments you enjoyed them in. Drop a comment below or share your photos—sharing food stories is half the fun, don’t you think?
Here’s to sweet, creamy, and speedy treats that make life a little brighter!
Frequently Asked Questions
Can I use frozen strawberries for this recipe?
Yes! Just thaw them completely and drain any excess juice before layering to avoid watery cups.
How long can I store the cheesecake cups in the fridge?
They keep well for up to 3 days when covered. The flavors improve, but the crust may soften slightly.
Can I make these strawberry cheesecake cups ahead of time?
Absolutely. Assemble them a few hours or the day before serving and keep refrigerated for best texture.
Is it possible to make this recipe dairy-free?
Yes, swap cream cheese with a vegan alternative and use coconut cream instead of heavy cream. Use dairy-free butter for the crust as well.
What can I substitute for graham crackers if I have a gluten allergy?
Use gluten-free cookies or crushed nuts as a crust alternative. Toasted almonds or pecans add great flavor and crunch.
For a fun twist on creamy desserts, you might enjoy my no-bake lemon cheesecake parfaits or the ever-popular classic vanilla pudding recipe, which also comes together quickly and tastes fantastic.
Pin This Recipe!
Easy 15-Minute Strawberry Cheesecake Cups Recipe with Creamy Layers
A quick and easy no-bake dessert featuring creamy cheesecake layers and fresh macerated strawberries, perfect for any occasion and ready in just 15 minutes.
- Prep Time: 10 minutes
- Cook Time: 0 minutes
- Total Time: 15 minutes
- Yield: 6 servings 1x
- Category: Dessert
- Cuisine: American
Ingredients
- 8 ounces cream cheese, softened
- 1 cup powdered sugar
- 1 teaspoon vanilla extract
- 1 cup heavy whipping cream, cold
- 1 cup fresh strawberries, hulled and sliced
- 1 tablespoon granulated sugar or honey
- 1 teaspoon fresh lemon juice
- 1 cup graham crackers, crushed (about 100g)
- 3 tablespoons unsalted butter, melted
Instructions
- Prepare the strawberry layer: In a medium bowl, combine sliced strawberries with 1 tablespoon granulated sugar (or honey) and a squeeze of fresh lemon juice. Stir gently and set aside to macerate for about 5 minutes.
- Make the graham cracker crust base: Crush 1 cup of graham crackers using a food processor or place them in a zip-top bag and crush with a rolling pin. Transfer crumbs into a bowl and mix with 3 tablespoons melted unsalted butter until evenly coated. Press about 2 tablespoons of this crumb mixture into the bottom of each serving cup to form a base layer. Chill if needed to set.
- Whip the cheesecake layer: In a large mixing bowl, beat 8 ounces of softened cream cheese with 1 cup powdered sugar and 1 teaspoon vanilla extract until smooth. In a separate bowl, whip 1 cup heavy cream to stiff peaks. Gently fold the whipped cream into the cream cheese mixture using a spatula, being careful not to deflate the airy texture.
- Assemble the cups: Spoon or pipe a generous layer of the creamy cheesecake mixture over the graham cracker base in each cup. Add a spoonful of the macerated strawberries and their juices. Repeat layers if desired, finishing with a few strawberry slices on top for garnish.
- Chill and serve: Chill the assembled cups for 15-30 minutes to let flavors meld and the base firm up. Serve chilled or immediately if preferred.
Notes
If cream cheese is not softened enough, microwave for 10 seconds and stir before whipping. Use a light hand when folding whipped cream to keep the texture fluffy. Macerate strawberries with sugar and lemon juice to enhance sweetness and flavor. For dairy-free version, substitute cream cheese with vegan alternative and heavy cream with coconut cream. Graham cracker crust can be swapped with gluten-free cookies or nut-based crust for dietary needs.
Nutrition
- Serving Size: 1 cup (one cheesecak
- Calories: 320
- Sugar: 18
- Sodium: 150
- Fat: 22
- Saturated Fat: 13
- Carbohydrates: 25
- Fiber: 2
- Protein: 4
Keywords: strawberry cheesecake cups, no-bake cheesecake, quick dessert, easy cheesecake, creamy dessert, strawberry dessert, 15-minute dessert