Love this? Save it for later!
Share the inspiration with your friends
“I wasn’t supposed to be cooking dinner that night,” I remember telling myself as I glanced at the clock. It was already 7:15 PM, and my stomach was growling louder than the TV show I was half-watching. The plan was simple: toss together something quick before the evening slipped away. But here’s the catch—chicken breast, as you know, has a notorious reputation for turning into dry, rubbery disappointment if you blink the wrong way.
Well, that night I stumbled upon what I now call my “quick never-dry chicken breast recipe.” Honestly, I was juggling a cracked mixing bowl, a phone call from my neighbor, and a last-minute decision to try something new with the spices I had on hand. Somehow, I nailed it in just 20 minutes flat.
Maybe you’ve been there—wanting a dinner that’s fast, foolproof, and juicy but finding yourself stuck with chicken that tastes like cardboard. This recipe changed all that for me. It’s not just about cooking fast; it’s about locking in moisture and flavor so that every bite is tender and satisfying. Let me tell you, this recipe stayed with me because it’s quick, easy, and most importantly, it keeps chicken breast from drying out—something I never thought possible in such a short time.
Why You’ll Love This Recipe
After testing countless methods and tweaking ingredients, I can confidently say this quick never-dry chicken breast recipe is one of my kitchen’s MVPs. Here’s why it’s become a go-to dinner option for me and my friends:
- Quick & Easy: Ready in 20 minutes, perfect for busy weeknights when you need dinner without a fuss.
- Simple Ingredients: No need for exotic spices or odd ingredients—just what you probably have in your pantry right now.
- Perfect for Any Occasion: Whether it’s a casual dinner, a last-minute lunch, or a meal prep staple, this recipe fits right in.
- Crowd-Pleaser: Kids and adults alike give it two thumbs up. No dry chicken complaints here!
- Unbelievably Delicious: The secret marinade and cooking method create a juicy texture with a punch of flavor that feels anything but basic.
This isn’t your typical chicken breast recipe that dries out no matter what. The magic lies in a quick brine and a hot sear that seals in juices. I’ve even swapped in smoked paprika for a smoky twist or added a honey glaze for a touch of sweetness, and it always delivers. Honestly, this recipe is the kind of comfort food you want on speed dial.
What Ingredients You Will Need
This recipe uses straightforward, wholesome ingredients that come together to create a juicy and flavorful chicken breast without any fuss. Most are pantry staples, so no last-minute grocery trips required!
- Chicken Breasts: 2 boneless, skinless chicken breasts (about 6-7 oz / 170-200 g each)
- Salt: 1 teaspoon kosher salt (for quick brining – you can use sea salt too)
- Sugar: 1/2 teaspoon granulated sugar (helps balance flavor and retain moisture)
- Olive Oil: 2 tablespoons extra virgin olive oil (adds richness and helps with searing)
- Garlic Powder: 1/2 teaspoon (adds savory depth)
- Onion Powder: 1/2 teaspoon (for subtle sweetness)
- Black Pepper: Freshly ground, about 1/4 teaspoon (to taste)
- Smoked Paprika: 1/2 teaspoon (optional, for a smoky flavor boost)
- Lemon Juice: 1 tablespoon fresh (brightens the flavor and tenderizes)
- Fresh Herbs: A few sprigs of thyme or parsley for garnish (optional)
If you’re looking to swap things up, feel free to use avocado oil instead of olive oil for a neutral taste or coconut sugar if you prefer a less refined sweetener. For a gluten-free or paleo-friendly option, all these ingredients work perfectly as is.
Equipment Needed
- Mixing Bowl: For the quick brine. I use a medium-sized glass or stainless steel bowl—easy to clean and non-reactive.
- Heavy Skillet or Cast Iron Pan: Essential for a good sear. I swear by my cast iron skillet; it holds heat well and gives a nice crust.
- Tongs: For flipping chicken without piercing the meat (keeps juices inside).
- Meat Thermometer: Optional but super helpful. Chicken is perfectly cooked at 165°F (74°C).
- Cutting Board and Knife: For prepping chicken and slicing after cooking.
If you don’t have cast iron, a heavy stainless steel pan works fine. Avoid non-stick for searing, or the surface may not brown properly. For budget-friendly options, any sturdy skillet you own will do; just make sure it can handle medium-high heat without warping.
Preparation Method
- Quick Brine the Chicken (5 minutes): In your mixing bowl, combine 1 cup (240 ml) of cold water, 1 teaspoon kosher salt, and 1/2 teaspoon sugar. Stir until dissolved. Submerge the chicken breasts completely in the brine and let them sit for 5 minutes. This step is the game-changer—it helps the chicken retain moisture during cooking.
- Pat Dry & Season (3 minutes): Remove chicken breasts from the brine and pat them thoroughly dry with paper towels. Drying the surface is key to getting a golden crust. Then, season both sides with garlic powder, onion powder, black pepper, and smoked paprika if using. Drizzle with lemon juice and rub in 1 tablespoon olive oil.
- Heat the Skillet (2 minutes): Place your skillet over medium-high heat and add 1 tablespoon olive oil. Let it heat until shimmering but not smoking—this usually takes about 2 minutes. A hot pan ensures a quick sear that locks in juices.
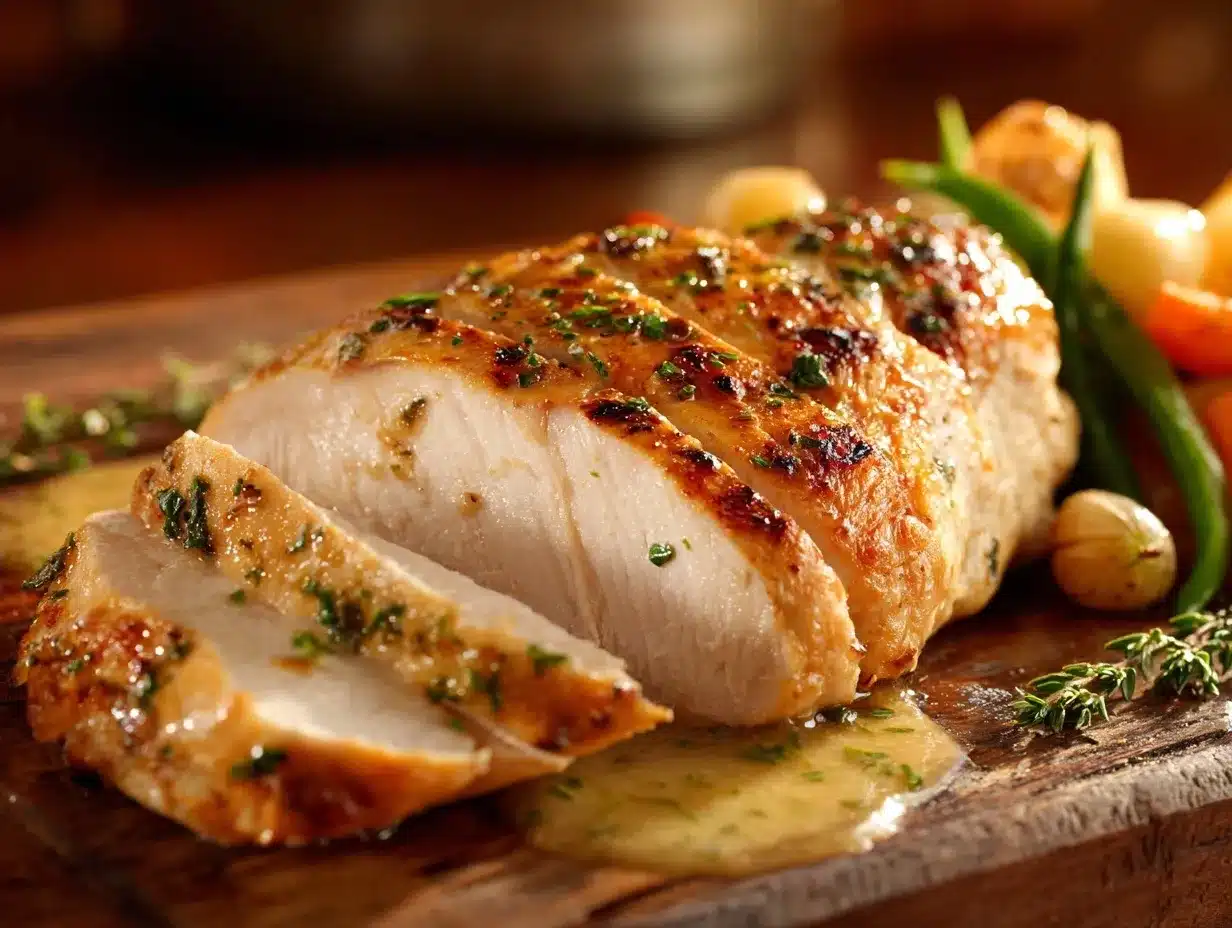
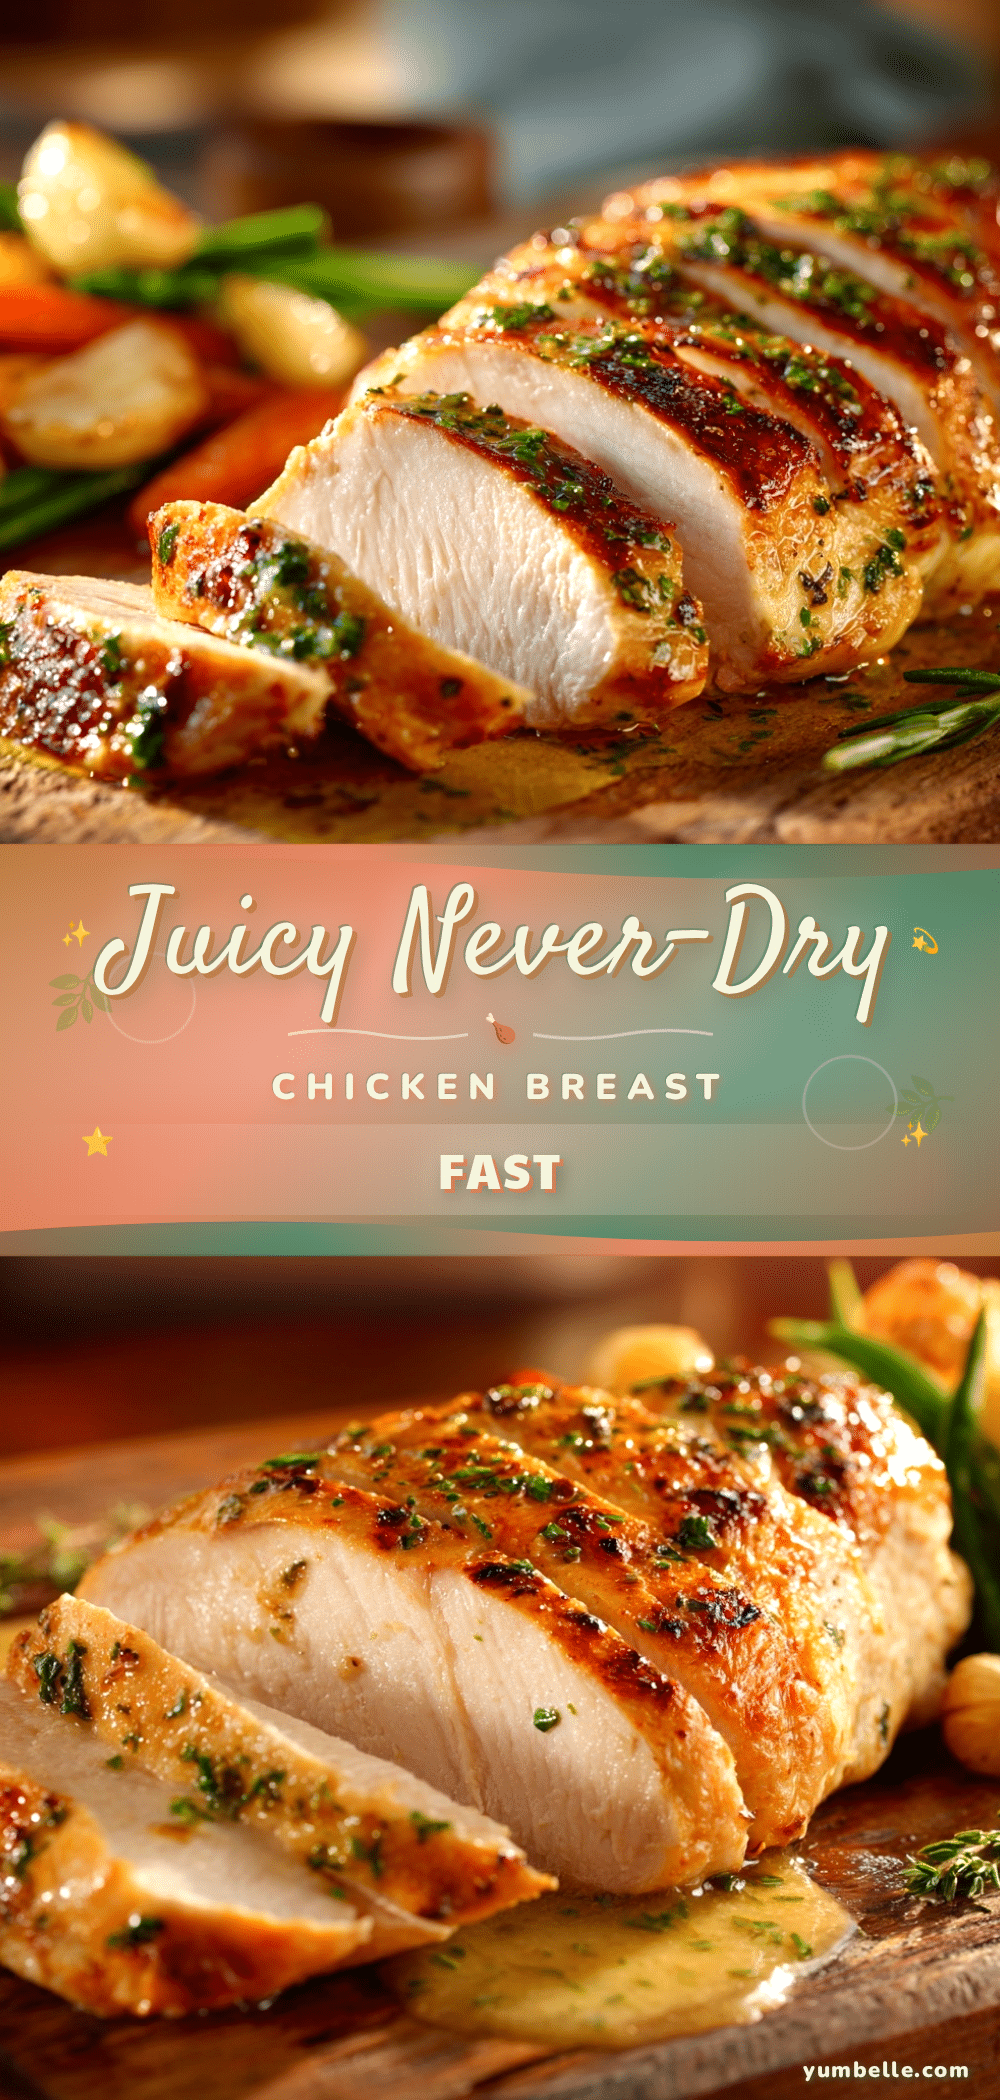
- Sear the Chicken (6-7 minutes): Lay the chicken breasts in the pan carefully. Don’t move them around; let them sear for 3-4 minutes on the first side until the edges look golden and crispy. Flip and sear the other side for another 3-4 minutes. If you have a meat thermometer, check the thickest part for 165°F (74°C). If not, slice into the thickest part to ensure juices run clear.
- Rest the Chicken (2-3 minutes): Remove the chicken from the skillet and let it rest on a plate loosely covered with foil. Resting allows the juices to redistribute, making the meat tender and juicy.
- Slice and Serve: Slice against the grain for maximum tenderness. Garnish with fresh herbs if you like, and pair with your favorite sides.
Heads-up: If your chicken breasts are thicker than usual, consider pounding them slightly before brining for even cooking. Oh, and don’t skip drying the chicken after brining—wet chicken will steam, not sear, and you know what that means!
Cooking Tips & Techniques
When I first started cooking chicken breasts, I thought longer cooking meant juicier meat—big mistake. This recipe taught me that it’s all about timing and technique.
- Don’t skip the brine: Even a short brine makes a huge difference. It’s the secret to never-dry chicken.
- Pat the chicken dry: Moisture on the surface equals steam, which sabotages the sear.
- Use a hot pan: This helps form a crust quickly, locking juices inside.
- Don’t overcrowd the pan: Cook chicken in batches if needed. Overcrowding cools the pan and leads to soggy meat.
- Rest the chicken: Impatience is the enemy here. Even 2 minutes makes a difference in juiciness.
- Multitasking tip: While the chicken rests, whip up a quick salad or steam some veggies to save time.
Once, I forgot to season the chicken before searing (classic me moment), and it tasted bland despite perfect texture. Lesson learned: seasoning is just as important as technique.
Variations & Adaptations
This recipe is a fantastic base, but I love mixing it up depending on my mood and what’s in the fridge.
- Herb & Citrus: Add chopped rosemary and swap lemon juice for orange juice to brighten the flavor.
- Spicy Kick: Mix in cayenne pepper or chili powder with the other spices for a subtle heat.
- Gluten-Free Option: All ingredients are naturally gluten-free, but double-check seasoning labels if you buy pre-mixed spices.
- Cooking Method Alternative: Try baking at 400°F (200°C) for 15-18 minutes after the brine, then sear quickly in a hot pan for color.
- Dairy-Free: This recipe contains no dairy, so it’s safe for those avoiding it.
My personal favorite is adding a quick honey-mustard glaze during the last minute of searing for a sweet-savory finish. It’s a small step that makes dinner feel special.
Serving & Storage Suggestions
Serve this juicy chicken breast warm, sliced over a bed of fluffy rice, crisp salad, or alongside roasted vegetables. A drizzle of extra virgin olive oil or a squeeze of fresh lemon right before serving gives it a fresh punch.
Leftovers? No worries. Store cooked chicken breasts in an airtight container in the fridge for up to 3 days. For longer storage, freeze them wrapped tightly in plastic wrap and foil; they’ll keep for up to 2 months.
When reheating, gently warm in a skillet with a splash of water or broth over low heat to prevent drying out. Avoid microwaving directly if possible—it tends to make chicken rubbery.
Fun fact: flavors deepen after resting in the fridge overnight, so sometimes I make this recipe a day ahead and enjoy even richer taste the next day.
Nutritional Information & Benefits
This quick chicken recipe is a lean protein powerhouse, making it ideal for balanced meals. Each 6-ounce (170 g) serving contains roughly:
| Calories | 280 kcal |
|---|---|
| Protein | 53 g |
| Fat | 6 g |
| Carbohydrates | 1 g |
Chicken breast is low in fat and carbs, making it great for low-carb or gluten-free diets. Plus, the olive oil adds heart-healthy monounsaturated fats, and the lemon juice provides vitamin C.
From a wellness standpoint, this recipe fits well into an active lifestyle, providing sustained energy without heaviness. It’s simple, clean eating that feels good on your plate and in your body.
Conclusion
This quick never-dry chicken breast recipe in 20 minutes is proof that fast food doesn’t have to be dry, dull, or complicated. Whether you’re rushing home after work or need a reliable recipe for unexpected guests, it’s a dependable kitchen win.
Don’t be afraid to make it your own—tweak the spices, try different herbs, or pair it with your favorite sides. I love this recipe because it respects the chicken’s natural flavor while making every bite juicy and satisfying.
If you give it a try, I’d love to hear how you make it yours—drop a comment below or share your favorite twists. Here’s to many delicious, never-dry chicken dinners ahead!
FAQs
How do I prevent chicken breast from drying out?
The key is a quick brine and searing in a hot pan to lock in moisture. Also, don’t overcook and always let the chicken rest before slicing.
Can I use frozen chicken breasts for this recipe?
It’s best to use fully thawed chicken breasts for even cooking. Frozen chicken may release excess water, affecting the sear and texture.
What if I don’t have smoked paprika?
No problem! Regular paprika or a pinch of chili powder works fine. The smoked paprika adds a subtle smoky flavor, but it’s optional.
Can I make this recipe gluten-free?
Yes, all the ingredients are naturally gluten-free. Just double-check any pre-mixed spices or seasonings for hidden gluten.
How do I know when the chicken is done?
Use a meat thermometer inserted into the thickest part; it should read 165°F (74°C). Alternatively, cut into the chicken to ensure juices run clear and there’s no pink inside.
Pin This Recipe!
Quick Never-Dry Chicken Breast Recipe 20 Minutes Easy and Perfect

A fast and foolproof chicken breast recipe that locks in moisture and flavor, delivering juicy, tender chicken in just 20 minutes.
- Prep Time: 8 minutes
- Cook Time: 12 minutes
- Total Time: 20 minutes
- Yield: 2 servings 1x
- Category: Main Course
- Cuisine: American
Ingredients
- 2 boneless, skinless chicken breasts (about 6–7 oz / 170–200 g each)
- 1 teaspoon kosher salt
- 1/2 teaspoon granulated sugar
- 2 tablespoons extra virgin olive oil
- 1/2 teaspoon garlic powder
- 1/2 teaspoon onion powder
- 1/4 teaspoon freshly ground black pepper
- 1/2 teaspoon smoked paprika (optional)
- 1 tablespoon fresh lemon juice
- A few sprigs of thyme or parsley for garnish (optional)
Instructions
- Quick Brine the Chicken (5 minutes): In a mixing bowl, combine 1 cup (240 ml) cold water, 1 teaspoon kosher salt, and 1/2 teaspoon sugar. Stir until dissolved. Submerge the chicken breasts completely in the brine and let sit for 5 minutes.
- Pat Dry & Season (3 minutes): Remove chicken breasts from the brine and pat dry thoroughly with paper towels. Season both sides with garlic powder, onion powder, black pepper, and smoked paprika if using. Drizzle with lemon juice and rub in 1 tablespoon olive oil.
- Heat the Skillet (2 minutes): Place skillet over medium-high heat and add 1 tablespoon olive oil. Heat until shimmering but not smoking.
- Sear the Chicken (6-7 minutes): Lay chicken breasts in the pan and sear without moving for 3-4 minutes until edges are golden and crispy. Flip and sear the other side for another 3-4 minutes. Check for internal temperature of 165°F (74°C) or ensure juices run clear.
- Rest the Chicken (2-3 minutes): Remove chicken from skillet and let rest on a plate loosely covered with foil to redistribute juices.
- Slice and Serve: Slice against the grain for maximum tenderness. Garnish with fresh herbs if desired and serve.
Notes
If chicken breasts are thicker than usual, pound slightly before brining for even cooking. Always pat chicken dry after brining to ensure a good sear. Avoid overcrowding the pan to maintain heat. Rest chicken after cooking to keep it juicy. For variations, try adding honey-mustard glaze or swapping smoked paprika for chili powder.
Nutrition
- Serving Size: 1 chicken breast (6-
- Calories: 280
- Fat: 6
- Carbohydrates: 1
- Protein: 53
Keywords: quick chicken breast, juicy chicken, easy chicken recipe, never dry chicken, weeknight dinner, healthy chicken