Love this? Save it for later!
Share the inspiration with your friends
The summer I turned thirty, I was at a local hardware store buying paint when the unlikeliest person started talking about cakes—yes, cakes in a place where you’d expect only nails and brushes. It was the quiet plumber named Joe, the kind of guy who usually blends into the background. But there he was, wiping his hands on a rag, describing in vivid detail how to make the perfect red velvet brownie flag cake for celebrations. Honestly, I wasn’t expecting cooking advice from someone who spends his days fixing leaky pipes. Yet, as Joe spoke about this cake—a bold, festive dessert that looks like a waving flag and tastes like a dream—I found myself scribbling down notes on a crumpled receipt while clutching my half-open paint can.
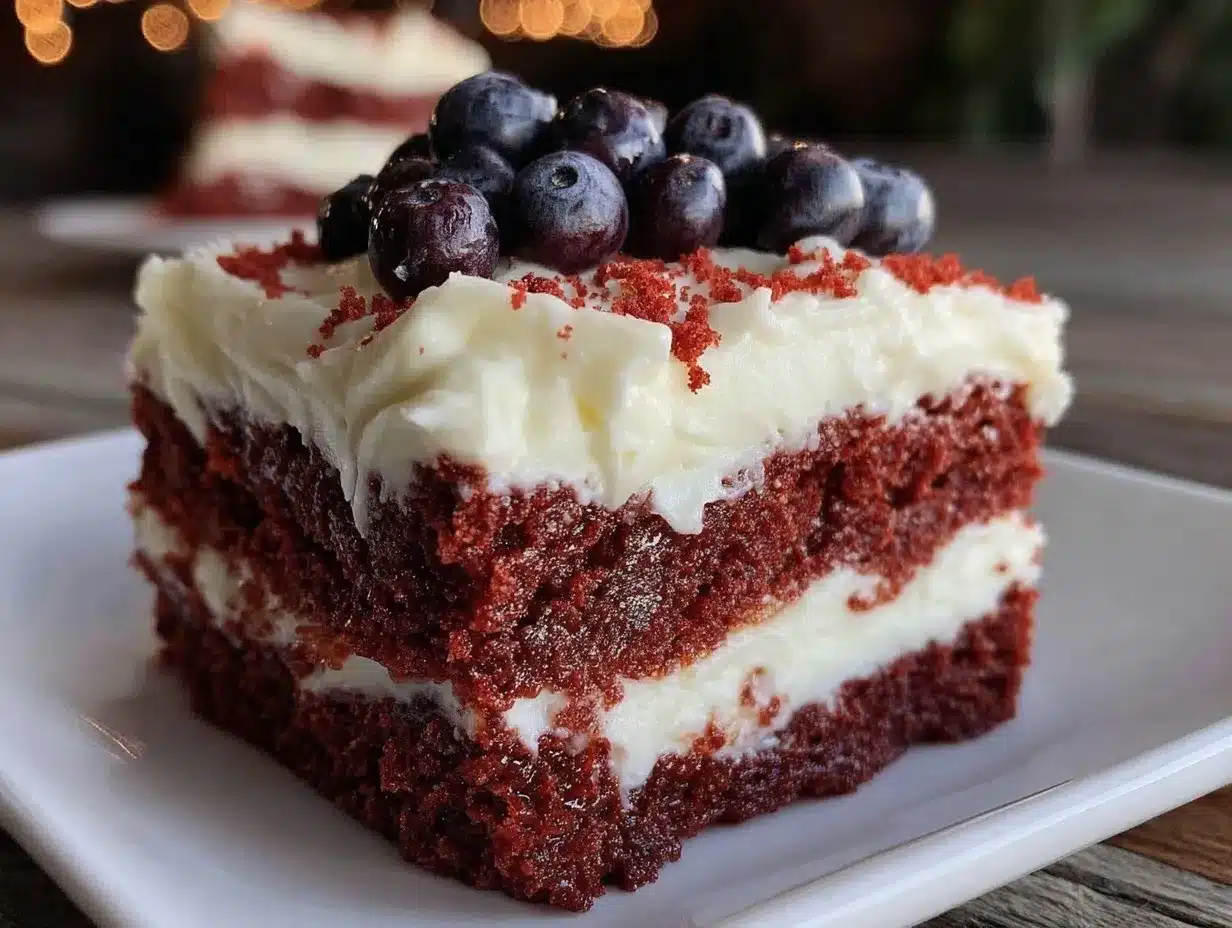
You know that feeling when you discover a secret recipe in the last place you’d imagine? That’s exactly what happened. Joe even admitted he once won a neighborhood baking contest with it, despite being known more for his wrenches than his whisk. The recipe stuck with me, partly because of the surprise of its origin and partly because the cake itself is an unforgettable celebration centerpiece. I made a mess trying it the first time—forgot the eggs, of all things—and had to improvise, but it was worth every crumb. Maybe you’ve been there, juggling a busy schedule and wanting a cake that’s show-stopping but not a headache to make. This red velvet brownie flag cake is exactly that kind of recipe. It’s the perfect mix of rich, fudgy brownie texture and the classic red velvet flavor, all dressed up in a patriotic flag design that’s sure to impress at any celebration.
Why You’ll Love This Recipe
Let me tell you, this red velvet brownie flag cake isn’t just any dessert. It’s been tested through my own kitchen mishaps and perfected with Joe’s tips. It’s a recipe that balances ease and wow-factor, which is rare. Here’s why you’re going to fall for it:
- Quick & Easy: Comes together in under 1 hour, which is fantastic for last-minute parties or when you’re juggling everything else.
- Simple Ingredients: No need to hunt down special items—most are pantry staples or easy to find at your local grocery store.
- Perfect for Celebrations: Whether it’s the 4th of July, Memorial Day, or any festive occasion, this cake’s flag design is a crowd-pleasing centerpiece.
- Crowd-Pleaser: Kids, adults, and even the picky eaters in your life will ask for seconds (or thirds).
- Unbelievably Delicious: The fudgy brownie base combined with the tender, tangy red velvet flavor is a texture and taste sensation.
What sets this recipe apart is the layering technique that creates a striking flag effect without complicated piping or frosting skills. I swapped traditional cake layers for a dense brownie base, making it sturdier and easier to cut into perfect flag slices. Plus, the cream cheese frosting is whipped to just the right fluffiness, adding that classic red velvet touch without overpowering the rich chocolate notes. Honestly, this isn’t just a cake; it’s a conversation starter, a celebration staple, and the kind of dessert that makes you close your eyes and savor every bite.
What Ingredients You Will Need
This red velvet brownie flag cake recipe uses simple, wholesome ingredients to deliver bold flavor and satisfying texture without the fuss. You probably already have most of these on hand, but here’s the full list:
- For the Brownie Base:
- Unsweetened cocoa powder (1/4 cup / 25g) – for that deep chocolate flavor
- All-purpose flour (1 cup / 125g) – provides structure
- Granulated sugar (1 cup / 200g) – for sweetness
- Unsalted butter (1/2 cup / 115g), melted – adds richness
- Large eggs (2), room temperature – binds the batter
- Vanilla extract (1 tsp) – boosts flavor
- Red food coloring (2 tbsp) – the signature red velvet hue
- Salt (1/4 tsp) – balances sweetness
- For the Cream Cheese Frosting:
- Cream cheese (8 oz / 225g), softened – for tangy smoothness
- Unsalted butter (1/4 cup / 57g), softened – adds creaminess
- Powdered sugar (2 cups / 240g), sifted – for smooth sweetness
- Vanilla extract (1 tsp) – fragrance and flavor
- Milk (1-2 tbsp), optional – to adjust consistency
- For the Flag Decoration:
- Fresh blueberries (1 cup) – for the blue star field
- Strawberries or raspberries (1 cup), sliced – to create red stripes
- Whipped cream or extra frosting – for white stripes
For best results, I personally recommend using a trusted brand like Ghirardelli for cocoa powder—it really deepens the chocolate notes. Also, if you want a gluten-free option, swapping all-purpose flour with almond flour works, though the texture will be a bit different. In summer, fresh berries are perfect, but frozen can also work if drained well. If you prefer dairy-free, coconut cream cheese and vegan butter can substitute nicely.
Equipment Needed
This recipe is pretty straightforward when it comes to equipment. Here’s what you’ll need to get started:
- 8×8-inch (20×20 cm) square baking pan – the perfect size for the brownie base
- Mixing bowls – one large for batter, one medium for frosting
- Electric mixer or stand mixer – for smooth cream cheese frosting (a hand whisk can work but takes longer)
- Measuring cups and spoons – for precise ingredient measurement
- Rubber spatula – to fold ingredients gently and scrape the bowl clean
- Cooling rack – to cool the brownies evenly
- Offset spatula or butter knife – for spreading frosting evenly
If you don’t have an electric mixer, no worries—I once whipped the frosting by hand with a whisk during a power outage, and it worked just fine (albeit with a bit more elbow grease). For budget-friendly options, simple glass or metal mixing bowls from thrift stores work great and last forever. Keeping your cream cheese and butter at room temperature makes frosting easier to spread and smoother, so plan ahead if you can.
Preparation Method
- Preheat your oven to 350°F (175°C) and grease your 8×8-inch (20×20 cm) baking pan with butter or non-stick spray. Line it with parchment paper if you want extra easy removal.
- Combine dry ingredients: In a medium bowl, sift together 1 cup (125g) all-purpose flour, 1/4 cup (25g) unsweetened cocoa powder, and 1/4 teaspoon salt. Setting this aside keeps things tidy.
- Whisk wet ingredients: In a large bowl, mix 1 cup (200g) granulated sugar with 1/2 cup (115g) melted unsalted butter until smooth. Add 2 large eggs one at a time, beating well after each. Stir in 1 teaspoon vanilla extract and 2 tablespoons red food coloring until the color is even.
- Combine wet and dry: Gradually fold in the dry ingredients to the wet mixture using a rubber spatula. Be gentle to keep the batter light but make sure everything is just incorporated—no flour pockets!
- Pour batter into pan: Spread evenly in your prepared baking pan. Don’t worry if it looks thick; that’s the magic of a fudgy brownie.
- Bake for 25-30 minutes: Check at 25 minutes by inserting a toothpick into the center. It should come out with a few moist crumbs, not wet batter. Overbaking dries it out, so keep an eye.
- Cool completely: Transfer the pan to a cooling rack and let the brownies cool fully before frosting. I learned this the hard way—frosting warm brownies makes a messy, melted disaster.
- Make the cream cheese frosting: Beat 8 oz (225g) softened cream cheese with 1/4 cup (57g) softened butter until smooth using your mixer. Gradually add 2 cups (240g) sifted powdered sugar and 1 teaspoon vanilla extract, beating until fluffy. Add 1-2 tablespoons milk if it feels too thick.
- Frost the cooled brownies: Spread an even layer of frosting over the top with an offset spatula or butter knife.
- Create the flag design: Arrange fresh blueberries in the top left corner to form the “star” section. Use sliced strawberries or raspberries to make the alternating red stripes horizontally across the rest of the cake. Fill the white stripes with dollops of whipped cream or extra frosting. This step is where your creativity shines, so have fun!
- Chill and serve: Refrigerate for at least 30 minutes to let the frosting set before slicing into squares. Serve cold or at room temperature for best texture.
Pro tip: If you want cleaner slices, dip your knife in hot water and wipe it dry between cuts. It helps keep those red and white stripes sharp and pretty.
Cooking Tips & Techniques
Making the perfect red velvet brownie flag cake is about both technique and a bit of patience. Here are some tips I’ve gathered from my own trials (and errors!):
- Don’t overmix the batter. When combining wet and dry ingredients, fold gently to keep the brownie tender rather than tough.
- Room temperature eggs and butter blend better and produce a smoother batter.
- Use good-quality cocoa powder. It makes a noticeable difference in depth of flavor—trust me, I once used cheap cocoa and regretted it.
- Cool your brownies completely before frosting. If the base is too warm, the cream cheese frosting melts and becomes runny. Patience here pays off.
- When frosting, use a light hand and an offset spatula. It’s easier to get a smooth layer, especially if your cream cheese isn’t perfectly room temp.
- For the flag design, plan your berry placement first. Arrange them loosely before pressing gently to avoid crushing.
- To avoid soggy fruit, pat berries dry with a paper towel before placing. This keeps your cake fresh longer.
- Multitasking tip: While the brownies bake, prep your frosting and wash the berries to save time.
Variations & Adaptations
This red velvet brownie flag cake is versatile and easy to tweak for different tastes or dietary needs. Here are a few ideas to make it your own:
- Gluten-Free Version: Swap all-purpose flour with a gluten-free blend or almond flour. You might need to adjust baking time slightly.
- Vegan Adaptation: Use flax eggs (1 tbsp ground flaxseed + 3 tbsp water per egg), dairy-free butter, and vegan cream cheese alternatives. The texture will be slightly different but still delicious.
- Seasonal Fruit Swap: In winter, use pomegranate seeds and kiwi slices for your flag colors instead of berries.
- Chocolate Lovers’ Twist: Add mini chocolate chips to the brownie batter for extra fudgy pockets.
- Personal Touch: I once added a swirl of peanut butter to the batter for a surprise flavor hit—it was a crowd favorite!
Serving & Storage Suggestions
This cake shines when served slightly chilled or at room temperature. The cream cheese frosting is best enjoyed cool, so I recommend taking the cake out of the fridge about 15 minutes before serving. Presentation-wise, cutting into neat squares reveals the gorgeous flag pattern inside, which always gets compliments.
Pair it with a cup of coffee or a glass of cold milk for classic comfort vibes. For celebrations, it pairs wonderfully with light fruit salads or even a scoop of vanilla ice cream.
To store, cover the cake tightly with plastic wrap or place it in an airtight container and refrigerate. It keeps well for up to 4 days. You can freeze unfrosted brownies for up to 3 months—just thaw completely before adding frosting and decorating.
Reheating is not usually necessary, but if you prefer a softer texture, warm a slice gently in the microwave for 10-15 seconds. Keep in mind, the frosting may soften or melt, so handle carefully.
Flavors actually get better after resting a day in the fridge, allowing the red velvet and cream cheese notes to meld beautifully.
Nutritional Information & Benefits
Each serving of this red velvet brownie flag cake provides a rich, satisfying treat. Here’s an estimate per slice (based on 12 servings):
| Calories | 320 kcal |
|---|---|
| Fat | 18g (mostly from butter and cream cheese) |
| Carbohydrates | 35g |
| Protein | 4g |
| Sugar | 25g |
The cream cheese adds a bit of calcium and protein, while the berries contribute antioxidants and vitamins. This cake is not low-calorie, but it’s made with real ingredients and offers a balanced indulgence without artificial additives.
For those monitoring gluten, swapping flours can easily make it gluten-free. If dairy is a concern, the vegan adaptation keeps it accessible. Personally, I appreciate how this recipe lets me treat myself while still feeling like I’m eating something with wholesome components.
Conclusion
If you’re looking for a show-stopping, festive dessert that’s actually easy to make, this perfect red velvet brownie flag cake recipe is your new best friend. It’s a recipe with a story, a personality, and a taste that keeps me coming back. Whether you’re celebrating the Fourth of July, a birthday, or just want to wow your friends, this cake covers all bases: it looks amazing, tastes incredible, and won’t have you stressing in the kitchen.
Feel free to tweak it to your tastes—add your favorite berries, try the peanut butter swirl, or make it dairy-free. I love how adaptable it is, and I’m excited for you to make it your own. Please leave a comment or share your own spin on this recipe—I’d love to hear how your celebrations go with this cake on the table. Here’s to sweet moments and memorable gatherings!
FAQs
Can I make this red velvet brownie flag cake ahead of time?
Yes! You can bake the brownie base a day before, refrigerate it, and frost and decorate on the day of your event for the freshest look and flavor.
What if I don’t have red food coloring?
You can use natural alternatives like beet juice or powder, but the color will be less vibrant. Alternatively, omit it for a chocolate brownie variant.
How do I keep the berries from making the cake soggy?
Pat the berries dry with a paper towel before arranging them on the frosting, and serve the cake within a day for best freshness.
Can I use box brownie mix instead of making the base from scratch?
Yes, a quality box mix works well and reduces prep time, but homemade gives you that classic red velvet flavor and texture.
How should I store leftover cake?
Cover tightly and refrigerate for up to 4 days. Bring to room temperature before serving for best taste and texture.
Pin This Recipe!
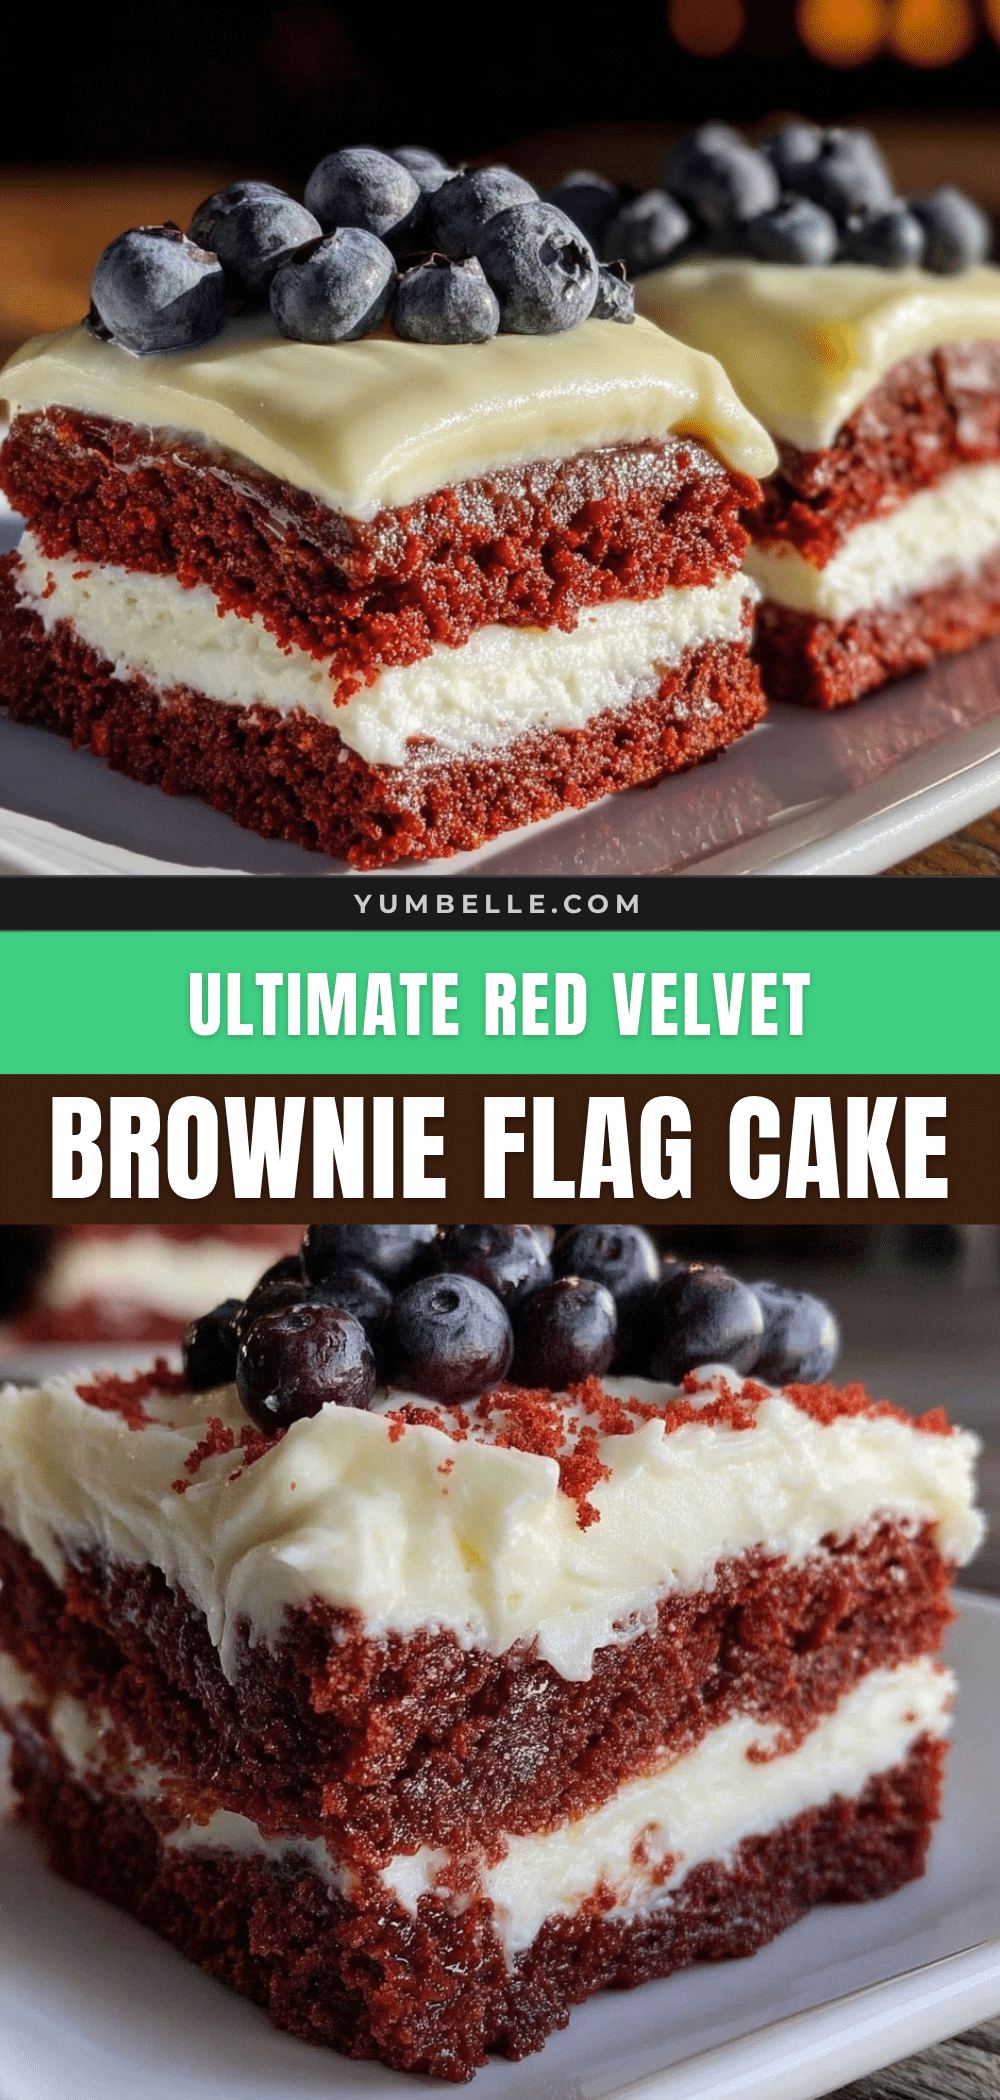
Perfect Red Velvet Brownie Flag Cake Recipe Easy for Celebrations
A rich, fudgy red velvet brownie cake decorated with cream cheese frosting and fresh berries to create a patriotic flag design, perfect for celebrations and easy to make in under an hour.
- Prep Time: 15 minutes
- Cook Time: 30 minutes
- Total Time: 45 minutes
- Yield: 12 servings 1x
- Category: Dessert
- Cuisine: American
Ingredients
- 1/4 cup unsweetened cocoa powder (25g)
- 1 cup all-purpose flour (125g)
- 1 cup granulated sugar (200g)
- 1/2 cup unsalted butter, melted (115g)
- 2 large eggs, room temperature
- 1 teaspoon vanilla extract
- 2 tablespoons red food coloring
- 1/4 teaspoon salt
- 8 oz cream cheese, softened (225g)
- 1/4 cup unsalted butter, softened (57g)
- 2 cups powdered sugar, sifted (240g)
- 1 teaspoon vanilla extract
- 1–2 tablespoons milk (optional)
- 1 cup fresh blueberries
- 1 cup sliced strawberries or raspberries
- Whipped cream or extra frosting for white stripes
Instructions
- Preheat your oven to 350°F (175°C) and grease an 8×8-inch (20×20 cm) baking pan with butter or non-stick spray. Line with parchment paper if desired.
- In a medium bowl, sift together the flour, cocoa powder, and salt.
- In a large bowl, mix granulated sugar with melted butter until smooth. Add eggs one at a time, beating well after each addition. Stir in vanilla extract and red food coloring until evenly combined.
- Gradually fold the dry ingredients into the wet mixture using a rubber spatula, being gentle to keep the batter light and fully incorporated.
- Pour the batter evenly into the prepared baking pan and spread it out.
- Bake for 25-30 minutes, checking at 25 minutes with a toothpick; it should come out with a few moist crumbs but no wet batter.
- Cool the brownies completely on a cooling rack before frosting.
- Beat softened cream cheese and softened butter together until smooth. Gradually add powdered sugar and vanilla extract, beating until fluffy. Add milk if frosting is too thick.
- Spread an even layer of cream cheese frosting over the cooled brownies using an offset spatula or butter knife.
- Create the flag design by arranging fresh blueberries in the top left corner for the star field, sliced strawberries or raspberries for red stripes, and dollops of whipped cream or extra frosting for white stripes.
- Refrigerate the cake for at least 30 minutes to let the frosting set before slicing and serving.
Notes
Use good-quality cocoa powder for best flavor. Cool brownies completely before frosting to avoid melting. Pat berries dry before decorating to prevent sogginess. For gluten-free, substitute flour with almond or gluten-free blend. Vegan adaptations possible with flax eggs and dairy-free substitutes. Dip knife in hot water and wipe between cuts for clean slices.
Nutrition
- Serving Size: 1 slice (1/12th of c
- Calories: 320
- Sugar: 25
- Fat: 18
- Carbohydrates: 35
- Protein: 4
Keywords: red velvet brownie, flag cake, celebration cake, patriotic dessert, cream cheese frosting, easy cake recipe, holiday dessert