Love this? Save it for later!
Share the inspiration with your friends
Introduction
“The power went out halfway through a lazy Saturday afternoon, and I found myself stuck at my neighbor’s place with nothing but a dim flashlight and a growing sweet tooth. Before I even realized it, the smell of crushed Oreos and sweet cream hit me from the kitchen. My neighbor wasn’t making a big deal out of it—just casually stirring something in a bowl like it was no big deal. Honestly, I was half expecting an elaborate dessert, but this creamy no-bake Oreo cheesecake delight was whipped up with such ease it felt like magic. The whole kitchen had that cozy, inviting vibe you get when something simple turns extraordinary without trying too hard. I mean, maybe you’ve been there—just craving a quick dessert and suddenly, you stumble upon something that feels like a happy accident but turns out to be a keeper forever. I forgot to ask for the recipe that day, but after a little persistence (and a cracked mixing bowl mishap), I recreated it at home. This no-bake cheesecake has been my go-to ever since for when I want something indulgent but fuss-free.”
Why You’ll Love This Recipe
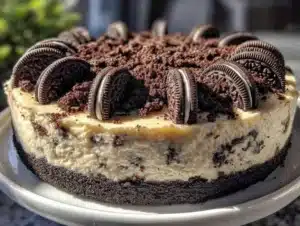
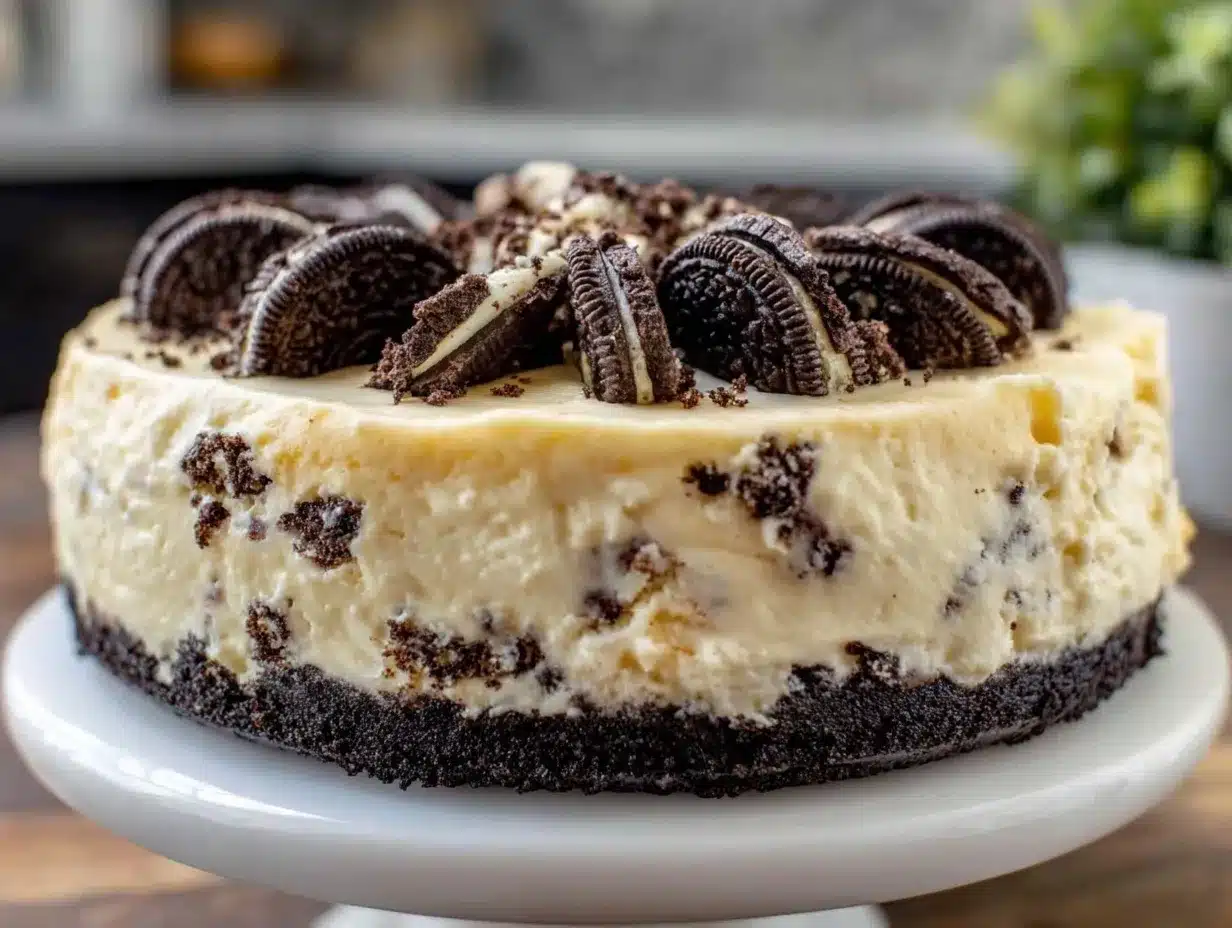
This creamy no-bake Oreo cheesecake delight is truly something special—not just because it tastes amazing, but because it fits right into your busy life with zero stress.
- Quick & Easy: Ready in under 30 minutes, perfect when you need a sweet fix on short notice.
- Simple Ingredients: Uses pantry staples and classic Oreos—no obscure items or fancy shopping required.
- Perfect for Any Occasion: Whether it’s a casual hangout, a family treat, or a last-minute party dessert, it fits the bill effortlessly.
- Crowd-Pleaser: Kids, adults, cookie lovers—everyone’s head over heels for this creamy, crunchy combo.
- Unbelievably Delicious: The balance of smooth cream cheese filling and crunchy Oreo crust hits all the right notes.
What sets this cheesecake apart? It’s the no-bake aspect that keeps it simple but still rich and silky. The secret is folding in the crushed Oreos gently, keeping that satisfying texture without losing creaminess. Plus, the crust doesn’t just hold the dessert together—it adds a chocolatey crunch that’s just the right contrast. Honestly, it’s like comfort food but without the oven heat, and that’s a game-changer on hot days or when you just don’t want to fuss. This has become my stress-free solution for dessert that feels homemade and special, with zero fancy techniques—just pure deliciousness that makes you close your eyes after the first bite.”
What Ingredients You Will Need
This creamy no-bake Oreo cheesecake delight uses straightforward ingredients to create a dessert that’s both rich and light—perfect for any season.
- For the Crust:
- 24 Oreo cookies (classic, with filling)
- 5 tablespoons unsalted butter, melted (I like Kerrygold for richness)
- For the Filling:
- 16 oz (450g) cream cheese, softened (room temperature is key for smooth mixing)
- 1 cup (120g) powdered sugar, sifted
- 1 teaspoon pure vanilla extract
- 1 1/2 cups (360ml) heavy whipping cream, cold
- 10 Oreo cookies, roughly chopped (for folding into the filling)
Feel free to swap heavy cream with coconut cream for a dairy-free twist, or use a sugar substitute like erythritol if you want a lower-sugar version. When selecting Oreos, the classic kind works best for that nostalgic flavor, but you can try golden Oreos for a fun variation. This recipe is forgiving with ingredients, so if you don’t have exactly 24 for the crust, just adjust butter accordingly—the ratio is what counts for binding.
Equipment Needed
- 9-inch (23cm) springform pan or a pie dish (springform is easier for clean removal)
- Mixing bowls (medium and large)
- Electric mixer or stand mixer with whisk attachment (a hand whisk works but takes longer)
- Food processor or a sturdy zip-top bag and rolling pin (for crushing Oreos)
- Rubber spatula (for folding ingredients gently)
If you don’t have a food processor, crushing cookies in a bag with a rolling pin works just fine—and honestly, it’s kind of fun to do! I’ve used both a springform pan and regular pie plates; the springform makes serving less messy. Also, make sure your cream cheese is properly softened—cold cream cheese can cause lumps, making mixing a battle. I keep my cream cheese out for about 30 minutes before starting. If you want to keep costs low, a basic hand mixer works great, and you don’t need fancy gadgets for this one.
Preparation Method
- Prepare the crust: Place 24 Oreo cookies in a food processor and pulse until finely crushed. If you don’t have a processor, put the cookies in a zip-top bag and crush with a rolling pin until you get fine crumbs. Transfer crumbs to a bowl and mix in 5 tablespoons of melted butter until well combined. (About 5 minutes)
- Press crust into pan: Pour the Oreo crust mixture into your 9-inch springform pan or pie dish. Use the back of a spoon or the bottom of a glass to press the crumbs firmly and evenly across the bottom. Don’t forget to press slightly up the sides for that perfect edge. Chill in the fridge while preparing the filling. (5 minutes pressing + 10 minutes chilling)
- Make the filling: In a large bowl, beat the softened cream cheese with an electric mixer on medium speed until smooth and creamy. Add powdered sugar and vanilla extract; mix until combined and smooth. (About 3-4 minutes)
- Whip the cream: In a separate bowl, whip the heavy cream on high speed until stiff peaks form. This means when you lift the whisk, peaks hold their shape firmly without drooping. (About 4-5 minutes)
- Combine cream with cream cheese mixture: Gently fold the whipped cream into the cream cheese mixture using a rubber spatula. Fold carefully so you keep as much air as possible, making the filling light and fluffy. (About 3 minutes)
- Fold in chopped Oreos: Add the roughly chopped 10 Oreos to the filling and gently fold just until evenly distributed. Careful not to overmix—you still want chunks! (1-2 minutes)
- Assemble the cheesecake: Pour the filling over the chilled crust and smooth the top with a spatula. Cover the pan with plastic wrap and refrigerate for at least 4 hours, preferably overnight, to let it set properly.
- Serve: Before serving, run a knife around the edges to loosen, remove the springform ring, and garnish with extra crushed Oreos or whipped cream if you like.
Pro tip: If your cream cheese isn’t soft enough, you’ll notice lumps—just keep mixing longer or soften it in short bursts in the microwave (10-second intervals). And if you’re pressed for time, 4 hours chilling still works, but overnight makes the texture creamier and more sliceable. Also, be patient when folding in the whipped cream; rushing this step can deflate the mixture and make the cheesecake dense.
Cooking Tips & Techniques
Making a no-bake cheesecake sounds easy, but a few tricks make all the difference.
- Softening cream cheese: Let it sit at room temperature for at least 30 minutes. Cold cream cheese mixes poorly and leaves lumps.
- Whipping cream perfectly: Use cold cream and a chilled bowl if possible. Stop whipping at stiff peaks—not too soft, not overwhipped.
- Folding technique: Use a gentle folding motion to keep air in the mixture. Think of it as gently turning the batter over itself instead of stirring.
- Crust pressing: Press firmly but don’t compact too much—you want a sturdy base that still lets the filling shine.
- Chilling time: Don’t skimp on chilling. A quick chill sets the crust, but the filling needs time to firm up for perfect slices.
One mistake I made early on was rushing the whipped cream step and ending up with a dense filling that felt heavy. Now, I always whip until stiff peaks and fold carefully, which keeps the cheesecake light as a cloud. Also, I learned that chopping some Oreos bigger than others adds fun texture surprises. Timing your prep so the crust chills while you make filling saves time and keeps the process smooth.
Variations & Adaptations
- Gluten-Free Version: Use gluten-free Oreo-style cookies for both crust and filling to keep all the Oreo flavor without gluten.
- Mint Oreo Twist: Swap classic Oreos for mint-flavored ones to add a refreshing note that pairs surprisingly well with the creamy filling.
- Berry Swirl Addition: Add a swirl of raspberry or strawberry jam to the filling before chilling for a fruity contrast.
- Vegan Adaptation: Use vegan cream cheese, coconut cream whipped to stiff peaks, and dairy-free Oreo cookies (check labels), for a plant-based delight.
- Chocolate Lover’s Upgrade: Mix in mini chocolate chips or drizzle melted dark chocolate on top before chilling.
When I tried the berry swirl version, I lightly folded in homemade raspberry preserves—just enough to create pretty marbled swirls without overpowering the Oreo flavor. It was a hit at a summer picnic! For baking alternatives, this cheesecake doesn’t require baking, but if you want a firmer texture, you can freeze it for an hour before slicing.
Serving & Storage Suggestions
This creamy no-bake Oreo cheesecake delight tastes best chilled but not ice-cold. Let it sit at room temperature for about 10 minutes before slicing to soften slightly and reveal the full flavor. Serve with a dollop of whipped cream or fresh berries for a nice balance. It pairs wonderfully with a hot cup of coffee or a cold glass of milk—classic comfort in every bite.
Store leftovers covered tightly in the fridge for up to 4 days. You can also freeze individual slices wrapped in plastic wrap and foil for up to 2 months; thaw in the fridge overnight before enjoying. Reheating isn’t recommended as it changes texture, but a little time out of the fridge softens it perfectly. Over time, the flavors meld beautifully, making it even more indulgent the next day.
Nutritional Information & Benefits
Each serving of this creamy no-bake Oreo cheesecake delight (about 1/10th of the recipe) contains approximately:
| Calories | 350-400 kcal |
|---|---|
| Fat | 25g (mostly from cream cheese and heavy cream) |
| Carbohydrates | 30g (from Oreos and sugar) |
| Protein | 5g |
The cream cheese provides a good source of calcium and protein, while the whipped cream adds richness. Although this dessert is indulgent, it’s easy to portion and share, making it a treat to savor rather than overindulge. For dietary considerations, swapping heavy cream for coconut cream can make it dairy-free, and gluten-free Oreos are available for those with gluten sensitivity. Just keep in mind the sugar content if you’re managing blood sugar levels.
Conclusion
This creamy no-bake Oreo cheesecake delight is one of those recipes that you keep coming back to because it’s just so easy and satisfying. It’s perfect for when you want a dessert that looks and tastes special without hours in the kitchen. I love how flexible it is—you can tweak flavors or ingredients to fit whatever mood or dietary need you have. Honestly, it’s the kind of dessert that makes people ask for seconds and then the recipe. If you try it, let me know how you put your spin on it or if it became your new favorite quick treat. Don’t forget to share your experience or questions—I’m always curious to hear how this simple cheesecake fits into your kitchen story!
Frequently Asked Questions
- Can I make this cheesecake without a springform pan?
Yes! A regular pie dish or any dish with removable sides works fine. Just be gentle when serving to keep slices intact. - How long can I store the no-bake Oreo cheesecake?
Store it covered in the fridge for up to 4 days. For longer storage, freeze wrapped slices for up to 2 months. - Can I use low-fat cream cheese or milk instead of heavy cream?
Low-fat cream cheese might make the cheesecake less creamy and stable. Heavy cream is best for whipping and texture, but you can try full-fat coconut milk as a dairy-free substitute. - Is it necessary to chill the cheesecake overnight?
Chilling for at least 4 hours is important for setting, but overnight chilling improves texture and flavor. - Can I add other mix-ins besides Oreos?
Absolutely! Try chocolate chips, nuts, or fruit swirls—just fold them in gently to keep the texture light and creamy.
Pin This Recipe!

Creamy No-Bake Oreo Cheesecake Delight

A quick and easy no-bake Oreo cheesecake with a creamy filling and crunchy Oreo crust, perfect for any occasion and made with simple pantry ingredients.
- Prep Time: 15 minutes
- Cook Time: 0 minutes
- Total Time: 4 hours 15 minutes
- Yield: 10 servings 1x
- Category: Dessert
- Cuisine: American
Ingredients
- 24 Oreo cookies (classic, with filling)
- 5 tablespoons unsalted butter, melted
- 16 oz (450g) cream cheese, softened
- 1 cup (120g) powdered sugar, sifted
- 1 teaspoon pure vanilla extract
- 1 1/2 cups (360ml) heavy whipping cream, cold
- 10 Oreo cookies, roughly chopped (for folding into the filling)
Instructions
- Place 24 Oreo cookies in a food processor and pulse until finely crushed. If you don’t have a processor, put the cookies in a zip-top bag and crush with a rolling pin until you get fine crumbs. Transfer crumbs to a bowl and mix in 5 tablespoons of melted butter until well combined.
- Pour the Oreo crust mixture into your 9-inch springform pan or pie dish. Use the back of a spoon or the bottom of a glass to press the crumbs firmly and evenly across the bottom, pressing slightly up the sides. Chill in the fridge while preparing the filling.
- In a large bowl, beat the softened cream cheese with an electric mixer on medium speed until smooth and creamy. Add powdered sugar and vanilla extract; mix until combined and smooth.
- In a separate bowl, whip the heavy cream on high speed until stiff peaks form.
- Gently fold the whipped cream into the cream cheese mixture using a rubber spatula, keeping the mixture light and fluffy.
- Add the roughly chopped 10 Oreos to the filling and gently fold just until evenly distributed.
- Pour the filling over the chilled crust and smooth the top with a spatula. Cover the pan with plastic wrap and refrigerate for at least 4 hours, preferably overnight, to let it set properly.
- Before serving, run a knife around the edges to loosen, remove the springform ring, and garnish with extra crushed Oreos or whipped cream if desired.
Notes
Let cream cheese soften at room temperature for at least 30 minutes to avoid lumps. Use cold heavy cream and whip to stiff peaks. Fold whipped cream gently to keep the filling light and fluffy. Chill cheesecake for at least 4 hours, preferably overnight, for best texture. Can substitute coconut cream for dairy-free version and gluten-free Oreos for gluten-free adaptation.
Nutrition
- Serving Size: 1 slice (1/10th of c
- Calories: 375
- Fat: 25
- Carbohydrates: 30
- Protein: 5
Keywords: no-bake cheesecake, Oreo cheesecake, easy dessert, quick dessert, no bake, Oreo dessert, creamy cheesecake