Love this? Save it for later!
Share the inspiration with your friends
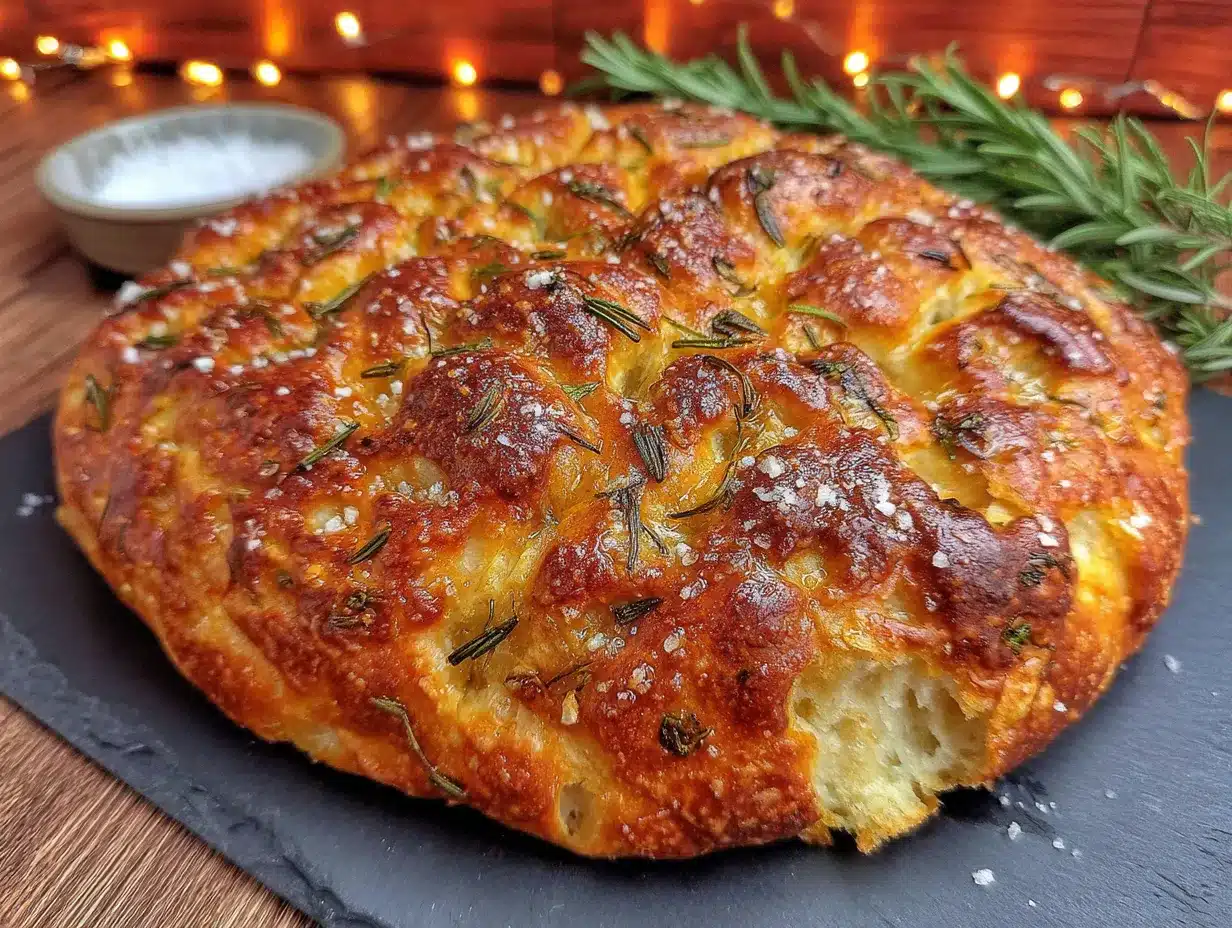
The neighborhood potluck was in three hours and I’d completely forgotten. I mean, I had a vague memory of signing up for it two weeks ago, but my calendar had other ideas. Everyone else would be bringing those perfectly layered tarts and fancy dips you see in magazines. I had a jar of sourdough starter that needed feeding, some wilting rosemary from the garden, and honestly? A mild sense of panic. I remember standing in my kitchen, staring at the counter, thinking, “There’s no way this is going to work.” But I’d seen a recipe for sourdough focaccia floating around online and figured, why not? It’s just bread, right? Little did I know, that afternoon of frantic mixing and impatient waiting would lead me to the most requested dish I’ve ever made. The crispy, golden crust with those little pools of olive oil, the soft, airy crumb, and that burst of rosemary and salt with every bite—people actually asked me for the recipe before I’d even set the pan down. And the best part? I’d messed up the timing and had to let it rise in a slightly warm oven because the kitchen was too cold. That accidental warmth, let me tell you, made the texture even better. Maybe you’ve been there, scrambling for a dish that looks impressive but doesn’t require a culinary degree. This is that recipe. It’s the one I keep coming back to, not because it’s fancy, but because it’s forgiving, delicious, and makes you look like you planned it all along.
Why You’ll Love This Recipe
Let’s be honest—there are a lot of focaccia recipes out there. But this one? It’s different. I’ve tested this version at least a dozen times, tweaking hydration levels and fermentation times until I got that perfect balance of a shatteringly crisp crust and a pillowy interior. It’s the kind of recipe that builds your confidence in the kitchen, whether you’re a sourdough newbie or a seasoned baker.
- Incredibly Crispy Crust: That golden, almost crackly bottom and top? It’s not an accident. The combination of high heat and a generous amount of olive oil creates a texture that store-bought bread just can’t match.
- Simple, Clean Ingredients: You don’t need a pantry full of specialty items. Flour, water, your sourdough starter, olive oil, rosemary, and salt. That’s it. No commercial yeast, no weird additives.
- Perfect for Entertaining: This focaccia is a showstopper at any gathering. Serve it as an appetizer with a good balsamic vinegar, alongside a bowl of soup, or as the base for the most incredible sandwiches. It’s a crowd-pleaser every single time.
- Forgiving and Foolproof: I’ve made this on humid summer days and dry winter afternoons. I’ve rushed the bulk fermentation and let it go overnight. It always works. The long, slow fermentation of the sourdough gives you a wide window of flexibility.
- Better the Next Day: Honestly, the flavor develops even more after a day. The rosemary infuses the olive oil, and the sourdough tang deepens. If you can resist eating it all fresh, you’re in for a treat.
This isn’t just another bread recipe. It’s the one that makes you close your eyes after that first bite—the one where the salt crystals pop, the rosemary hits your senses, and the crunch gives way to that soft, chewy inside. It’s comfort food, but elevated in the simplest, most honest way possible.
What Ingredients You Will Need
This recipe relies on a handful of quality ingredients to deliver that signature flavor and texture. Each one plays a specific role, so let’s break down what you’ll need and why it matters.
- Bread Flour (500g / about 4 cups): The higher protein content in bread flour (around 12-14%) is essential for developing the strong gluten network that gives focaccia its characteristic chewy crumb and structure. I prefer King Arthur Baking Company for its consistent quality, but any good bread flour will work. Avoid all-purpose flour here if you can—it won’t give you the same satisfying chew.
- Active Sourdough Starter (200g / about 1 cup): This is the heart of the recipe. You want a starter that’s bubbly, active, and has been fed within the last 4-8 hours. A mature starter gives you that complex, tangy flavor that commercial yeast just can’t replicate. If your starter is sluggish, feed it twice before using it in this recipe.
- Warm Water (350g / about 1 ½ cups): The water should be lukewarm—around 80-85°F (27-29°C). Too hot, and you’ll kill the beneficial bacteria and yeast in your starter. Too cold, and the fermentation will take forever. I usually use filtered tap water, as heavily chlorinated water can sometimes inhibit fermentation.
- Extra-Virgin Olive Oil (¼ cup + more for the pan): Don’t skimp here. This isn’t the time for a cheap, flavorless oil. A good, fruity extra-virgin olive oil adds richness to the dough and is crucial for creating that crispy, almost fried bottom crust. I use California Olive Ranch for a reliable, everyday option. You’ll also need a generous amount for coating the pan and drizzling on top.
- Fresh Rosemary (2-3 tablespoons, finely chopped): Fresh is non-negotiable. Dried rosemary just doesn’t have the same aromatic punch. You want the leaves to be bright green and fragrant. I love the look of whole sprigs pressed into the dough, but finely chopped rosemary distributes the flavor more evenly. Do a mix of both if you’re feeling fancy.
- Flaky Sea Salt (1-2 teaspoons, for finishing): This is your final touch, and it makes a huge difference. A good flaky salt like Maldon or Jacobsen provides those little bursts of salinity that contrast beautifully with the rich olive oil and earthy rosemary. Don’t use regular table salt for the topping; it will just dissolve and you’ll miss that textural pop.
- Fine Sea Salt (10g / about 2 teaspoons, for the dough): This is incorporated into the dough to build the base flavor. You want a fine grain so it dissolves evenly.
Equipment Needed
You don’t need a professional bakery setup to make this focaccia, but a few key tools will make the process much smoother.
- Large Mixing Bowl: A sturdy glass or ceramic bowl is ideal. It holds heat better than metal, which can help with consistent fermentation.
- Digital Kitchen Scale: Honestly, this is the most important tool. Baking by weight is far more accurate than using measuring cups, especially with sourdough where hydration ratios are critical. A simple OXO scale will change your baking life.
- Bench Scraper or Dough Cutter: This is invaluable for handling the sticky dough, especially during the folding process. A metal bench scraper is my go-to.
- 13×9-inch Baking Pan: A heavy-duty metal pan is best for heat conduction. Avoid glass or ceramic for this recipe, as they don’t get hot enough to create that crispy bottom crust. I use a USA Pan, and it works perfectly every time.
- Plastic Bowl Scraper: A flexible plastic scraper is great for getting every last bit of dough out of the bowl without making a huge mess.
- Plastic Wrap or a Shower Cap: You need something to cover the dough during its long rises. A reusable shower cap is my secret weapon—it fits perfectly over the bowl and creates a great seal.
Preparation Method
This process is all about patience and gentle handling. Don’t rush it—the long fermentation is what builds that incredible flavor and texture.
- Mix the Dough (10 minutes): In your large mixing bowl, combine the warm water and your active sourdough starter. Whisk them together until the starter is mostly dissolved—it doesn’t need to be perfect. Add the bread flour and the fine sea salt. Use your hands or a sturdy wooden spoon to mix until a shaggy, sticky dough forms. There should be no dry bits of flour left. Cover the bowl with plastic wrap or a damp towel and let it rest for 30 minutes. This is called the “autolyse” period, and it allows the flour to fully hydrate and start developing gluten without any work from you.
- Perform the Stretch and Folds (30 minutes): After the rest, it’s time to strengthen the dough. Wet your hands slightly to prevent sticking. Grab a section of the dough from one side, stretch it up and over the center of the dough. Rotate the bowl a quarter turn and repeat. Do this four times total, so you’ve stretched and folded from all four “sides” of the bowl. The dough will be very sticky and loose at this point—that’s normal. Cover the bowl and let it rest for 15 minutes. Repeat this entire stretch-and-fold process two more times, with 15-minute rests in between. After the third set of folds, the dough should feel noticeably smoother and more elastic.
- Bulk Fermentation (6-8 hours at room temperature, or overnight in the fridge): This is the most important step. Cover the bowl tightly and let it sit at room temperature (around 70-75°F / 21-24°C) for 6 to 8 hours. The dough should nearly double in size, become bubbly on the surface, and smell wonderfully yeasty and tangy. If your kitchen is cold, it will take longer. If it’s hot, it will be faster. For the best flavor, you can do the first 4-6 hours at room temperature and then pop the covered bowl in the fridge overnight (up to 12 hours). The cold fermentation slows down the yeast and allows the bacteria to produce more complex flavors.
- Prepare the Pan and Second Rise (1-2 hours): Generously coat your 13×9-inch baking pan with olive oil—don’t be shy, you want a good 2-3 tablespoons in the bottom. Gently coax the risen dough out of the bowl and into the oiled pan. It will deflate a bit, that’s okay. Now, instead of punching it down, you’re going to coax it to the edges of the pan. Use your fingertips to gently press the dough outwards. If it resists and springs back, let it rest for 10-15 minutes and try again. Once it’s evenly spread in the pan, cover it loosely with plastic wrap and let it rise for another 1 to 2 hours, or until it’s puffy and has risen significantly.
- Dimple and Top (5 minutes): About 20 minutes before you’re ready to bake, preheat your oven to 450°F (232°C) with a rack in the middle. Once the dough has finished its second rise, this is the fun part. Drizzle another 2-3 tablespoons of olive oil over the top. Then, using your fingertips, press deep dimples all over the surface of the dough—right down to the bottom of the pan. Don’t be gentle; those dimples are where the oil pools and creates those crispy, flavorful spots. Sprinkle the finely chopped fresh rosemary evenly over the top, followed by a generous pinch of flaky sea salt.
- Bake (25-30 minutes): Place the pan in the preheated oven and bake for 25-30 minutes. The focaccia is done when the top is a deep golden brown and the bottom is crispy. You can carefully lift an edge with a spatula to check. If it’s not as brown as you’d like, give it another 2-3 minutes. The internal temperature should be around 200-210°F (93-99°C).
- Cool and Serve (15 minutes): Pull the pan out of the oven and let it cool in the pan for 5 minutes. Then, carefully slide the focaccia onto a wire rack. This prevents the bottom from getting soggy. Let it cool for at least 10-15 minutes before slicing. I know it’s tempting to tear into it immediately, but it needs a few minutes to set. Serve warm or at room temperature.
Cooking Tips & Techniques
I’ve made this recipe more times than I can count, and I’ve definitely had my share of failures. Here are the lessons I learned the hard way so you don’t have to.
- Don’t Overthink the Stretch and Folds: I used to be terrified of this step, thinking I’d deflate the dough. But it’s actually quite forgiving. The key is to be gentle but confident. If the dough tears a little, it’s not the end of the world. Just keep going.
- The “Poke Test” for Readiness: After the second rise, lightly poke the dough with a floured finger. If the indentation springs back slowly and leaves a small dimple, it’s ready to bake. If it springs back immediately, it needs more time. If the indentation stays and doesn’t move at all, you’ve over-proofed it (but don’t panic—it will still taste good, just be a little flatter).
- My Biggest Mistake: The first time I made this, I used a glass baking dish. The bottom of the focaccia was pale and soft—nowhere near that crispy, golden crust I was after. The glass just didn’t get hot enough. Switching to a metal pan was a game-changer. It’s a simple swap, but it makes all the difference.
- Multitasking Strategy: Start this recipe in the morning or the night before. The bulk fermentation is the longest step, but it’s also the most hands-off. I usually mix the dough and do the folds while I’m having my morning coffee, then let it rise while I work. The overnight option in the fridge is even easier—you do all the work on day one, and the next day you just shape, rise, and bake.
- Getting Consistent Results: The biggest factor is your starter. If your starter is happy and active, your focaccia will be too. Feed it regularly and keep it at room temperature for a few days before using it in this recipe. A neglected, hungry starter will give you a dense, flat loaf.
Variations & Adaptations
Once you’ve mastered the basic recipe, the possibilities are endless. Here are a few of my favorite twists.
- Garlic and Herb: Before dimpling the dough, mince 3-4 cloves of garlic and let them sit in 2 tablespoons of olive oil for 10 minutes. Drizzle this garlic oil over the dough before dimpling. The garlic roasts into these soft, sweet, savory pockets that are absolutely addictive. You can also add a mix of thyme, oregano, and a little cracked black pepper.
- Caramelized Onion and Gruyère: While the dough is doing its final rise, slowly caramelize 2 large sliced onions in butter and a pinch of salt for about 30 minutes. Once the focaccia is dimpled and oiled, scatter the caramelized onions and a generous handful of grated Gruyère cheese over the top. Bake as directed. The cheese gets all bubbly and the onions add a deep, sweet savoriness.
- Gluten-Free Adaptation: This is a tricky one, but it can be done. Use a high-quality 1-to-1 gluten-free flour blend that contains xanthan gum. You’ll need to increase the water slightly, as gluten-free flours are more absorbent. The dough won’t be as elastic, so you’ll skip the stretch and folds and just mix it well. The texture will be more cake-like and less chewy, but it’s still delicious in its own right.
- Sun-Dried Tomato and Olive: After dimpling, press halved cherry tomatoes or chopped sun-dried tomatoes and pitted Kalamata olives into the dough. The tomatoes burst in the oven, creating little jammy pockets of flavor. It’s like a trip to the Mediterranean in every bite.
Serving & Storage Suggestions
This focaccia is incredibly versatile, and how you serve it can change the whole meal.
- Serving Temperature: It’s fantastic warm from the oven, but I honestly love it just as much at room temperature. The flavors seem to meld and mellow out. If you’re serving it as an appetizer, cut it into squares or long, thin strips and serve with a bowl of good balsamic vinegar and a dish of high-quality olive oil for dipping.
- Perfect Pairings: This focaccia is a natural partner for so many dishes. It’s incredible alongside a hearty minestrone soup or a creamy tomato bisque. Use it as the bread for a prosciutto and mozzarella sandwich. Toast it and top it with a poached egg for a next-level breakfast. Or just eat it plain—it’s that good.
- Storage Instructions: Store leftover focaccia in an airtight container at room temperature for up to 2 days. Do not refrigerate it, as the fridge will dry it out and make the crust go stale. The texture will soften over time, but it’s still delicious.
- Freezer Instructions: This freezes beautifully. Once completely cool, wrap the whole focaccia or individual slices tightly in plastic wrap, then place them in a freezer-safe bag. Freeze for up to 3 months. To reheat, unwrap and place directly on the oven rack at 350°F (175°C) for 10-15 minutes, or until heated through and the crust crisps back up.
- Reheating Methods: The oven is your best friend for reheating. A toaster oven works great for single slices. The microwave will make it soggy and sad—avoid it at all costs. If you’re in a real pinch, you can reheat slices in a dry skillet over medium heat for a minute or two per side.
Nutritional Information & Benefits
While this focaccia is a treat, it does offer some surprising benefits thanks to the sourdough fermentation process.
- Estimated Nutritional Values (per serving, 1/12 of recipe): Calories: 220, Fat: 9g, Carbohydrates: 30g, Fiber: 1g, Protein: 5g, Sodium: 350mg. These are estimates and will vary based on your specific ingredients.
- Health Benefits of Sourdough: The long fermentation process in sourdough breaks down phytic acid, a compound in grains that can interfere with the absorption of minerals like iron, zinc, and magnesium. This makes the nutrients in the flour more bioavailable. Sourdough also has a lower glycemic index than bread made with commercial yeast, meaning it causes a slower, more gradual rise in blood sugar.
- Dietary Considerations: This recipe is naturally vegan and contains no dairy or eggs. It is not gluten-free unless you use a specific gluten-free flour blend. The olive oil provides healthy monounsaturated fats, which are great for heart health.
- Potential Allergens: This recipe contains gluten (from the wheat flour). Always check your ingredient labels if you have other sensitivities.
I love that I can enjoy a slice of this focaccia and feel good about what I’m putting into my body. It’s real food, made with simple ingredients and a little bit of patience. That’s a win in my book.
Conclusion
So there you have it—my go-to recipe for crispy rosemary sourdough focaccia. It started as a frantic, last-minute attempt to bring something to a potluck, and it’s become a staple in my kitchen. I love how forgiving it is, how the ingredients are so simple, and how that first bite—with the crunch, the salt, and the rosemary—never gets old.
I really hope you give this a try. Don’t be intimidated by the sourdough starter or the long rising times. Trust the process, and remember that even if it doesn’t turn out perfectly, it will still be delicious. That’s the beauty of bread—it’s always good. I’d love to hear how it goes for you. Did you try a variation? Did you serve it with something amazing? Drop a comment below and let me know. And if you’re proud of your creation, snap a photo and share it. Happy baking, friends!
Frequently Asked Questions
Can I use active dry yeast instead of a sourdough starter?
Absolutely. If you don’t have a sourdough starter, you can substitute it with 1 teaspoon of active dry yeast dissolved in the warm water. Let it sit for 5 minutes until frothy, then proceed with the recipe. The flavor won’t be as tangy, and you won’t get the same health benefits from long fermentation, but you’ll still get a delicious, fluffy focaccia. You can also try a simple sourdough starter guide if you want to make your own from scratch.
Why is my focaccia dough so sticky?
Don’t worry, that’s totally normal! Sourdough focaccia has a very high hydration level (around 75-80%), which means it’s naturally very wet and sticky. This high moisture content is what creates those big, airy bubbles and a soft crumb. Resist the urge to add more flour. Instead, use wet hands or a wet bench scraper to handle the dough during the stretch and folds.
Can I bake this in a cast iron skillet?
Yes, a 10-inch or 12-inch cast iron skillet works wonderfully. It gets incredibly hot and creates an amazing crispy crust. Just make sure your skillet is well-seasoned and generously coated with olive oil. The baking time might be slightly shorter, so start checking at the 20-minute mark.
How do I know when my sourdough starter is active enough?
An active, healthy starter should at least double in volume within 4-8 hours of being fed. It should look bubbly and frothy on the surface and have a pleasant, slightly tangy, yeasty smell. It should also pass the “float test”—a small spoonful of starter dropped into a glass of water should float. If it sinks, it needs more time or more frequent feedings.
My focaccia didn’t get crispy on the bottom. What went wrong?
This is almost always a pan issue. A glass or ceramic baking dish doesn’t conduct heat as well as a metal pan. Make sure you’re using a heavy-duty metal baking pan. Also, don’t be shy with the olive oil in the pan—a generous layer helps “fry” the bottom of the dough as it bakes. Finally, make sure your oven is fully preheated to 450°F (232°C) before you put the bread in. You can also try placing the pan on the lowest oven rack for the first 15 minutes of baking.
Pin This Recipe!

Crispy Rosemary Sourdough Focaccia with Flaky Sea Salt

This forgiving sourdough focaccia features a shatteringly crisp crust, a pillowy interior, and bursts of rosemary and flaky sea salt. Perfect for entertaining or as a versatile bread for sandwiches and soups.
- Prep Time: 20 minutes
- Cook Time: 25-30 minutes
- Total Time: 8-10 hours (includes fermentation and rising)
- Yield: 12 servings 1x
- Category: Bread
- Cuisine: Italian
Ingredients
- 500g bread flour (about 4 cups)
- 200g active sourdough starter (about 1 cup)
- 350g warm water (about 1 ½ cups, 80-85°F)
- ¼ cup extra-virgin olive oil, plus more for the pan
- 2–3 tablespoons fresh rosemary, finely chopped
- 1–2 teaspoons flaky sea salt (for finishing)
- 10g fine sea salt (about 2 teaspoons, for the dough)
Instructions
- Mix the Dough: In a large mixing bowl, combine warm water and active sourdough starter. Whisk until mostly dissolved. Add bread flour and fine sea salt. Mix with hands or a wooden spoon until a shaggy, sticky dough forms. Cover and let rest for 30 minutes (autolyse).
- Perform Stretch and Folds: Wet your hands. Grab a section of dough, stretch it up and over the center. Rotate the bowl a quarter turn and repeat. Do this four times total. Cover and rest 15 minutes. Repeat the stretch-and-fold process two more times with 15-minute rests. After the third set, the dough should feel smoother and more elastic.
- Bulk Fermentation: Cover the bowl tightly and let it sit at room temperature (70-75°F) for 6-8 hours until nearly doubled in size, bubbly, and fragrant. For best flavor, you can refrigerate overnight after 4-6 hours at room temperature.
- Prepare Pan and Second Rise: Generously coat a 13×9-inch metal baking pan with olive oil (2-3 tablespoons). Gently transfer the dough to the pan. Use fingertips to press it out to the edges. If it resists, let it rest 10-15 minutes and try again. Cover loosely and let rise 1-2 hours until puffy.
- Dimple and Top: Preheat oven to 450°F (232°C). Drizzle 2-3 tablespoons olive oil over the dough. Use fingertips to press deep dimples all over the surface. Sprinkle chopped rosemary and flaky sea salt evenly on top.
- Bake: Place pan in preheated oven and bake for 25-30 minutes until deep golden brown and crispy on the bottom. Internal temperature should be 200-210°F.
- Cool and Serve: Let cool in pan for 5 minutes, then slide onto a wire rack. Cool for at least 10-15 minutes before slicing. Serve warm or at room temperature.
Notes
For best results, use a metal pan (not glass or ceramic) to achieve a crispy bottom crust. The dough is very sticky; resist adding extra flour. If your kitchen is cold, bulk fermentation may take longer. The overnight cold fermentation option enhances flavor.
Nutrition
- Serving Size: 1/12 of recipe
- Calories: 220
- Sodium: 350
- Fat: 9
- Saturated Fat: 1.5
- Carbohydrates: 30
- Fiber: 1
- Protein: 5
Keywords: sourdough focaccia, rosemary focaccia, crispy focaccia, homemade bread, sourdough bread, Italian bread, easy focaccia


