Love this? Save it for later!
Share the inspiration with your friends
I was elbow-deep in a sink full of kale last Tuesday when the smell hit me. Not the kale—that just smelled like dirt and regret. No, it was the sharp, sinus-clearing sting of vinegar and horseradish wafting from my neighbor’s open kitchen window. And just like that, I was twenty-three again, standing in a tiny, cluttered apartment kitchen with my college roommate, Maria, who was convinced she could cure our shared cold with a concoction that looked like swamp water and smelled like a battle. She called it her “magic elixir,” and honestly, I thought she’d lost her mind. But after one hesitant shot of that fiery, golden liquid, I could breathe through my nose for the first time in three days. That memory, that specific feeling of a warm, prickly heat spreading from my throat to my fingertips, is exactly what I was chasing when I started making these Zesty Fire Cider Immune Shots with Ginger and Turmeric.
I mean, let’s be real—I was skeptical for years. I figured it was just trendy wellness stuff, you know? But then winter hit, and I was on my third cold of the season. I was desperate. So I texted Maria, who now lives three states away, and asked for her “recipe.” She sent back a voice memo that was mostly her laughing and saying, “Just throw everything spicy in a jar and wait.” Not exactly helpful. So I did what any reasonable person would do: I went down a rabbit hole of research, combining old folk remedies with what I actually had in my pantry. The result is this version. It’s not Maria’s swamp water. It’s better. It’s balanced. It’s the kind of thing you actually look forward to taking, even when you’re not sick. And maybe you’ve been there—staring at a pharmacy aisle full of neon syrups, wondering if there’s a simpler, more natural way to kick something before it really takes hold.
This recipe is my answer. It’s a little bit of a science experiment, a little bit of a love letter to my friend’s crazy ideas, and a whole lot of ginger and turmeric. It’s the reason I haven’t had a cold last more than two days in the past three winters. And it all started with a neighbor’s open window and a memory I couldn’t let go of.
Why You’ll Love This Recipe
I’ve tested this recipe about a dozen times. I’ve made it with too much horseradish (don’t do it—you’ll cry for an hour) and not enough honey (sour, sad, and completely undrinkable). This version? It’s the Goldilocks of fire cider. It’s potent enough to feel like it’s working, but tasty enough that you won’t dread your daily dose.
- Quick & Easy: The active prep time is only about 15 minutes. The hard part is literally just waiting for it to steep for a few weeks. Set it and forget it.
- Simple Ingredients: No weird supplements or hard-to-find powders. You probably already have most of these in your fridge or spice cabinet.
- Perfect for Cold Season: This is my go-to for the first tickle of a sore throat, a stuffy nose, or just feeling run down. It’s like a security blanket in a shot glass.
- Crowd-Pleaser: I know it sounds weird, but everyone who tries it at my house asks for the recipe. Even my dad, who is the pickiest eater on the planet, takes a shot every morning when he visits.
- Unbelievably Delicious: The combo of spicy ginger, earthy turmeric, and sweet apple cider vinegar with a touch of raw honey is honestly addictive. It’s a flavor explosion that wakes up your whole mouth.
What makes my version different? It’s the balance. Most recipes online are either too harsh or too sweet. I spent a lot of time tweaking the ratios so the ginger and turmeric shine without being overpowered by the vinegar. Plus, I add a secret weapon: a pinch of black pepper. It’s not just for flavor—it actually helps your body absorb the curcumin in the turmeric. That’s a little chef’s trick I picked up from a nutritionist friend. This isn’t just another wellness shot. It’s the one that will actually make you feel better, not just make you pucker.
Honestly, this recipe is comfort for your immune system. It’s the kind of thing that makes you feel proactive and in control. No more waiting to get sick—you’re building a little fortress of flavor, one zesty shot at a time.
What Ingredients You Will Need
This recipe uses simple, whole ingredients to create a powerful and flavorful immune booster. The beauty of fire cider is its flexibility, but this specific combination of ingredients has been tested to deliver the best balance of heat, tang, and sweetness.
- Apple Cider Vinegar (Raw, Unfiltered): This is the base of your fire cider. Look for a brand like Bragg’s or Vermont Village that contains the “mother”—that cloudy stuff is full of good bacteria and enzymes. It’s what gives the cider its probiotic punch. (The mother is key for gut health!)
- Fresh Ginger Root: You’ll need about a 4-inch piece. Don’t bother peeling it too carefully—just give it a good scrub. The skin has tons of flavor and nutrients. I slice mine into thin coins so the vinegar can really penetrate. (Adds a warm, spicy kick and helps with nausea.)
- Fresh Turmeric Root: Another 4-inch piece. Fair warning: this stuff stains everything it touches a bright, sunny yellow. Use a cutting board you don’t mind getting dyed, or line it with parchment paper. (The star anti-inflammatory ingredient.)
- Horseradish Root (Fresh): A 2-inch piece, peeled and chopped. This is the “fire” in the cider. It’s potent, so don’t go overboard unless you really love the burn. (Clears your sinuses like nothing else.)
- Onion (Yellow or Red): Half a medium onion, roughly chopped. I know, it sounds weird in a drink. But trust me, it adds a subtle savory depth that rounds out all the sharp flavors. (Rich in quercetin, a natural antihistamine.)
- Garlic Cloves: 4-5 cloves, smashed with the flat side of your knife. No need to chop them finely—smashing releases the good stuff. (A classic immune booster with allicin.)
- Jalapeño or Serrano Pepper: One small pepper, sliced in half. Leave the seeds in if you want extra heat, or remove them for a milder kick. (Adds a fresh, vegetal spice.)
- Raw Honey: 2-3 tablespoons, or to taste. This is crucial for balancing the acidity and heat. Don’t use processed honey—raw honey has its own antibacterial properties and a more complex flavor. (Soothes the throat and adds natural sweetness.)
- Whole Black Peppercorns: 1 teaspoon. This is my non-negotiable addition. Piperine in black pepper significantly boosts the bioavailability of curcumin from the turmeric. (A tiny but mighty ingredient.)
- Optional Add-ins: A sprig of fresh rosemary, a few slices of lemon, or a cinnamon stick can add another layer of flavor. I sometimes add a star anise in the winter for a warming, licorice-like note.
Equipment Needed
You don’t need any fancy gadgets for this. That’s part of what I love about it. It’s a very low-tech, back-to-basics kind of recipe.
- A Large Glass Jar (Quart Size): A 32-ounce Mason jar or a repurposed pickle jar works perfectly. Make sure it’s thoroughly washed and dried. Avoid plastic, as the vinegar can leach chemicals over time.
- A Sharp Knife and Cutting Board: You’ll be doing a fair amount of chopping. A good chef’s knife makes quick work of the ginger and turmeric. (Fair warning: turmeric will stain your cutting board. I have a specific plastic board I use just for it.)
- A Wooden Spoon or Chopstick: For stirring and pressing down the ingredients in the jar. Metal can react with the vinegar, so stick with wood or silicone.
- A Fine-Mesh Strainer or Cheesecloth: For straining the cider after it’s done steeping. Cheesecloth gives you a clearer liquid, but a fine-mesh strainer works fine for a slightly cloudier result.
- A Funnel: Makes transferring the strained cider into smaller bottles so much less messy. Trust me on this one.
- Small Glass Bottles or Jars for Storage: I use 4-ounce swing-top bottles. They look cute on the counter and are the perfect size for a daily shot.
Budget-friendly tip: Don’t run out and buy a fancy fermentation jar. A clean, quart-sized pasta sauce jar is perfect. Just make sure you wash it in hot, soapy water and dry it completely before using.
Preparation Method
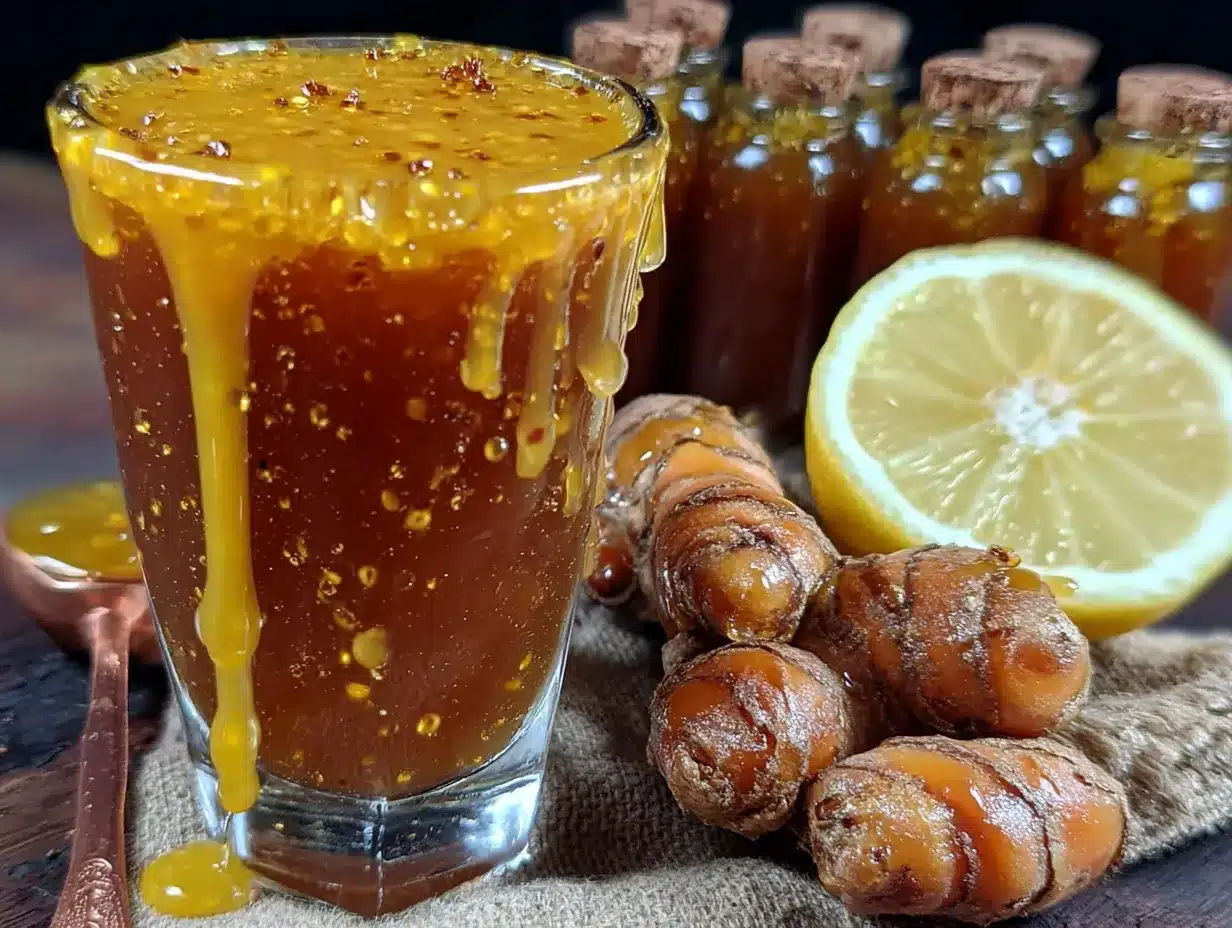
Making fire cider is more about patience than skill. The actual hands-on time is minimal, but the waiting is the hardest part. Here’s exactly how I do it.
- Prep Your Ingredients (10 minutes): Give your ginger and turmeric a good scrub under running water. You don’t need to peel them, just get the dirt off. Slice them into thin coins, about 1/8-inch thick. Peel the horseradish root and chop it into small chunks. Smash your garlic cloves with the flat side of your knife. Roughly chop the half onion. Slice the jalapeño in half lengthwise.
- Layer Everything in the Jar (5 minutes): Grab your clean quart-sized jar. Start layering in the solid ingredients. I like to put the ginger and turmeric on the bottom, then the horseradish, garlic, onion, and jalapeño on top. Add the whole black peppercorns. Don’t pack it down too tightly—you want there to be space for the vinegar to flow around everything.
- Add the Apple Cider Vinegar (2 minutes): Pour the raw, unfiltered apple cider vinegar over the ingredients until they are completely submerged. Leave about an inch of headspace at the top of the jar. Use a wooden spoon or chopstick to gently poke around and release any air bubbles. You want the vinegar to get into every nook and cranny.
- Seal and Shake (1 minute): Put the lid on the jar tightly. Give it a good, vigorous shake. You’ll see the colors start to swirl together immediately. Label the jar with the date.
- The Waiting Game (2-4 weeks): This is the hardest part. Store the jar in a cool, dark place like a pantry or a cabinet. I keep mine on the kitchen counter because I like looking at it, but make sure it’s out of direct sunlight. Shake the jar once a day, every day. This helps redistribute the flavors and prevents any mold from forming on the top. (I’ve never had mold, but the daily shake is a good habit.)
- Taste and Adjust (Day 14): After two weeks, start tasting your cider. Use a clean spoon to dip in and try it. Is it spicy enough? If not, let it go another week. Is it too vinegary? You can add a bit more honey at the end. I usually let mine steep for a full three weeks. The flavor gets deeper and more complex the longer it sits.
- Strain and Bottle (15 minutes): When it tastes perfect to you, it’s time to strain. Place your fine-mesh strainer or cheesecloth over a large bowl or measuring cup. Pour the entire contents of the jar through the strainer. Let it drip for a few minutes. Don’t press on the solids too hard, or you’ll get a cloudy liquid. (I save the leftover solids and use them in salad dressings or marinades—they still have tons of flavor!)
- Sweeten and Store (5 minutes): Once strained, stir in your raw honey. Start with 2 tablespoons, taste, and add more if you like it sweeter. The honey will dissolve more easily if the cider is at room temperature. Use the funnel to pour the finished fire cider into your small bottles. Store them in the refrigerator. It will keep for up to a year, but honestly, you’ll probably use it up long before then.
A personal note on timing: I once forgot about a batch for six weeks. I was scared it would be ruined, but it was actually the best batch I ever made. So don’t stress if life gets in the way. The flavors just get more intense.
Cooking Tips & Techniques
I’ve made a lot of mistakes with this recipe so you don’t have to. Here are the biggest lessons I’ve learned.
Don’t skimp on the quality of your vinegar. I tried making this once with cheap, distilled white vinegar because it was all I had. It was a disaster—harsh, one-dimensional, and totally unappealing. The raw, unfiltered apple cider vinegar is non-negotiable. It’s the backbone of the whole recipe.
The “smash, don’t chop” rule for garlic. Smashing the garlic cloves releases more of the allicin, which is the compound responsible for its immune-boosting properties. Chopping is fine, but smashing is better. Plus, it’s easier to fish out the big pieces when you strain it.
Patience is a virtue, but so is tasting. Don’t just set a timer and forget it. Your kitchen’s temperature and the freshness of your ingredients will affect how quickly the flavors develop. Start tasting after two weeks. I’ve had batches that were perfect at 18 days and others that needed a full month. Your taste buds are the best guide.
One failure I’ll never forget: I got overexcited and added a whole habanero pepper to a batch. I thought, “More heat = more better!” I was wrong. So, so wrong. The resulting cider was so spicy it was actually painful to drink. I ended up using it as a base for a spicy chili instead of taking it as a shot. Lesson learned: start mild and adjust next time.
Multitasking tip: While you’re chopping the ginger and turmeric, put your jar and lid in the dishwasher or wash them by hand. That way, everything is clean and ready to go when you’re done prepping. It saves a little bit of time and keeps your workflow smooth.
Variations & Adaptations
This recipe is incredibly forgiving. Here are a few ways I’ve changed it up over the years.
Milder Version for Sensitive Stomachs: If you find the horseradish or jalapeño too intense, simply reduce the amount or leave them out entirely. You can also swap the jalapeño for a bell pepper for a tiny bit of flavor without the heat. The ginger and turmeric will still do the heavy lifting for your immune system.
Sweet and Citrusy Twist: Add the zest and juice of one lemon and one orange to the jar along with the other ingredients. This gives the final cider a brighter, more refreshing flavor. I love this version in the summer when I want something that feels less like a medicine and more like a spicy lemonade.
Warming Winter Spice Blend: Add a cinnamon stick, 2 whole cloves, and a star anise to the jar. This makes the fire cider taste incredibly cozy and festive. It’s my go-to batch for the holiday season. The spices infuse beautifully with the ginger and turmeric.
Dietary Adaptations: This recipe is naturally gluten-free, dairy-free, and vegan if you swap the honey for maple syrup or agave nectar. I’ve tried it with maple syrup, and it gives it a slightly earthier, more caramel-like sweetness that works surprisingly well.
My personal favorite variation: I once added a handful of fresh echinacea flowers and leaves from my garden to a batch. It felt very “witchy” and medicinal. The flavor was a bit more floral and herbal. I can’t say for sure if it was more effective, but it made me feel very connected to the process.
Serving & Storage Suggestions
This fire cider is best served as a daily wellness shot. I take mine first thing in the morning, before breakfast. It wakes up my digestion and gives me a little burst of energy.
Serving Temperature: I prefer it straight from the fridge. The cold temperature helps mellow the initial burn a little bit. Some people like to let it come to room temperature first, which can make the flavors more pronounced. Try it both ways and see what you prefer.
How to Take It: Use a 1-ounce shot glass. Take it like a shot—quick and all at once. Follow it with a glass of water if the burn is too intense. You can also mix a tablespoon into a glass of sparkling water with a squeeze of lemon for a refreshing, spicy soda. (I call this a “fire soda” and it’s surprisingly good.)
Storage Instructions: Store your finished fire cider in the refrigerator. It will keep for 6 to 12 months. The flavor will continue to mellow and deepen over time. I’ve found it’s at its best between the 1-month and 3-month mark.
Reheating (Yes, You Can!): If you feel a cold coming on, I like to warm up 2 tablespoons of fire cider in a small saucepan with a cup of hot water and a squeeze of lemon. It makes a kind of spicy, soothing tea that’s perfect for sore throats. Don’t boil it, just warm it gently to preserve the raw honey’s benefits.
How Flavors Develop: Freshly strained fire cider is bright, sharp, and very vinegary. After a week in the fridge, the flavors start to marry and mellow. The honey integrates fully, and the heat from the ginger and horseradish becomes more rounded. It just gets better with time.
Nutritional Information & Benefits
While I’m not a doctor or a nutritionist, I can share what I’ve learned from my own research and experience. A 1-ounce shot of this fire cider is packed with beneficial compounds.
Estimated Nutritional Values (per 1 oz shot): Calories: 15-20, Carbohydrates: 4g, Sugars: 3g (from honey). It’s very low in calories and contains no fat or protein.
Key Health Benefits:
- Ginger: Known for its anti-nausea and anti-inflammatory properties. Great for settling an upset stomach.
- Turmeric (with Black Pepper): Curcumin is a powerful antioxidant. The black pepper makes it significantly more absorbable by your body.
- Garlic and Onion: Both contain compounds that support the immune system and have natural antimicrobial properties.
- Apple Cider Vinegar: May help with blood sugar regulation and gut health thanks to the probiotics from the “mother.”
- Horseradish: A natural decongestant. It’s fantastic for clearing sinuses.
Dietary Considerations: This recipe is naturally gluten-free, dairy-free, and vegan-friendly (if using maple syrup). The main potential allergen is honey, so if you’re allergic to bee products, use a different sweetener.
I personally love that this recipe lets me take a proactive role in my health. It’s not a cure-all, but it’s a delicious, natural way to support my body, especially during the winter months.
Conclusion
This Zesty Fire Cider Immune Shots with Ginger and Turmeric recipe is more than just a wellness trend. It’s a return to simple, old-fashioned kitchen medicine. It’s about taking a little time to prepare something that will support you through the sniffly season. It’s about the satisfaction of making something powerful with your own two hands.
I honestly look forward to my morning shot now. It’s a small ritual that makes me feel strong and prepared. And the best part? You can tweak it endlessly to make it your own. Add more honey if you like it sweet. Throw in an extra clove of garlic if you feel something coming on. Make it yours. That’s the whole point.
I’d love to hear how your batch turns out! Did you add any fun ingredients? Did it help you kick a cold? Drop a comment below and let me know. And if you found this helpful, please share it with a friend who could use a little immune support. Happy brewing, and stay healthy out there!
Frequently Asked Questions
How long does it take for the fire cider to be ready?
The minimum steeping time is 2 weeks, but I find 3 to 4 weeks gives the best, deepest flavor. Start tasting it after 14 days to see if it’s strong enough for you.
Can I use dried ginger and turmeric instead of fresh?
You can, but the flavor will be significantly different and less vibrant. Fresh roots have a bright, spicy kick that dried powders just can’t replicate. I strongly recommend using fresh for the best results.
Do I have to shake the jar every day?
It’s not strictly necessary, but it helps distribute the flavors and prevents any ingredients from sitting dry at the top of the jar. It’s a good habit to get into, and it only takes a second.
Is this safe for children?
In very small amounts, it can be, but use your judgment. The heat from the horseradish and jalapeño can be intense for little ones. I’d suggest starting with just a few drops mixed into juice or water for older children, and always consult with your pediatrician first.
Can I reuse the leftover solids after straining?
Absolutely! Don’t throw them away. They are still packed with flavor. I chop them up finely and mix them into salad dressings, marinades for chicken or pork, or even stir them into a pot of soup for an extra kick. They’re also great on a cheese board with some crackers.
Pin This Recipe!

Best Zesty Fire Cider Immune Shots with Ginger and Turmeric

A balanced, potent, and delicious immune-boosting fire cider made with fresh ginger, turmeric, horseradish, and raw apple cider vinegar. This easy, DIY wellness shot is perfect for cold season and can be customized to your taste.
- Prep Time: 15 minutes
- Cook Time: 0 minutes
- Total Time: 15 minutes (plus 2-4 weeks steeping)
- Yield: About 2 cups (16 servings of 1 oz each) 1x
- Category: Wellness Shot
- Cuisine: American
Ingredients
- 2 cups raw, unfiltered apple cider vinegar (e.g., Bragg’s)
- 4-inch piece fresh ginger root, scrubbed and sliced into thin coins
- 4-inch piece fresh turmeric root, scrubbed and sliced into thin coins
- 2-inch piece fresh horseradish root, peeled and chopped
- 1/2 medium yellow or red onion, roughly chopped
- 4–5 garlic cloves, smashed
- 1 small jalapeño or serrano pepper, sliced in half (seeds in for more heat, removed for milder)
- 2–3 tablespoons raw honey (or to taste)
- 1 teaspoon whole black peppercorns
- Optional: fresh rosemary sprig, lemon slices, cinnamon stick, star anise
Instructions
- Prep your ingredients: Scrub ginger and turmeric (no need to peel), slice into thin coins. Peel and chop horseradish. Smash garlic cloves. Roughly chop onion. Slice jalapeño in half lengthwise.
- Layer everything in a clean quart-sized glass jar: start with ginger and turmeric, then add horseradish, garlic, onion, jalapeño, and whole black peppercorns. Do not pack too tightly.
- Pour apple cider vinegar over the ingredients until completely submerged, leaving about 1 inch of headspace. Use a wooden spoon or chopstick to release air bubbles.
- Seal the jar tightly and shake vigorously. Label with the date.
- Store in a cool, dark place (like a pantry) for 2-4 weeks. Shake the jar once daily.
- After 2 weeks, start tasting the cider. Let it steep longer if you want a stronger flavor (up to 4 weeks or more).
- When the flavor is perfect, strain the cider through a fine-mesh strainer or cheesecloth into a large bowl or measuring cup. Do not press on the solids.
- Stir in raw honey to taste (start with 2 tablespoons). Use a funnel to pour the finished fire cider into small glass bottles or jars.
- Store in the refrigerator. It will keep for up to 1 year.
Notes
Start tasting after 2 weeks; steeping time can vary. For a milder version, reduce or omit horseradish and jalapeño. The leftover solids can be used in salad dressings, marinades, or soups. Store in the refrigerator for up to 1 year.
Nutrition
- Serving Size: 1 oz shot
- Calories: 1520
- Sugar: 3
- Sodium: 5
- Carbohydrates: 4
Keywords: fire cider, immune shots, ginger, turmeric, apple cider vinegar, wellness, cold remedy, homemade, natural


