Love this? Save it for later!
Share the inspiration with your friends
The power went out halfway through a chilly December afternoon, and there I was, staring at a half-rolled dough and a kitchen filled with the soft hum of interrupted holiday plans. Honestly, it felt like the universe was telling me to slow down. But with a box of cookie cutters and a bag of powdered sugar waiting patiently, I decided to keep going by candlelight. That’s how these Perfect Iced Sugar Cookie Stars with Royal Icing came to be—an unplanned, slightly messy, but utterly magical baking moment that turned a blackout into a new holiday tradition.
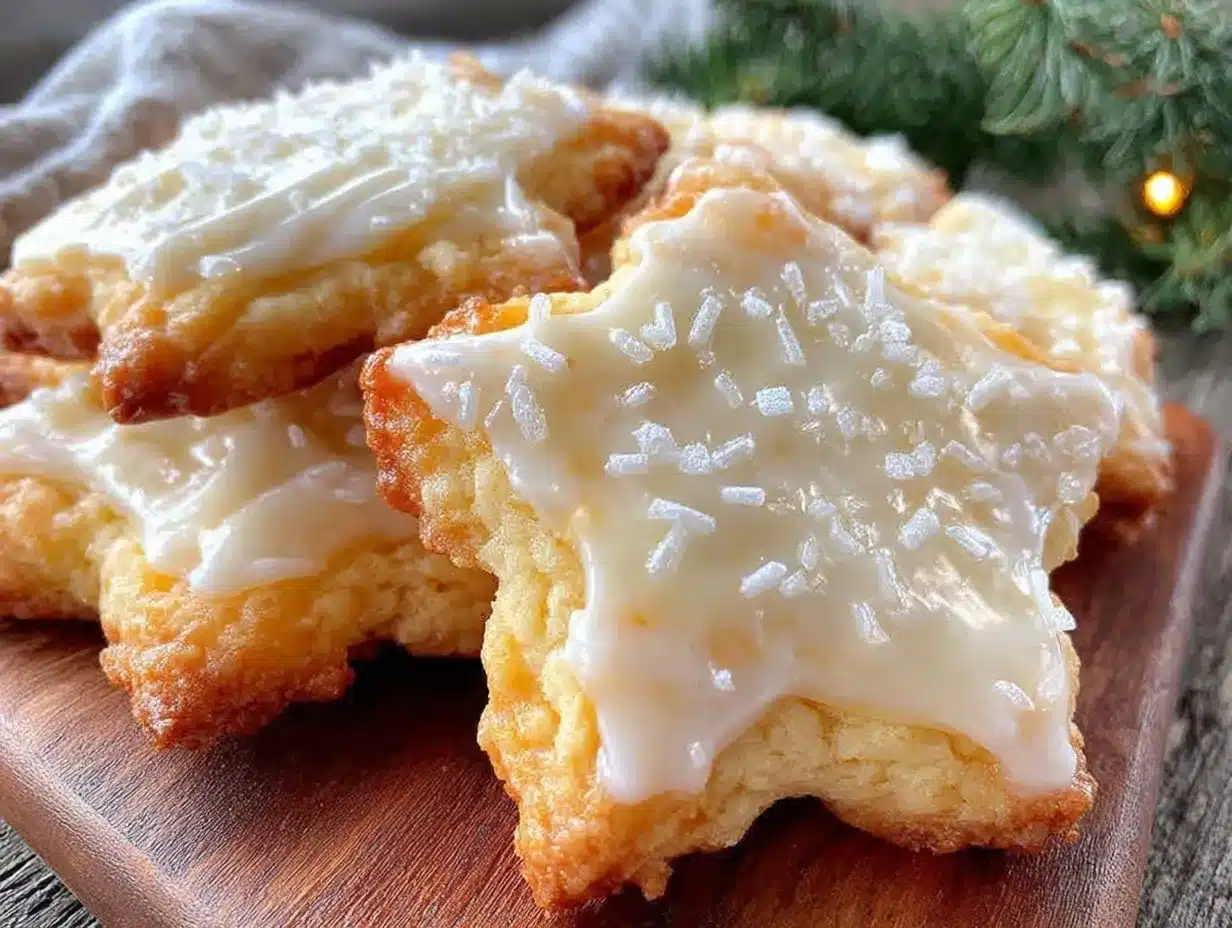
You know that feeling when a simple cookie becomes more than just a sweet treat? These star-shaped sugar cookies, iced with just the right royal icing, have that effect. They’re crisp yet tender, with a smooth, glossy icing that sets just right. I remember forgetting the vanilla extract initially, then adding it late and wondering if it would ruin everything. Spoiler: it didn’t. It made the flavor even more interesting—like a little holiday surprise in every bite.
Maybe you’ve been there—trying to bake something perfect for the holidays but juggling time, interruptions, or unexpected kitchen chaos. That’s what makes this recipe special. It’s forgiving, straightforward, and yields those picture-perfect iced sugar cookie stars everyone loves. And honestly, once you make these, they’ll find their way onto your cookie trays year after year.
Why You’ll Love This Recipe
After countless trials and a few frosting mishaps, I’ve landed on this recipe that truly feels like the best version of iced sugar cookie stars for the holidays. It’s been tested in my kitchen with guests ranging from picky kids to dessert-loving adults, and it always brings smiles. Here’s why this recipe stands out:
- Quick & Easy: Comes together in under an hour—perfect when holiday prep piles up or when you need a last-minute festive treat.
- Simple Ingredients: Uses pantry staples like butter, sugar, and vanilla, so no special trips required.
- Perfect for Holiday Baking: Ideal for cookie exchanges, seasonal parties, or cozy nights in with a cup of cocoa.
- Crowd-Pleaser: The star shape and shiny royal icing make these cookies irresistible to both kids and grown-ups.
- Unbelievably Delicious: The balance between a tender cookie base and smooth icing creates a comforting yet elegant flavor.
What really makes this recipe different is the royal icing technique I use—it sets just right, not too hard or too sticky, making decorating easy (even if you’re not a pro). Plus, the dough handles beautifully, so rolling and cutting stars won’t feel like a chore. Honestly, this isn’t just another sugar cookie recipe; it’s the one that makes you pause and savor that first festive bite.
What Ingredients You Will Need
This recipe uses simple, wholesome ingredients to deliver bold flavor and satisfying texture without the fuss. Most of these are pantry staples, with room for easy swaps if you need them.
- For the Sugar Cookie Dough:
- 2 ¾ cups (345 g) all-purpose flour (I prefer King Arthur for consistent results)
- 1 teaspoon baking powder
- ½ teaspoon salt
- 1 cup (227 g) unsalted butter, softened (use unsalted to control saltiness)
- 1 ½ cups (300 g) granulated sugar
- 1 large egg, room temperature
- 1 tablespoon pure vanilla extract (don’t skip this—it adds a lovely warmth)
- 2 tablespoons milk (whole or 2%)
- For the Royal Icing:
- 3 cups (360 g) powdered sugar, sifted
- 2 large egg whites or 4 tablespoons meringue powder mixed with 6 tablespoons water
- 1 teaspoon lemon juice (helps the icing set and adds a slight tang)
- Gel food coloring (optional, for vibrant colors)
If you want a gluten-free option, swapping the all-purpose flour for a blend like Bob’s Red Mill gluten-free flour works well. For dairy-free, coconut oil or vegan butter can replace the butter, though texture might be slightly different. I recommend using meringue powder for royal icing if you have little ones around, just for safety and ease.
Equipment Needed
- Mixing bowls (preferably one large and one small)
- Electric mixer or stand mixer (makes creaming butter a breeze)
- Rolling pin (a smooth, medium-weight one works best for even dough thickness)
- Star-shaped cookie cutters (sizes from 2 to 4 inches are great for variety)
- Baking sheets lined with parchment paper or silicone mats
- Cooling racks (to cool cookies evenly without sogginess)
- Piping bags with fine tips or squeeze bottles for icing application
- Sifter for powdered sugar (helps avoid lumps in icing)
If you don’t have a stand mixer, a good hand mixer or even a sturdy whisk will do. For rolling, if you’re short on space, a clean wine bottle works as a substitute for a rolling pin—just make sure it’s clean and dry! Silicone mats are my favorite for baking because of easy cleanup and consistent baking, but parchment paper is a budget-friendly alternative that does the job well.
Preparation Method
- Mix Dry Ingredients: In a medium bowl, whisk together 2 ¾ cups (345 g) all-purpose flour, 1 teaspoon baking powder, and ½ teaspoon salt. Set aside. This takes about 5 minutes and prevents clumps.
- Cream Butter and Sugar: Using an electric mixer, beat 1 cup (227 g) unsalted butter (softened) with 1 ½ cups (300 g) granulated sugar until light and fluffy—about 3 to 4 minutes. The texture should be pale and airy, which means you’ve added enough air for tender cookies.
- Add Egg and Vanilla: Beat in 1 large egg and 1 tablespoon vanilla extract until fully combined. If you forget the vanilla like I did once, don’t panic—add it now and mix well.
- Combine Wet and Dry: Gradually add the flour mixture to the wet ingredients, alternating with 2 tablespoons milk, starting and ending with the flour. Mix just until combined—don’t overmix or the cookies will be tough. The dough should feel soft but not sticky. This step takes about 5 minutes.
- Chill the Dough: Divide the dough into two disks, wrap in plastic wrap, and refrigerate for at least one hour. This helps the dough firm up and makes rolling easier.
- Preheat Oven: Set your oven to 350°F (175°C) about 20 minutes before baking.
- Roll and Cut: On a lightly floured surface, roll one dough disk to about ¼ inch (6 mm) thickness. Use star cutters to cut shapes, transfer them to a parchment-lined baking sheet using a spatula. Gather scraps, re-roll, and repeat.
- Bake: Bake cookies for 8 to 10 minutes or until edges just begin to turn golden. Watch carefully—overbaking dries them out. Cool on baking sheets for 5 minutes, then move to wire racks to cool completely.
- Prepare Royal Icing: Beat 3 cups (360 g) sifted powdered sugar with 2 large egg whites and 1 teaspoon lemon juice until smooth and thick but still pipeable (about 7 minutes). For safer alternative, use meringue powder. Add gel food coloring if desired.
- Ice the Cookies: Transfer icing to piping bags or squeeze bottles. Outline each cookie, then flood the inside with thinner icing. Use a toothpick to spread icing evenly and pop air bubbles. Let dry completely—overnight is best—for that perfect glossy finish.
Pro tip: If your icing gets too stiff, add a few drops of water at a time until it reaches the right consistency. If it’s too runny, add more powdered sugar. And hey, don’t stress if your first few cookies aren’t perfect—practice makes perfect (and they still taste amazing!).
Cooking Tips & Techniques
Some things I’ve learned the hard way while making these iced sugar cookie stars:
- Don’t skip chilling the dough. It prevents spreading, keeps those star shapes sharp, and makes rolling less sticky.
- Use room temperature ingredients. Butter and eggs mix better, giving you a smoother dough and consistent texture.
- Roll dough evenly. Uneven dough leads to uneven baking. Use rolling pin guides or ruler for uniform thickness.
- Keep an eye on baking time. Cookies can go from perfect to overdone in 30 seconds, so watch them closely.
- Practice your icing consistency. Too thick icing is hard to spread; too thin will run off the cookie edges. I find a consistency like thick honey works best for flooding.
- Let icing dry completely. This is key for stacking or packaging cookies without smudging.
- Use gel food coloring, not liquid. It won’t change icing consistency and produces vibrant colors.
One time, I tried to rush the icing drying process by putting cookies in the fridge. Big mistake! It caused condensation and made the icing tacky. So, patience really does pay off. Also, multitasking by prepping icing while cookies bake saves loads of time.
Variations & Adaptations
- Flavor Twists: Add almond extract instead of vanilla for a subtle nutty note. You can also mix in lemon or orange zest into the dough for a fresh citrus twist.
- Dietary Adjustments: Swap all-purpose flour for a gluten-free blend. Use dairy-free butter and plant-based milk to make these vegan-friendly (just use aquafaba or meringue powder in royal icing).
- Seasonal Themes: Change cookie cutters and icing colors to match other holidays—pumpkins and orange icing for Halloween, hearts and pink icing for Valentine’s Day.
- Decorating Styles: Instead of full flooding, try just outlining the stars and adding sprinkles or edible glitter before icing sets for a sparkly effect.
- Personal Favorite: I once added tiny edible gold leaf flakes to freshly iced cookies for a festive touch—fancy but surprisingly easy!
You can also bake these as mini stars on skewers for edible holiday centerpieces or stack them with layers of frosting for a cookie cake. The recipe adapts well to many creative ideas.
Serving & Storage Suggestions
Serve these iced sugar cookie stars at room temperature for the best texture and flavor. They pair beautifully with hot chocolate, mulled cider, or a strong cup of coffee to balance sweetness.
Store cookies in an airtight container at room temperature for up to 5 days. If you want to keep them longer, freezing works well—just layer parchment paper between cookies and thaw at room temperature before serving. Avoid refrigerating as it can soften the icing and cookie texture.
Reheat gently in a warm oven (around 200°F / 93°C) for 5 minutes if you want a freshly baked feel. Over time, the flavors meld, making the cookies taste even better after a day or two.
Nutritional Information & Benefits
Each iced sugar cookie star contains approximately 150-180 calories, with about 6 grams of fat and 25 grams of carbohydrates. While these cookies are a treat, using real butter and fresh ingredients means you’re enjoying quality flavors without artificial additives.
The egg whites in royal icing provide a protein boost, and the lemon juice adds a fresh, natural component. For those watching gluten, this recipe can be modified easily to suit gluten-free diets. Just keep in mind the sugar content, especially if you’re sharing with little ones or mindful eaters.
From a wellness perspective, baking at home like this lets you control ingredients and create joyful moments—sometimes the best benefit of all.
Conclusion
If you’re looking for a holiday cookie recipe that balances tradition with ease, these Perfect Iced Sugar Cookie Stars with Royal Icing are your new go-to. They’re forgiving enough for beginners but satisfying for experienced bakers who appreciate a flawless finish.
Feel free to tweak the flavors or colors to make them your own—after all, holidays are about making memories and sharing joy. For me, these cookies represent those small, sweet moments of calm amid the holiday rush.
Give this recipe a try, and let me know how your stars came out! I’d love to hear about your decorating adventures or any creative spins you put on these classic treats. Happy baking and happy holidays!
Frequently Asked Questions
Can I make the cookie dough ahead of time?
Yes! You can prepare the dough up to 3 days in advance and keep it wrapped tightly in the fridge. Just let it warm slightly before rolling.
How long does royal icing take to dry?
Typically, royal icing dries to the touch in 1-2 hours but should be allowed to set overnight for best results.
Can I use powdered egg whites instead of fresh eggs?
Absolutely. Meringue powder is a safe and convenient substitute that also helps the icing last longer without refrigeration.
What if my cookies spread too much while baking?
This usually means the dough was too warm or not chilled enough. Make sure to chill the dough for at least an hour before cutting and baking.
Do I have to use gel food coloring?
Gel colors are recommended because they don’t thin the icing and give vibrant hues. Liquid food coloring can work but may affect icing consistency.
For a festive baking companion, you might enjoy trying my classic Christmas cutout cookies or the easy vanilla glaze glazed cookies—both crowd favorites during the holiday season.
Pin This Recipe!

Perfect Iced Sugar Cookie Stars

These star-shaped sugar cookies are crisp yet tender, iced with smooth royal icing that sets perfectly for a glossy finish. A forgiving and straightforward holiday baking recipe that yields picture-perfect cookies everyone loves.
- Prep Time: 20 minutes
- Cook Time: 10 minutes
- Total Time: 1 hour 30 minutes
- Yield: 24 cookies 1x
- Category: Dessert
- Cuisine: American
Ingredients
- 2 ¾ cups (345 g) all-purpose flour
- 1 teaspoon baking powder
- ½ teaspoon salt
- 1 cup (227 g) unsalted butter, softened
- 1 ½ cups (300 g) granulated sugar
- 1 large egg, room temperature
- 1 tablespoon pure vanilla extract
- 2 tablespoons milk (whole or 2%)
- 3 cups (360 g) powdered sugar, sifted
- 2 large egg whites or 4 tablespoons meringue powder mixed with 6 tablespoons water
- 1 teaspoon lemon juice
- Gel food coloring (optional)
Instructions
- Mix dry ingredients: whisk together flour, baking powder, and salt in a medium bowl; set aside.
- Cream butter and sugar: beat softened butter with granulated sugar until light and fluffy, about 3 to 4 minutes.
- Add egg and vanilla: beat in egg and vanilla extract until fully combined.
- Combine wet and dry ingredients: gradually add flour mixture alternating with milk, starting and ending with flour; mix just until combined.
- Chill the dough: divide dough into two disks, wrap in plastic wrap, and refrigerate for at least one hour.
- Preheat oven to 350°F (175°C) about 20 minutes before baking.
- Roll and cut: roll one dough disk to about ¼ inch thickness on a lightly floured surface; cut star shapes and transfer to parchment-lined baking sheet.
- Bake cookies for 8 to 10 minutes until edges begin to turn golden; cool on baking sheets for 5 minutes then transfer to wire racks to cool completely.
- Prepare royal icing: beat powdered sugar with egg whites and lemon juice until smooth and thick but pipeable, about 7 minutes; add gel food coloring if desired.
- Ice the cookies: outline each cookie with icing, flood the inside with thinner icing, spread evenly with a toothpick, and let dry completely overnight.
Notes
Chill dough for at least one hour to prevent spreading and keep star shapes sharp. Use room temperature ingredients for smooth dough. Watch baking time closely to avoid overbaking. Practice icing consistency for best results; add water or powdered sugar to adjust. Let icing dry overnight for a perfect glossy finish. Use gel food coloring for vibrant colors without affecting icing consistency.
Nutrition
- Serving Size: 1 cookie
- Calories: 165
- Sugar: 15
- Sodium: 80
- Fat: 6
- Saturated Fat: 4
- Carbohydrates: 25
- Protein: 2
Keywords: iced sugar cookies, holiday baking, royal icing, sugar cookie stars, Christmas cookies, festive treats, easy cookie recipe