Love this? Save it for later!
Share the inspiration with your friends
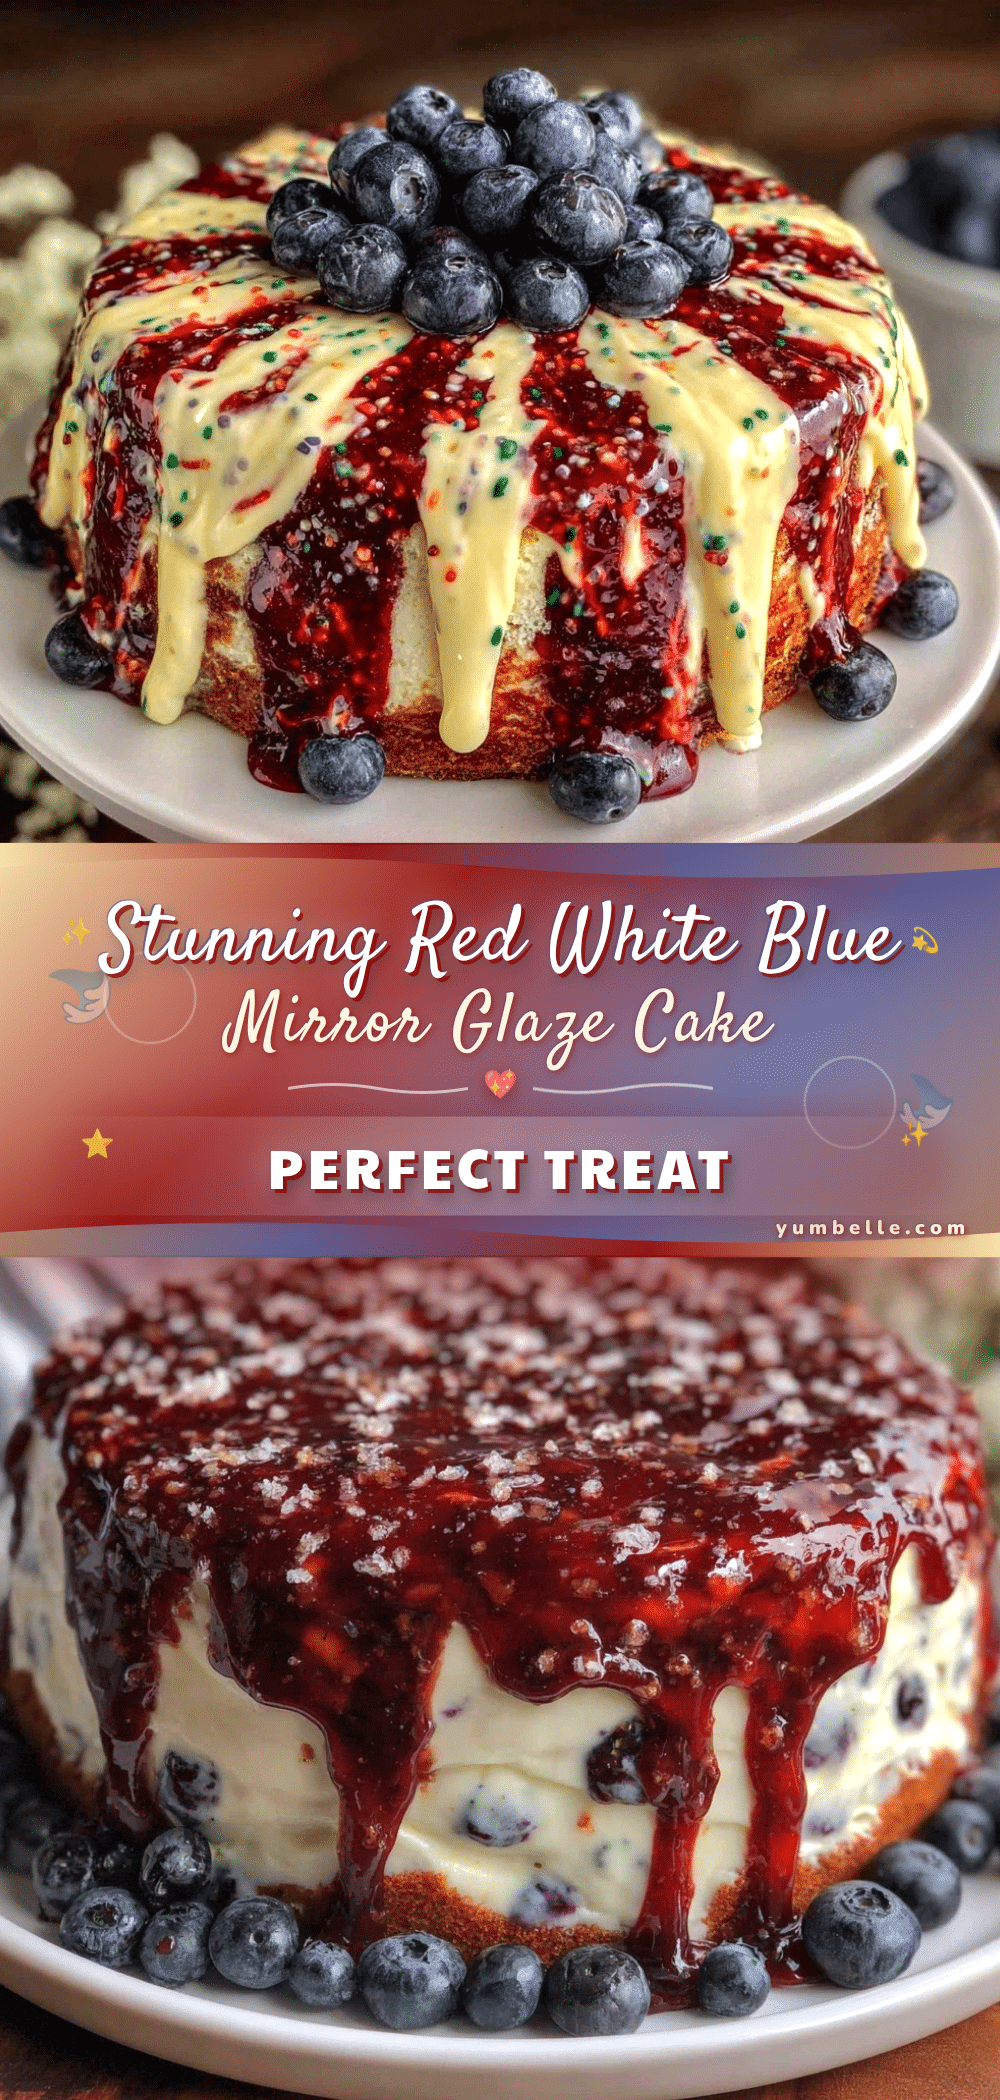
It was just past midnight on July 3rd, and I was staring at a half-empty fridge, wondering how on earth I’d pull together a show-stopping dessert for the Fourth of July party the next day. Honestly, I wasn’t exactly armed with the usual festive ingredients—no red velvet cake mix or pre-made patriotic toppings in sight. But that’s when the idea hit me: what if I created a mirror glaze cake that captured the spirit of the holiday in the most modern, eye-catching way possible? The red, white, and blue colors would swirl together with that glossy, glass-like finish I’d always admired but never dared to try myself.
You know that feeling when you want something spectacular but have zero time? I had a cracked mixing bowl, a blender that kept buzzing like a bee trapped in a jar, and a kitchen timer that decided to go silent mid-prep. Despite those little hiccups, the whole process became this weirdly soothing late-night experiment that somehow turned into something truly special. I mean, I wasn’t expecting to make a cake that looked like a patriotic masterpiece at 1 AM, but here we are.
Maybe you’ve been there too—scrambling to whip up a dessert that’s as delicious as it is unforgettable. This Perfect Modern Red White and Blue Mirror Glaze Patriotic Cake stuck with me because it’s not just about looking good; it’s about capturing a moment, a feeling, and the pride of a holiday celebrated with friends, fireworks, and, yes, a little kitchen chaos. So, let me tell you how you can bring this stunning cake to your own table, no matter your baking experience.
Why You’ll Love This Recipe
After testing this recipe multiple times (and tweaking the glaze temperature more times than I care to admit), I can confidently say it’s a winner for anyone wanting a fuss-free yet stunning dessert. Here’s why this red white and blue mirror glaze cake deserves a spot in your holiday dessert lineup:
- Quick & Easy: Comes together in just under 2 hours, making it perfect for last-minute Fourth of July celebrations or any patriotic occasion.
- Simple Ingredients: Uses pantry staples and basic baking supplies—no hunting down obscure ingredients required.
- Perfect for Summer Parties: Whether it’s a backyard BBQ, picnic, or potluck, this cake steals the show with its glossy finish and vibrant colors.
- Crowd-Pleaser: Kids and adults alike are always wowed by the mirror glaze’s shiny, almost surreal look—and the flavor is just as impressive.
- Unbelievably Delicious: The moist, tender vanilla sponge pairs perfectly with a smooth cream cheese frosting, all wrapped in that silky glaze.
What makes this mirror glaze cake stand out is the balance between the vibrant patriotic colors and the modern, sleek finish that isn’t overly sweet or fussy. I experimented with different glaze recipes before settling on this one, which blends beautifully without cracking or dulling too quickly. Honestly, this isn’t just another red, white, and blue cake—it’s the kind of dessert that makes you pause, smile, and maybe snap a few photos before slicing.
And if you’re like me, sometimes the kitchen mess and late-night experiments lead to the best discoveries. This cake has become my go-to for impressing guests without stress, and I think you’ll love how it turns any patriotic gathering into a memorable celebration.
What Ingredients You Will Need
This Perfect Modern Red White and Blue Mirror Glaze Patriotic Cake relies on straightforward, wholesome ingredients that work together to create those bold colors and that glossy finish without any fuss. Here’s a breakdown of what you’ll need:
- For the Cake:
- All-purpose flour – 2 ½ cups (320g), sifted for a light crumb
- Baking powder – 2 ½ teaspoons (10g), to give the cake a gentle rise
- Salt – ½ teaspoon (3g), to balance flavors
- Unsalted butter – 1 cup (227g), softened (I recommend Land O’Lakes for best texture)
- Granulated sugar – 1 ¾ cups (350g), for sweetness
- Large eggs – 4, room temperature (helps with better mixing)
- Whole milk – 1 cup (240ml), for moistness (you can swap with dairy-free milk like oat or almond)
- Pure vanilla extract – 2 teaspoons (10ml), for that classic, comforting flavor
- For the Cream Cheese Frosting:
- Cream cheese – 8 ounces (227g), softened (Philadelphia brand works great here)
- Unsalted butter – ½ cup (113g), softened
- Powdered sugar – 3 cups (360g), sifted to avoid lumps
- Pure vanilla extract – 1 teaspoon (5ml)
- Heavy cream – 2 tablespoons (30ml), optional, for smoothness
- For the Mirror Glaze:
- Granulated sugar – 1 ¼ cups (250g)
- Sweetened condensed milk – 1 cup (306g)
- Water – ½ cup (120ml)
- Unflavored gelatin powder – 3 tablespoons (about 21g)
- White chocolate chips – 7 ounces (200g), finely chopped (I recommend Callebaut if you want that silky texture)
- Gel food coloring – red and blue (high-quality brands like AmeriColor provide vibrant hues)
Most of these ingredients are pantry staples, but if you’re aiming for a dairy-free or vegan version, you can swap the milk and cream cheese with plant-based alternatives, though the texture might shift slightly. The key to that glassy mirror glaze is in the gelatin and white chocolate ratio, so I’ve kept those pretty precise.
Equipment Needed
Before you start, gather the right tools to make your cake experience smooth and enjoyable. Here’s what I used and recommend:
- 9-inch round cake pans (2 or 3 pans): I like using non-stick pans, but if you don’t have those, greasing and flouring regular pans works fine.
- Electric mixer: Stand or hand mixer will do. I personally prefer a stand mixer for better consistency, but a hand mixer can handle the job if you don’t want to invest.
- Mixing bowls: Use medium and large sizes; glass or metal bowls work best for temperature control.
- Offset spatula: Essential for smooth frosting application.
- Thermometer: A digital instant-read thermometer is a game-changer when working with mirror glaze to get the temperature just right for pouring.
- Wire rack and baking tray: The wire rack allows glaze to drip off the cake onto the tray below, keeping your workspace tidy.
- Measuring cups and spoons: Accuracy matters here, so have these handy.
- Gel food coloring: Be sure to have small brushes or toothpicks for detailed color mixing.
If you’re short on budget, you can substitute a thermometer by carefully watching the glaze’s consistency as it cools, but it’s trickier. And while a stand mixer speeds things up, I once made this cake with just a whisk and a lot of elbow grease—totally doable with patience!
Preparation Method
- Preheat and prepare pans: Preheat your oven to 350°F (175°C). Grease and flour your 9-inch cake pans or line with parchment paper. This ensures your cake layers release easily.
- Mix dry ingredients: In a medium bowl, sift together 2 ½ cups (320g) all-purpose flour, 2 ½ teaspoons (10g) baking powder, and ½ teaspoon (3g) salt. Set aside.
- Cream butter and sugar: In a large bowl using an electric mixer, beat 1 cup (227g) softened unsalted butter with 1 ¾ cups (350g) granulated sugar on medium speed until light and fluffy—about 3-4 minutes. This step traps air for a tender crumb.
- Add eggs: Add 4 large eggs one at a time, beating well after each addition. If your mixture starts to look curdled, don’t panic—it’ll come together once you add the flour.
- Mix in vanilla and milk: Stir in 2 teaspoons (10ml) pure vanilla extract. Alternate adding the dry ingredients and 1 cup (240ml) whole milk to the butter mixture, starting and ending with flour. Mix gently until just combined—overmixing can make the cake dense.
- Divide and bake: Evenly divide the batter among the prepared pans. Bake for 25-30 minutes, or until a toothpick inserted in the center comes out clean. Let cakes cool in pans for 10 minutes, then transfer to wire racks to cool completely.
- Prepare cream cheese frosting: Beat 8 ounces (227g) softened cream cheese and ½ cup (113g) softened butter until smooth. Gradually add 3 cups (360g) powdered sugar and 1 teaspoon (5ml) vanilla extract. Add 2 tablespoons (30ml) heavy cream if frosting feels too thick. Set aside.
- Assemble the cake: Level the cooled cake layers if needed. Place one layer on your serving plate, spread a generous layer of cream cheese frosting, then add the next layer. Repeat until all layers are stacked. Apply a thin crumb coat of frosting all around and chill for 20-30 minutes.
- Make the mirror glaze: In a small bowl, sprinkle 3 tablespoons (21g) gelatin over ½ cup (120ml) cold water and let bloom for 5 minutes. In a saucepan, combine 1 ¼ cups (250g) granulated sugar, 1 cup (306g) sweetened condensed milk, and ½ cup (120ml) water. Heat gently, stirring until sugar dissolves—do not boil.
- Add gelatin and chocolate: Remove from heat and stir in the bloomed gelatin until completely dissolved. Pour the hot mixture over 7 ounces (200g) chopped white chocolate. Let sit for 5 minutes, then stir gently until smooth.
- Divide and color glaze: Divide glaze into three bowls. Color one with red gel food coloring, one with blue, and keep one white (or very lightly tinted if desired). Remember, a little color goes a long way, so add gradually.
- Cool glaze: Let the glaze cool to about 90°F (32°C). Use a digital thermometer for accuracy—too hot and it will be thin, too cold and it will thicken too fast.
- Pour glaze: Place your chilled cake on a wire rack over a baking tray. Pour the glaze starting with white in the center, then red and blue on opposite sides, letting the colors swirl naturally. Use a spatula to smooth if needed but keep it loose for that modern, marbled effect.
- Chill and serve: Let the glaze set for at least 30 minutes in the fridge before slicing. Serve chilled or at room temperature for the best flavor.
Quick tip: If your glaze starts to harden before pouring, gently warm it in short bursts in the microwave, stirring carefully to keep it smooth.
Cooking Tips & Techniques
Mirror glaze can be intimidating at first, but a few tricks will make it a breeze. Here’s what I learned after some messy trials and errors:
- Temperature is everything: The glaze should be around 90°F (32°C) when poured. Too hot, and it’ll run right off; too cold, and it won’t coat smoothly. Use a digital thermometer—trust me, it saves a ton of guesswork.
- Chill cake thoroughly: The glaze needs a cold surface to set nicely. If your cake is warm, the glaze will melt or slide off.
- Gelatin bloom matters: Don’t skip blooming the gelatin in cold water—that step ensures your glaze sets with that perfect glossy sheen.
- Mix colors carefully: Use gel food coloring, not liquid, to avoid thinning the glaze. Add color slowly; it’s easier to darken than lighten.
- Don’t overmix glaze: Stir gently to avoid air bubbles—those can pop and leave marks on your cake’s surface.
- Use a wire rack: Pouring glaze over a rack lets excess drip down, reducing pooling and mess.
- Practice patience: I once poured glaze while distracted and missed the perfect temperature window—lesson learned! Keep your focus, and the results shine.
Variations & Adaptations
This red white and blue mirror glaze cake is versatile and can be adapted to suit different tastes and dietary needs. Here are some ideas to make it your own:
- Flavor variations: Add lemon zest to the cake batter for a citrus twist or swap vanilla for almond extract for a subtle nutty note.
- Dietary adaptations: Use gluten-free flour blends (like Bob’s Red Mill) to make the cake gluten-free. For dairy-free, swap butter and cream cheese with coconut oil and vegan cream cheese alternatives.
- Seasonal twists: In summer, try layering fresh blueberries or strawberries between the cake layers for added freshness and texture.
- Different glaze designs: For a more abstract look, use a toothpick or skewer to drag through the colors for a marbled or starburst effect.
- Personal favorite: I once tried a mirror glaze with a hint of espresso powder in the white section—it gave a subtle coffee kick that balanced the sweetness beautifully.
Serving & Storage Suggestions
This mirror glaze cake is best served slightly chilled or at room temperature to let the flavors shine through. I like slicing it with a hot, dry knife—just dip the blade in hot water and wipe it dry between cuts for clean edges.
Pair it with simple sides like fresh berries or a scoop of vanilla ice cream to keep the focus on the cake’s glossy finish and tender crumb. For beverages, a light sparkling wine or berry-infused iced tea complements the patriotic vibe perfectly.
To store, cover the cake loosely with plastic wrap and refrigerate for up to 3 days. The glaze holds up well, though it might lose a bit of its shine over time. If you want to keep it longer, freeze the cake (without glaze) and glaze fresh when ready to serve.
Reheating isn’t necessary; the cake is best enjoyed cold or at room temp. Letting it sit out for 15-20 minutes before serving softens the frosting and enhances flavor.
Nutritional Information & Benefits
This cake is a treat, but it also offers some nutritional perks thanks to its wholesome ingredients. Here’s a rough estimate per slice (1/12th of cake):
- Calories: ~350-400 kcal
- Fat: 18g (mostly from butter and cream cheese)
- Carbohydrates: 45g
- Protein: 5g
- Sugar: 30g
The use of real butter and cream cheese provides a good source of fat-soluble vitamins, while eggs bring high-quality protein. Using whole milk adds a bit of calcium and vitamin D. If you’re mindful of sugar, you can slightly reduce the powdered sugar in the frosting without losing texture.
This recipe is naturally gluten-rich but easy to adapt with gluten-free flours. It does contain dairy and gelatin, so keep that in mind for allergy concerns.
Conclusion
The Perfect Modern Red White and Blue Mirror Glaze Patriotic Cake is more than just a dessert—it’s a celebration in every slice. Its stunning glossy finish and harmonious flavors make it a centerpiece that’s both impressive and approachable. Whether you’re a seasoned baker or someone who’s just curious about mirror glazing, this recipe offers an exciting way to bring a bit of magic to your Fourth of July festivities.
Feel free to tweak the colors, flavors, or layers to suit your style—that’s the beauty of this modern take on a classic patriotic cake. Personally, it reminds me of that late-night kitchen experiment that turned into a crowd favorite, and I hope it becomes a favorite for you too.
Give it a try, and let me know how your cake turns out! I’d love to hear about your variations or any fun decorating ideas you come up with. Here’s to many more delicious celebrations ahead!
Frequently Asked Questions
Q: Can I make the mirror glaze ahead of time?
A: It’s best to make the glaze the same day you plan to pour it for optimal shine and texture. You can prepare some components, like blooming the gelatin, in advance, but keep the glaze covered and refrigerated if needed.
Q: What if I don’t have gelatin—can I use something else?
A: Gelatin is key for that smooth, shiny finish. Agar-agar is a vegetarian substitute but behaves differently and may affect the texture. If you try agar, test it separately before glazing your cake.
Q: How do I get the glaze to be perfectly smooth without bubbles?
A: Stir the glaze gently and avoid whisking too hard to prevent air bubbles. If bubbles appear, you can skim them off or gently pop them with a toothpick before pouring.
Q: Can I use this glaze for other cakes or desserts?
A: Yes! This mirror glaze works great on mousse cakes, cheesecakes, or even cupcakes for a glossy finish.
Q: How do I store leftover cake without ruining the glaze?
A: Store the cake in the refrigerator, loosely covered with plastic wrap or a cake dome. Avoid airtight containers that might cause condensation, which can dull the glaze’s shine.
For a festive twist on summer desserts, you might also enjoy my easy no-bake berry cheesecake or the crowd-pleasing crispy garlic chicken if you’re planning a full meal. Both pair wonderfully with the patriotic vibes of this mirror glaze cake!
Pin This Recipe!
Perfect Modern Red White and Blue Mirror Glaze Patriotic Cake
A stunning and easy-to-make Fourth of July dessert featuring a moist vanilla sponge, smooth cream cheese frosting, and a glossy red, white, and blue mirror glaze finish.
- Prep Time: 30 minutes
- Cook Time: 30 minutes
- Total Time: 1 hour
- Yield: 12 servings
- Category: Dessert
- Cuisine: American
Ingredients
- All-purpose flour – 2 ½ cups (320g), sifted
- Baking powder – 2 ½ teaspoons (10g)
- Salt – ½ teaspoon (3g)
- Unsalted butter – 1 cup (227g), softened
- Granulated sugar – 1 ¾ cups (350g)
- Large eggs – 4, room temperature
- Whole milk – 1 cup (240ml)
- Pure vanilla extract – 2 teaspoons (10ml)
- Cream cheese – 8 ounces (227g), softened
- Unsalted butter – ½ cup (113g), softened
- Powdered sugar – 3 cups (360g), sifted
- Pure vanilla extract – 1 teaspoon (5ml)
- Heavy cream – 2 tablespoons (30ml), optional
- Granulated sugar – 1 ¼ cups (250g)
- Sweetened condensed milk – 1 cup (306g)
- Water – ½ cup (120ml)
- Unflavored gelatin powder – 3 tablespoons (about 21g)
- White chocolate chips – 7 ounces (200g), finely chopped
- Gel food coloring – red and blue
Instructions
- Preheat oven to 350°F (175°C). Grease and flour 9-inch cake pans or line with parchment paper.
- In a medium bowl, sift together flour, baking powder, and salt. Set aside.
- In a large bowl, beat softened butter and granulated sugar on medium speed until light and fluffy, about 3-4 minutes.
- Add eggs one at a time, beating well after each addition.
- Stir in vanilla extract. Alternate adding dry ingredients and milk to the butter mixture, starting and ending with flour. Mix gently until just combined.
- Divide batter evenly among prepared pans. Bake 25-30 minutes or until a toothpick inserted in the center comes out clean. Cool in pans 10 minutes, then transfer to wire racks to cool completely.
- Beat cream cheese and softened butter until smooth. Gradually add powdered sugar and vanilla extract. Add heavy cream if frosting is too thick. Set aside.
- Level cooled cake layers if needed. Place one layer on serving plate, spread frosting generously, repeat with remaining layers. Apply thin crumb coat and chill 20-30 minutes.
- Sprinkle gelatin over cold water and let bloom 5 minutes.
- In saucepan, combine granulated sugar, sweetened condensed milk, and water. Heat gently, stirring until sugar dissolves; do not boil.
- Remove from heat, stir in bloomed gelatin until dissolved. Pour over chopped white chocolate. Let sit 5 minutes, then stir until smooth.
- Divide glaze into three bowls. Color one red, one blue, and keep one white or lightly tinted.
- Cool glaze to about 90°F (32°C) using a digital thermometer.
- Place chilled cake on wire rack over baking tray. Pour glaze starting with white in center, then red and blue on opposite sides, allowing colors to swirl naturally.
- Chill glazed cake at least 30 minutes before slicing. Serve chilled or at room temperature.
Notes
Use a digital thermometer to ensure glaze is poured at about 90°F for best results. Chill cake thoroughly before glazing. Bloom gelatin in cold water before use. Use gel food coloring to avoid thinning glaze. If glaze hardens before pouring, gently warm in microwave in short bursts. For clean cake slices, dip knife in hot water and wipe dry between cuts.
Nutrition
- Serving Size: 1 slice (1/12th of c
- Calories: 375
- Sugar: 30
- Sodium: 180
- Fat: 18
- Saturated Fat: 11
- Carbohydrates: 45
- Fiber: 0.5
- Protein: 5
Keywords: mirror glaze cake, Fourth of July dessert, patriotic cake, red white and blue cake, vanilla sponge cake, cream cheese frosting, easy mirror glaze