Love this? Save it for later!
Share the inspiration with your friends
Introduction
“The kitchen timer was buzzing, the kids were clamoring for their after-school snack, and honestly, I had zero patience for a complicated dessert that day.” That’s how my journey with this creamy Instant Pot pudding began. I was juggling a hectic Tuesday afternoon when my trusty Instant Pot beckoned me to try something new — a silky smooth pudding that promised comfort without the fuss. I wasn’t expecting much, honestly, but the way that pudding turned out? It was like discovering a hidden gem right in my own kitchen. The texture was so luxuriously smooth, it felt like a little victory after a long day.
This recipe came together thanks to a random conversation with my neighbor, Mia, who swore by her Instant Pot for everything from stews to desserts. She scribbled the basic idea on a napkin while I was helping her carry groceries, and since then, I’ve tweaked it here and there to make it just right. Maybe you’ve been there—wanting something indulgent but quick, and not willing to stand over the stove stirring for half an hour. This creamy Instant Pot pudding fits that bill perfectly. I mean, the way it sets in the pot, turning into this smooth, comforting bowl of goodness—it’s honestly a little magic in a pot.
What stuck with me, beyond the taste, was how this pudding became a small ritual—something I’d make when I needed a quick pick-me-up or a simple dessert that still felt special. And yes, I did make a mess the first time (spilled pudding base all over the counter, classic me), but that just made the success taste even sweeter. If you love cozy desserts and want a recipe that’s easy, quick, and reliably delicious, stick around because this creamy Instant Pot pudding might just become your new go-to treat.
Why You’ll Love This Recipe
After testing this creamy Instant Pot pudding recipe multiple times, I can confidently say it’s one of those dishes that feels fancy but is ridiculously easy to pull off. Here’s why it will win you over:
- Quick & Easy: Ready in under 30 minutes, making it perfect for busy evenings or last-minute dessert cravings.
- Simple Ingredients: You probably have everything on hand already — no need for fancy specialty items.
- Perfect for Any Occasion: Whether it’s a cozy night in, a family gathering, or a casual weekend treat, this pudding fits right in.
- Crowd-Pleaser: Kids and adults alike can’t get enough of its smooth, creamy texture and comforting flavor.
- Unbelievably Delicious: That silky smooth texture combined with just the right sweetness makes each spoonful feel like a hug.
What sets this recipe apart from others is the use of the Instant Pot to create a pudding that’s perfectly creamy without the usual double boiler or constant stirring. Plus, the gentle pressure cooking helps lock in flavor and achieve that dreamy texture that’s so hard to get otherwise. Honestly, it’s a little shortcut that feels like a secret weapon in the kitchen.
Whether you want to impress guests without the fuss or just treat yourself to a no-fail comfort dessert, this pudding hits all the right notes. It’s the kind of recipe that makes you close your eyes after the first bite, savoring every silky spoonful. Trust me, once you make it, you’ll find yourself coming back to it again and again.
What Ingredients You Will Need
This creamy Instant Pot pudding relies on straightforward, wholesome ingredients that come together to create bold flavors and that satisfy your sweet tooth without any fuss.
- Whole milk (4 cups / 950 ml) – the base for a rich, creamy texture
- Granulated sugar (1/2 cup / 100 g) – for balanced sweetness
- Cornstarch (1/4 cup / 30 g) – thickens the pudding perfectly without lumps
- Salt (1/4 tsp) – enhances the flavors
- Vanilla extract (2 tsp) – adds warm, aromatic notes
- Unsalted butter (2 tbsp / 28 g) – for that smooth, velvety finish
- Egg yolks (3 large) – boost creaminess and richness (room temperature)
Optional additions:
- Cocoa powder (2 tbsp) – for a chocolate twist
- Ground cinnamon (1/2 tsp) – adds warmth and subtle spice
- Fresh berries or toasted nuts – for garnish and texture contrast
I usually go for organic whole milk and use Nielsen-Massey vanilla extract because the flavor really shines through and makes a difference. If you prefer a dairy-free version, swap the milk with coconut or almond milk and skip the butter or use a plant-based alternative. For a gluten-free pudding, cornstarch is naturally gluten-free, so no worries there.
Equipment Needed
- Instant Pot or any electric pressure cooker with a “Manual” or “Pressure Cook” setting
- Mixing bowls – for whisking the pudding ingredients together
- Whisk – to blend ingredients smoothly without lumps
- Measuring cups and spoons – for precision
- Spoon or spatula – for stirring and scraping the pudding
- Heatproof serving bowls or ramekins – to set and serve the pudding
If you don’t have an Instant Pot, a stovetop double boiler works, but it takes longer and you need constant attention. My first pudding attempt was on the stove, and I ended up with lumps—Instant Pot really changed the game for me. For budget-friendly options, electric pressure cookers are widely available now and worth the investment if you enjoy quick meals and desserts. Remember to clean your Instant Pot sealing ring regularly—pudding smells can linger otherwise.
Preparation Method
- Mix the dry ingredients: In a large mixing bowl, whisk together 1/2 cup (100 g) granulated sugar, 1/4 cup (30 g) cornstarch, and 1/4 tsp salt until well combined. This ensures even thickening without clumps. (5 minutes)
- Prepare the wet ingredients: In a separate bowl, lightly beat the 3 large egg yolks until smooth. Slowly whisk in 1 cup (240 ml) of whole milk to temper the eggs, preventing them from curdling later. (5 minutes)
- Combine mixtures: Gradually pour the egg-and-milk mixture into the dry ingredients, whisking continuously for a smooth batter. Then, add the remaining 3 cups (710 ml) of whole milk, stirring gently to combine all.
- Transfer to Instant Pot: Pour the mixture into the Instant Pot’s inner stainless steel pot. Add 2 tbsp (28 g) unsalted butter and 2 tsp vanilla extract. (Tip: Leave the butter out if using dairy-free milk.)
- Seal and set pressure cook: Secure the lid, set the valve to sealing, and select the “Manual” or “Pressure Cook” mode. Cook on high pressure for 8 minutes. (This step cooks the pudding perfectly without stirring.)
- Natural pressure release: Let the pressure release naturally for 10 minutes, then carefully quick-release any remaining pressure. (This helps prevent the pudding from curdling or separating.)
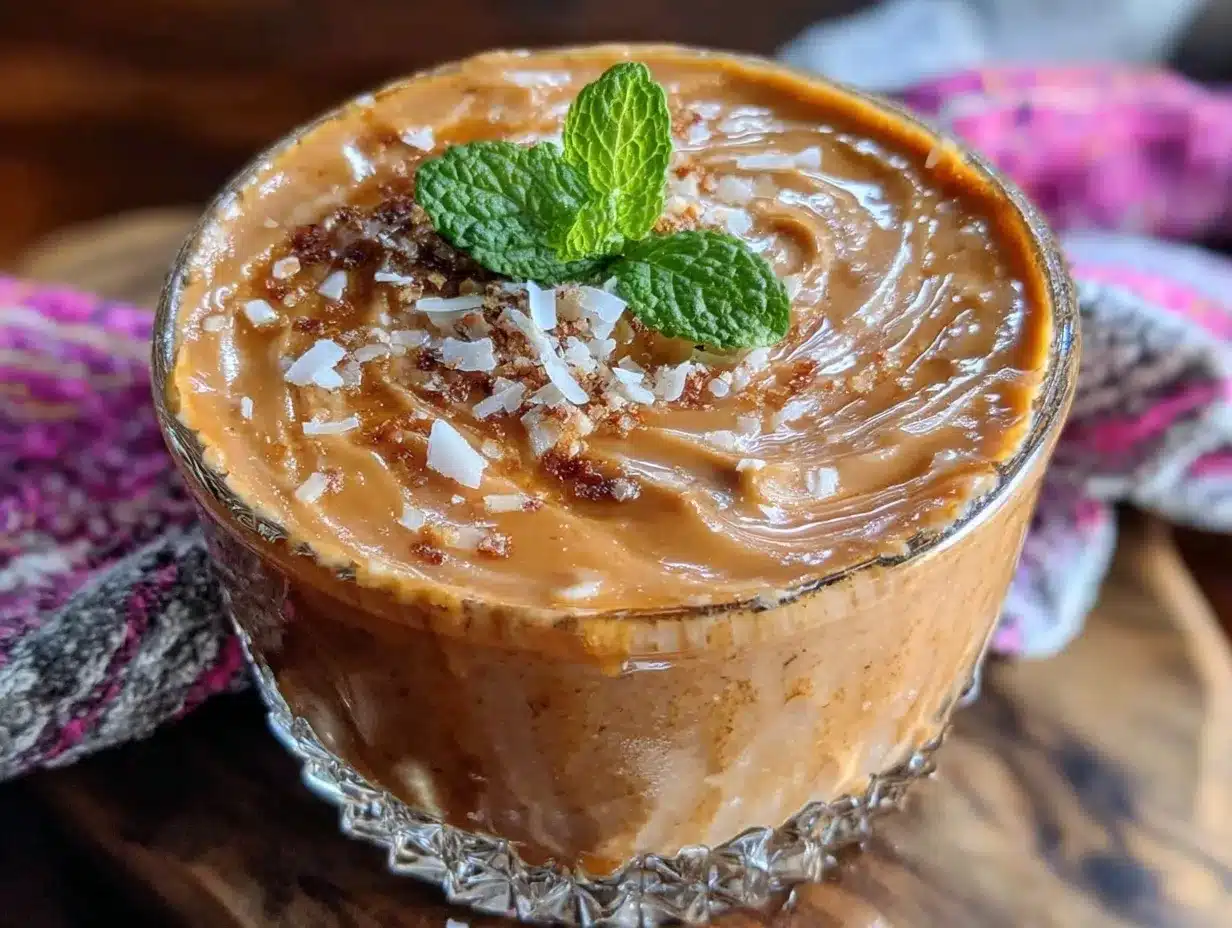
- Whisk pudding: Remove the lid and immediately whisk the pudding vigorously. It will look a bit loose at first but will thicken as it cools. (This step ensures the pudding is silky smooth.)
- Cool and serve: Spoon the pudding into heatproof bowls or ramekins. Cover with plastic wrap directly on the surface to prevent skin from forming. Chill in the fridge for at least 2 hours before serving for the best texture.
If you notice lumps at any point, don’t panic. A quick vigorous whisk or blending with an immersion blender fixes it right up. The first time I made this, I forgot to seal the lid properly and got a bit of steam leakage, but the pudding still turned out creamy—proof that this recipe is forgiving enough for kitchen mishaps.
Cooking Tips & Techniques
Cooking pudding in an Instant Pot might seem intimidating, but trust me, it’s a breeze once you get the hang of it. Here’s what I’ve learned through trial and error:
- Temper the eggs: Slowly whisking milk into egg yolks prevents scrambling. I used to rush this step and ended up with bits of cooked egg—no thanks!
- Use cornstarch: It’s the magic thickener that gives pudding its classic texture without heaviness or graininess.
- Don’t rush pressure release: Natural pressure release helps the pudding settle gently. Quick release too soon can cause texture issues.
- Whisk immediately: Once the pot opens, whisking vigorously helps smooth out any tiny lumps and creates that signature silky finish.
- Cover pudding while chilling: Plastic wrap pressed on the surface keeps a skin from forming, which can be a bit frustrating otherwise.
- Multitask: While the pudding pressure cooks, you can prep toppings or clean up to save time.
One time, I left the pudding in the pot too long after cooking and it became a bit thicker than I wanted, but reheating gently with a splash of milk fixed it right away. So if your pudding is firmer than expected, don’t worry—you can always adjust the texture with a little extra milk warmed up.
Variations & Adaptations
This creamy Instant Pot pudding is a fantastic base that you can customize to suit your taste or dietary needs:
- Chocolate pudding: Add 2 tablespoons of unsweetened cocoa powder to the dry ingredients for a rich chocolate twist. I love topping mine with a sprinkle of sea salt for contrast.
- Dairy-free version: Use coconut or almond milk and swap butter for coconut oil or non-dairy margarine. Just remember the flavor will be slightly different but still delicious.
- Spiced variation: Mix in 1/2 teaspoon ground cinnamon or nutmeg for a warm, cozy flavor—perfect for autumn evenings.
For a personal touch, I once stirred in a spoonful of peanut butter just before chilling, creating a creamy peanut butter pudding that vanished faster than I could scoop it. You can also layer the pudding with fresh fruit or granola for texture contrasts.
Serving & Storage Suggestions
This pudding is best served chilled, so plan ahead to give it time to set properly in the fridge. I usually garnish mine with a dusting of cinnamon or a few fresh berries to brighten things up visually and flavor-wise.
If you’re serving a crowd, individual ramekins make it easy to portion and present, but a large bowl works just as well for casual family nights.
Store leftovers covered in the refrigerator for up to 3 days. The pudding thickens as it chills, so you might want to stir in a splash of milk before reheating gently on the stove or in the microwave for a few seconds. Flavors mellow over time, making the next-day pudding even more comforting.
Nutritional Information & Benefits
Each serving (about 1/2 cup or 120 ml) of this creamy Instant Pot pudding contains roughly 180 calories, 6 grams of fat, 25 grams of carbohydrates, and 5 grams of protein. Using whole milk and egg yolks gives it a nourishing quality, providing calcium, vitamin D, and essential amino acids.
Choosing organic milk or pasture-raised eggs can boost nutrient content, and opting for natural vanilla extract avoids artificial additives. This pudding is naturally gluten-free thanks to cornstarch thickening, making it suitable for gluten-sensitive diets.
In my experience, this dessert strikes a nice balance between satisfying a sweet craving and offering some nutritional value, especially when paired with fresh fruit or nuts.
Conclusion
This creamy Instant Pot pudding recipe is a keeper—not just because it’s easy and fast, but because it delivers that silky smooth texture and rich, comforting flavor every single time. I love how it feels like a little celebration in a bowl, perfect for treating yourself after a busy day or charming guests without stress.
Feel free to tweak the flavors or add your favorite mix-ins to make it truly your own. Honestly, once you’ve tasted this pudding, you might find yourself making it more often than you planned (just like I do!).
If you try it, I’d love to hear how it goes—drop a comment or share your own pudding twists. Let’s keep this cozy dessert tradition alive, one creamy spoonful at a time!
FAQs
Can I use skim milk instead of whole milk?
Yes, but the pudding will be less creamy and rich. Whole milk provides that silky texture, but skim milk works if you want a lighter version.
How do I prevent a skin from forming on top of the pudding?
Press plastic wrap directly onto the surface of the pudding while it cools and chills. This stops the skin from forming and keeps the texture smooth.
Can I make this pudding ahead of time?
Absolutely! Prepare and chill it up to 2 days in advance. Just stir gently before serving if it thickens too much.
What if my pudding turns out lumpy?
Whisk vigorously right after cooking or blend briefly with an immersion blender. This usually smooths out any lumps quickly.
Is this recipe suitable for vegans?
It’s not vegan as is, but you can make a dairy-free and egg-free version by using plant-based milk and skipping the egg yolks. The texture will be slightly different but still tasty.
By the way, if you enjoy making comforting desserts in the Instant Pot, you might appreciate how well it works for classic rice pudding or even a quick batch of Instant Pot chocolate mousse for a little variety.
Pin This Recipe!
Creamy Instant Pot Pudding Recipe Easy Silky Smooth Dessert

A quick and easy creamy pudding made in the Instant Pot, delivering a silky smooth texture and comforting flavor without the fuss of constant stirring.
- Prep Time: 15 minutes
- Cook Time: 18 minutes
- Total Time: 33 minutes
- Yield: 6 servings 1x
- Category: Dessert
- Cuisine: American
Ingredients
- 4 cups (950 ml) whole milk
- 1/2 cup (100 g) granulated sugar
- 1/4 cup (30 g) cornstarch
- 1/4 tsp salt
- 2 tsp vanilla extract
- 2 tbsp (28 g) unsalted butter
- 3 large egg yolks (room temperature)
- Optional: 2 tbsp cocoa powder for chocolate twist
- Optional: 1/2 tsp ground cinnamon for spice
- Optional: fresh berries or toasted nuts for garnish
Instructions
- In a large mixing bowl, whisk together granulated sugar, cornstarch, and salt until well combined (about 5 minutes).
- In a separate bowl, lightly beat the egg yolks until smooth. Slowly whisk in 1 cup (240 ml) of whole milk to temper the eggs (about 5 minutes).
- Gradually pour the egg-and-milk mixture into the dry ingredients, whisking continuously for a smooth batter. Add the remaining 3 cups (710 ml) of whole milk and stir gently to combine.
- Pour the mixture into the Instant Pot’s inner stainless steel pot. Add unsalted butter and vanilla extract (omit butter if using dairy-free milk).
- Secure the lid, set the valve to sealing, and select the ‘Manual’ or ‘Pressure Cook’ mode. Cook on high pressure for 8 minutes.
- Allow natural pressure release for 10 minutes, then carefully quick-release any remaining pressure.
- Remove the lid and immediately whisk the pudding vigorously until smooth. It will thicken as it cools.
- Spoon pudding into heatproof bowls or ramekins. Cover with plastic wrap pressed directly on the surface to prevent skin formation. Chill in the refrigerator for at least 2 hours before serving.
Notes
Temper the eggs slowly to prevent scrambling. Use natural pressure release to avoid curdling. Whisk immediately after cooking to smooth out lumps. Cover pudding with plastic wrap pressed on the surface to prevent skin formation. For dairy-free versions, substitute milk and butter with plant-based alternatives.
Nutrition
- Serving Size: About 1/2 cup (120 m
- Calories: 180
- Sugar: 24
- Sodium: 150
- Fat: 6
- Saturated Fat: 3
- Carbohydrates: 25
- Protein: 5
Keywords: Instant Pot pudding, creamy pudding, easy dessert, pressure cooker pudding, silky smooth pudding, quick pudding recipe